


Your artistic vision, your creative drive and your advancing skill level make you the wonderfully unique artist you are. When I recall other artist’s work, the memorable pieces are those that truly show the artist’s personality. Being original and true to yourself makes your artwork stand out from the crowd. So, how do you free your spirit and find inspiration? Here are some techniques I use to unleash my inner designer.
Harness the Power of Design
You don’t need a fine art degree to draw your own original designs. Clean lines and crisp colors are powerful tools you can use to increase the dramatic impact of your work.
Glass is a versatile medium. It’s well suited for different design styles like geometric patterns as well as abstract compositions. It’s this flexibility, combined with its magical luminous quality that inspires so many artists to create their art in glass.
A lot of my artwork is pictorial with images of landscapes or animals. I love bringing recognizable subjects to life in unique ways that reflect my sense of whimsy. On other occasions, it’s fun to design a pattern that changes our view of a familiar geometric shape and transforms something old into something new.
In my experience, the best way to shift expectation of a basic shape is to draw an original design. I start with a blank piece of paper. I leave preconceived ideas at the door and approach this new pattern design with fresh eyes.

I begin with the basics, a blank page, a pencil, an eraser, and a ruler. I draw the perimeter shape. Then I consider how to divide the space in a way that is unique and engaging. As the drawing develops, I allow myself the flexibility to add or erase lines as I go along. The best results are achieved when I let this exercise progress organically. In other words, just play. Add random lines, make fun shapes. Don’t over think the outcome. Have fun. You’ll be surprised how creative your subconscious mind is when you give it free rein. Go for it!
Over the years I’ve learned not to over-plan the design at the pattern stage. Instead, I leave room for the glass to influence the design style with added visual interest and vivid color.
I’m a visual learner. Therefore, I thought it would be helpful if I demonstrated the design process with this Geometric bowl from my, Fused Art Design video.
Begin by drawing the perimeter shape with a pencil and ruler. In this case our project is a 10 inch by 10 inch square. I drew notches, one on each side, to spice up the plain square shape. Then I try a variety of layouts by adding lines and shapes to the pattern. I work with pencil so I can make changes easily, like removing lines.
I often draw borders into my geometric designs. They visually contain the art like a frame. And it’s a great place to punch up the color with bright strips of glass.
Here I’m also introducing a partial square drawn on edge. The unexpected position of the shape adds tension to the simple square profile, which in turn makes the finished piece more interesting.

Now it’s time to cut glass.
I’m working with high contrast colors to create a bold composition. I also purposely selected both opal and transparent glass colors. It’s a winning combination that increases the dramatic impact of my pieces. I’ve also included dichroic glass because the sultry color shifts breathe life into the art.

I cut strips of glass out of the materials I’ve pulled, and then arrange the cut class on the pattern. I reposition the glass until something strikes me. Then I build from there. In essence, the glass is contributing to the development of the design. Working this way releases your creative mood and generates fresh new design ideas that would have otherwise gone undiscovered.
Once I’m satisfied with the glass layout, I move the cut glass from the pattern and arrange in on a clear glass base. I build most of my projects with two layers of glass. Design details and accents are stacked on top of the second layer. This type of assembly produces durable projects with uniform thickness and visually pleasing edges.
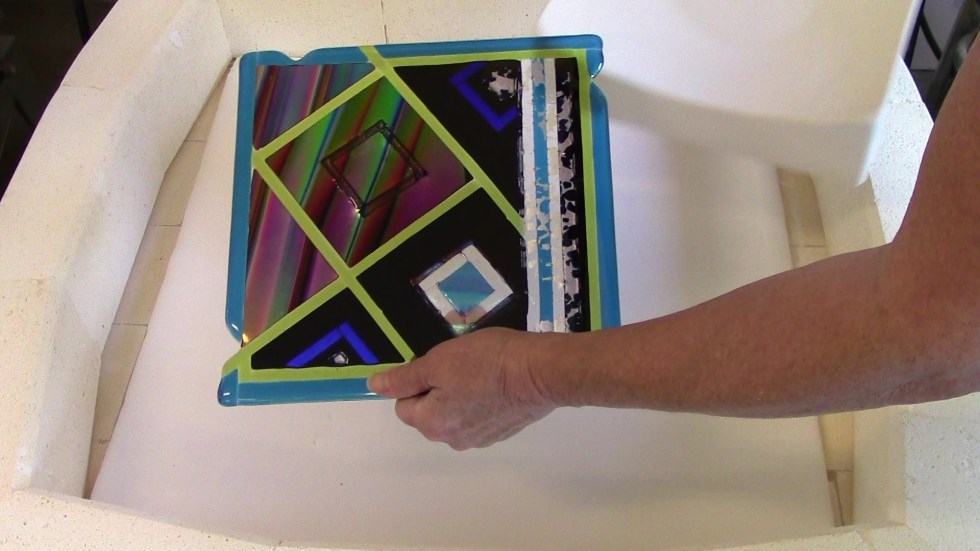
The assembled glass is then fired in a kiln to a full fuse temperature. The fused glass is then fired in a kiln in a square mold to a slumping temperature.

Creating exceptional art is my passion. My process is never rushed. Shortcuts are unacceptable. I always do my best work to create the highest quality artwork I can. Sure, I make mistakes. Some pieces are disappointing disasters. I don’t let failure slow me down. I learn from the experience and I start over. I work on my idea until I achieve the desired result.
Next time you need a creative lift, consider starting from scratch and drawing your own fused glass pattern. It doesn’t have to be complex to be great. Simple designs that reflect your personal style and artistic flare are destined to be beautiful and memorable works of art.
Wherever you are in your artistic journey, you’re doing terrific! Keep up the great work.
Happy Fusing!
Lisa & Niki
Follow my blog for more tips and tricks!

Geometric, as seen in my video Fused Art Design available on my website at
Watch it NOW! Start fusing today!

Downloadable instructional videos for every skill level.

Check out my eBooks for elegant patterns and detailed fusing instructions.