Posted on Leave a comment

5 Tips to Get into Your Creative Zone

The creative zone is a wonderful place where new ideas are conceived, advanced techniques are tested, and innovative pieces of art are brought to life. In the creative zone time doesn’t exist. It’s a beautiful realm full of wonder and surprise. It’s a place of magic we all want to visit. So, how do you produce the right environment to get to this artist’s heaven on-demand? Here are some tricks to fast-track you to the zone.  

1 Find your sweet spot.

Identify when you feel most productive creatively. Don’t fight it. Not everyone is meant for a 9:00 to 5:00 workday. For me, my most fruitful hours are between 11:00 am and 7:00 pm. And, I like to work even later if I’ve gained momentum that’s getting projects in the kiln. My day starts a lot earlier than 11:00, but I like to work-out and clean house a little before I get serious about glass work. Then, I can focus on artsy tasks without distractions.

2 Free-play without a critic.

Play with your glass colors without a rigid plan. Allow your spontaneous artistic mind to wander and explore new ways to combine glass colors to make interesting blends. I pull scrap glass out and arrange it on the table in random color schemes. Then I mix them up to get even more unique design palates. This exercise is a process. Once you’ve exhausted the routine combinations, it’s amazing how new fresh ideas reveal themselves.

3 Take a break.

Look outside for inspiration. Exciting original art is the product of artists who actively seek out stimuli to generate new ideas. Take a walk, go to the beach, the mountains, the zoo or the park. The exercise and fresh air nurtures your creative spirit and promotes action.

4 Sketch design ideas on paper.

You don’t have to be good at drawing for this exercise to work. The process of doodling frees your mind and hushes the internal sensor that holds you back. Forge ahead. Be bold. The idea is to let the drawings come naturally. You’ll be pleasantly surprised how much this simple act empowers your artistic style. Try it!

5 Dedicate time to developing your art and your talent.

Commit to branching out and trying new techniques and methods that challenge your skills. In this uncharted territory you’ll find renewed energy that’ll quickly translates into exciting new pieces of art.  

Excelling in your craft is the dream of every dedicated artist. The creative zone is where we find and fine tune our own personal style. It’s where we identify with ourselves and that’s what makes you the incredible artist you are.

You have an amazing talent. Nurture and be kind to yourself. Keep trying. Always, push ahead! No matter where you are in your artistic journey, you’re doing great!

Follow my blog for weekly inspiration sent to your inbox! 

Happy Fusing!

Lisa

Upcoming Class!

Advanced Glass Fusing Class

4-Day, Hands-on Class, Wesley Chapel, FL

October 22-25, 2024, only 1 Seat Left.

YOU can make gallery quality fused glass art! You’ll love the personalized instruction in this exciting advanced technique, artistic awakening and skill building workshop. This is the turning point experience you’ve been waiting for.

Someday is here! What are you waiting for? You’re in your prime. You’re at the peak of your interest in glass fusing. Take the next step and raise your artwork to an exciting new level of sophistication.

Join me for this intense workshop held in my private studio.
Wesley Chapel, Florida, 4-Day, Hands-on, Class size is limited.

In this class, you will push the boundaries art glass imposes. Students will explore innovative approaches to design and combine multiple advanced techniques to construct original art that reflects their own personal style. You’ll enjoy: the one-on-one instruction, making multifaceted projects, the well-equipped classroom, and the intimate class size.

You’ll love the concentrated, in-depth study and creative momentum you’ll gain while actively producing, nonstop for four consecutive days. You’ll leave class with a working knowledge of kiln operation, custom project specific firing guides, and the inspiration you’ve been craving to go bigger and do more elaborate works of fused glass art!

Join me and take your glass fusing to the next level!


Knowledge – Confidence - Inspiration

Premium Video Courses by Lisa


Posted on 2 Comments

Upscale Fusing

You might wonder, what does upscale fusing mean?

Upscale fusing is the intentional pairing of complimentary design ideas to elevate the overall visual power of your artwork. It’s a simple concept that’s easily implemented. Combine this theory with your artistic flare, and you’ll rapidly advance your glass work from craft to fine art.

In the following examples I’ll show you how I put these ideas into practice.

Blue Beauty

Blue Beauty is a wonderful example of using visual texture to lure the viewer in and hold their attention. The woven center, made with iridized black strips, creates a focal point that intrigues the viewer. Then the linear band along the bottom invites the eye to move over and around the rest of the art. The tight linear pattern is also a welcome contrast to the openness of the background. Here, the airy color palate of blues and greens playfully call for further reflection.  

Grape Tray

Grape Tray is terrific example of the power of shape to engage the viewer. This is a simple design, but the unique profile combined with the clever representation of the heavily patterned glass is a winning combination.  

Fancy Feathers

Fancy Feathers is an example of reinforcing the focal point, the flashy peacock feather, by including a background that enhances the key subject. Here, I use a subtle pattern that represents the tight feathers that run along a peacock’s neck to add interest and purpose to the background. This is also a great example of going out of bounds by designing a unique shape that viewers don’t anticipate but love. 

Lock & Key

Lock and Key is a fun example of how delivering a message can create a more intimate bond between the art and viewer. Here the recognizable images, the lock and key invite the viewer to linger longer to consider what deep message the artist might be trying to convey.

Amber Round

Amber Round is an excellent example of using color and pattern to seduce the viewer. Here the sweeping lines, contrasted by the solid black lines is a lively combination that’s irresistible.  

Golden Aspen

Golden Aspen has it all. The striking imagery, embossed texture, tower style profile and custom glass pedestal give it a gallery quality, sculptural presence that viewers are drawn to. It’s the innovative combination of visual treats that make this piece of art memorable.

The individual techniques used to make these projects are easy. It’s the pairing of different methods that make these pieces of art exceptional. The work, and fun are in the planning and the execution.

On your next project, try blending two or three of your favorite techniques. The results will be nothing short of amazing. 

Follow my blog for weekly inspiration sent to your inbox! 

Happy Fusing!

Lisa

Upcoming Class!

Advanced Glass Fusing Class

4-Day, Hands-on Class, Wesley Chapel, FL

October 22-25, 2024, only 1 Seat Left.

YOU can make gallery quality fused glass art! You’ll love the personalized instruction in this exciting advanced technique, artistic awakening and skill building workshop. This is the turning point experience you’ve been waiting for.

Someday is here! What are you waiting for? You’re in your prime. You’re at the peak of your interest in glass fusing. Take the next step and raise your artwork to an exciting new level of sophistication.

Join me for this intense workshop held in my private studio.
Wesley Chapel, Florida, 4-Day, Hands-on, Class size is limited.

In this class, you will push the boundaries art glass imposes. Students will explore innovative approaches to design and combine multiple advanced techniques to construct original art that reflects their own personal style. You’ll enjoy: the one-on-one instruction, making multifaceted projects, the well-equipped classroom, and the intimate class size.

You’ll love the concentrated, in-depth study and creative momentum you’ll gain while actively producing, nonstop for four consecutive days. You’ll leave class with a working knowledge of kiln operation, custom project specific firing guides, and the inspiration you’ve been craving to go bigger and do more elaborate works of fused glass art!

Join me and take your glass fusing to the next level!


Knowledge – Confidence - Inspiration

Premium Video Courses by Lisa


Posted on Leave a comment

Understanding Firing Guides & Target Temperatures

Firing guides are our glass fusing recipes. We follow schedules published by trusted sources to ensure we have fusing success. I’ve been fusing glass for more than 35 years. In that time, my personal firing guides have been adjusted and evolved into recipes I rely on for predictable results. Recently, taking the wise advice of a fellow fuser, (thanks Larry!) I reworked and updated my firing guides to include both 96 COE and 90 COE. Taking it one step further, I now also include Fahrenheit as well as Celsius temperatures.

In addition to making fun videos, I’m hard at work on a new glass fusing eBook. The following is an excerpt from my book. I hope you find it helpful and informative.

Understanding Firing Guides

A firing guide is a step-by-step schedule to fire glass of a certain size and thickness to achieve a specific result. Firing guides are carried out in steps called segments. Larger, thicker projects have more conservative firing guides with more segments. The rate per hour indicates how quickly the kiln should change temperature in an hour. Temperature is the target temperature the kiln will be taken to for a specific purpose. The hold time indicates how long the kiln will remain at a certain temperature to achieve the desired results.

Use these guides to fire projects 12” (30.46 Cm.) in size or smaller, made with 2 layers of glass plus accents. If your project is larger or thicker fire it slower.

These guides are based on my own experience and the glass manufacturer’s firing guides.

Kilns fire differently. Test these guides and adjust as needed.

Because every kiln fires differently, firing guides suggest you test fire the guide in your kiln and then adjust if needed. But they don’t give advice as to how to make those changes. I write new custom firing guides all the time. My advice is look at firing guides that have worked for you in the past. Decide what you want differently this time and then change either the target temperature or change the hold time at that temperature.   

Target & Process Temperatures for 96 COE & 90 COE    

These graphs illustrate the different temperatures we fire glass in a kiln to produce our desired results.

These graphs are based on my own experience and the glass manufacturer’s firing guides.

How to adjust the firing guides to achieve the results you want.

Change one thing at a time.

Change the target temperature by 5° one way or the other. Lower the temperature for a harder edge or increase it for a softer edge.

Or

Change the target temperature hold time by 5 minutes. Reduce the hold by 5 minutes for a harder finish or increase the hold by 5 minutes for a softer finish.

And

Compare firing guides. Identify similar patterns in the heating and cooling stages. Combine the segments that make sense for your artistic style, type of construction and the size of your kiln. Then write your own custom firing guide.

Take notes to build confidence and consistency into your kiln work. Take before and after pictures to repeat your success and learn from your experience.

These colorful floral images are from my, Sensational Sunflower Bowl, a Premium Video Membership Course.

The Sunflower how-to video with pattern eBook is available on my website.

For more tips watch the video, Understanding Firing Guides & Target Temperatures Here!

Looking for more inspiration?

My Breaking Through – Making Exhibition Quality Art video has 5 advanced projects to elevate your skill level.

Follow my blog for weekly inspiration sent to your inbox! 

Happy Fusing!

Lisa

Upcoming Class!

Advanced Glass Fusing Class

4-Day, Hands-on Class, Wesley Chapel, FL

October 22-25, 2024, only 1 Seat Left.

YOU can make gallery quality fused glass art! You’ll love the personalized instruction in this exciting advanced technique, artistic awakening and skill building workshop. This is the turning point experience you’ve been waiting for.

Someday is here! What are you waiting for? You’re in your prime. You’re at the peak of your interest in glass fusing. Take the next step and raise your artwork to an exciting new level of sophistication.

Join me for this intense workshop held in my private studio.
Wesley Chapel, Florida, 4-Day, Hands-on, Class size is limited.

In this class, you will push the boundaries art glass imposes. Students will explore innovative approaches to design and combine multiple advanced techniques to construct original art that reflects their own personal style. You’ll enjoy: the one-on-one instruction, making multifaceted projects, the well-equipped classroom, and the intimate class size.

You’ll love the concentrated, in-depth study and creative momentum you’ll gain while actively producing, nonstop for four consecutive days. You’ll leave class with a working knowledge of kiln operation, custom project specific firing guides, and the inspiration you’ve been craving to go bigger and do more elaborate works of fused glass art!

Join me and take your glass fusing to the next level!


Knowledge – Confidence - Inspiration

Premium Video Courses by Lisa


Posted on 1 Comment

How to Create a Light Source

You may know, I studied fine art in college. Art classes were the only classes I excelled in and so I filled my schedule with everything from art history to weaving. Art history was an 8:00 am class I slept through more than I should have. While my oil painting class in the afternoon always had my full attention. To this day, I love the smell of paint and the limitless possibilities of a dripping brush in my hand.

Now, I apply the art theory principles I learned all those years ago in my painting class to the development of my fused glass artwork.

You can too! It’s easy.

You just have to put purposeful thought into how you approach your glass work.

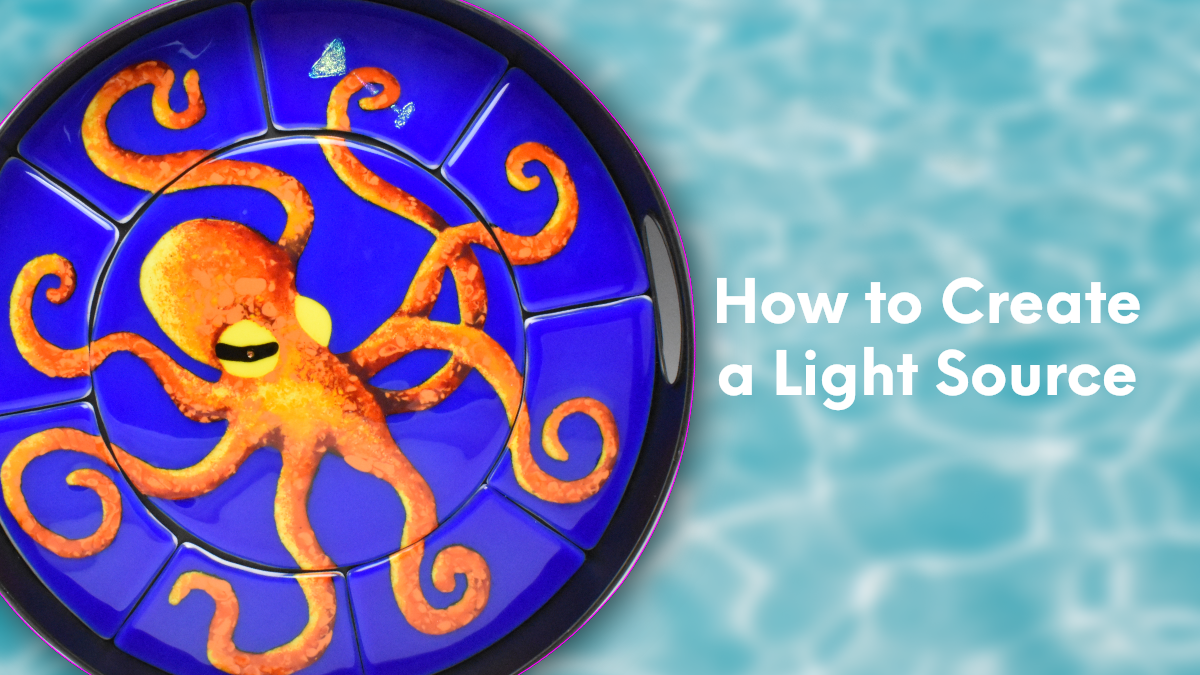
There are several design tips I consider using when I start a project. Creating a light source is ideal for patterns with realistic subject matter like this octopus. As you can see, the addition of highlights and dark shadows opposite them really bring this exotic ocean dweller to life. So, how do you achieve this level of sophistication?

One step at a time.  

Frit is an amazing tool for glass artists who want to give their pieces gradual color changes that produce one-of-a-kind designs with a painterly quality.

I drew this octopus design for a large mosaic project. It turned out beautifully. The stretching image was so powerful I knew I had to find another use for this whimsical pattern.

This specific design is also a great example of how easily you can repurpose a pattern. You can make the pattern smaller and use a different glass assembly technique to get further enjoyment out of a favorite design.

At first glance, this design looks busy and difficult to make. But if you break down the stages into steps, the creative process is manageable and even fun.

When deciding exactly how to build this design, it made sense to cut the blue background out of sheet glass. This would give the design a pleasing solid field of color that would enhance the fluid movement of my focal point, the octopus.

It would have been time consuming and difficult to cut sheet glass for the octopus tentacles and body. I decided the fastest, easiest, and most visually exciting way to render these areas would be with the application of frit. With frit I could create shading and visual texture that would beautifully contrast and pop out from the sharp confines of the blue water background.

This piece is made using two layers of fusible glass. The base layer is white. I cut the second, blue glass layer with a wet saw. The cut blue layer is then stacked on the white base layer and held in place with a small amount of fuser’s glue. Once dry, the glue prevents the blue glass pieces from moving. This is an important step as it ensures you have clean edges and strong line quality around the octopus body and tentacles.

Applying the frit.

My daughter did a fabulous job applying the frit. We started with a course orange opal frit on the right side of the octopus’s body and tentacles. Moving to the left, we gradually added a fine orange opal followed by a fine marigold yellow opal frit. We then added fine bright yellow opal, concentrating it on the left side of the tentacles and the upper left side of the octopus’s head. This bright yellow established the direction of the light source in the upper left hand corner of the design. The use of different shades of color and different frit sizes increases the visual depth and fullness of this design.

Now for the shadows.

Highlights like these are stronger and more effective when contrasted by deep shadows. We applied fine dark red opal frit on the right side of the tentacles and where the tentacles join the body. Fine purple frit was used to create darker shadows where the tentacles overlap and where they disappear behind the octopus’s body. 

This artwork was full fused. The completed piece was glued into a 15 inch metal serving tray. This pattern can easily be made smaller, and you will have the same great results.  

Tips for working with frit.

Apply larger size frit first then fill in the gaps with smaller frit of different color.

Start with a small amount of frit. You can always add more as needed.

Apply the frit with purpose. Plan your direction and the way the colors will transition from one to another.

Create color gradients using different shades of the same color frit.

Blend colors for added interest. 

Don’t be skimpy. Apply a thick layer of frit to hide the white glass base layer below.

Take your time and enjoy watching your colorful design develop.

Be bold. Have fun!

You got this!

I hope this artistic insight empowers you to work with frit and create striking original pieces of art.

For more tips watch my, How to Design with Purpose Video.

For more in depth design tips and 12 awesome projects check out my video Fused Art Design!

For more design tips PL US 12 brilliant projects check out my Fused Art Design video!

Follow my blog for weekly inspiration sent to your inbox! 

Happy Fusing!

Lisa

Upcoming Class!

Advanced Glass Fusing Class

4-Day, Hands-on Class, Wesley Chapel, FL

October 22-25, 2024, only 1 Seat Left.

YOU can make gallery quality fused glass art! You’ll love the personalized instruction in this exciting advanced technique, artistic awakening and skill building workshop. This is the turning point experience you’ve been waiting for.

Someday is here! What are you waiting for? You’re in your prime. You’re at the peak of your interest in glass fusing. Take the next step and raise your artwork to an exciting new level of sophistication.

Join me for this intense workshop held in my private studio.
Wesley Chapel, Florida, 4-Day, Hands-on, Class size is limited.

In this class, you will push the boundaries art glass imposes. Students will explore innovative approaches to design and combine multiple advanced techniques to construct original art that reflects their own personal style. You’ll enjoy: the one-on-one instruction, making multifaceted projects, the well-equipped classroom, and the intimate class size.

You’ll love the concentrated, in-depth study and creative momentum you’ll gain while actively producing, nonstop for four consecutive days. You’ll leave class with a working knowledge of kiln operation, custom project specific firing guides, and the inspiration you’ve been craving to go bigger and do more elaborate works of fused glass art!

Join me and take your glass fusing to the next level!


Knowledge – Confidence - Inspiration

Premium Video Courses by Lisa


Posted on Leave a comment

Lifelong Learners Welcome!

Reason to Celebrate

It never ceases to amaze me how much fun you can have while you’re hard at work. It’s no surprise I love my job, creating glass and teaching. But more than anything, I like meeting new people. And what better way to really get to know someone, than in an extended workshop where we grow skills while working with a medium we love. 

Over the years I’ve hosted numerous fused glass workshops. It’s the students who make the class extraordinary. Each person has a fascinating story. Many had surprising careers, others found themselves at a crossroad and made the decision to take their life in a different direction. Many were survivors, some of accidents and others of disease. Each story is unique, but they had a shared effect. The story proved to be the catalyst that lead the student to expose themselves to exciting, new things. Often that exciting, new thing is expanding their glass fusing knowledge and skills in one of my classes. You can imagine how rewarding it is for me to guide these students and then share their joy, when they exceed their own expectations.

Now that you know what I get from teaching the class, it’s only fair you hear what the students are saying about taking the workshop.

“Lisa had great ideas on color and design and composition. My favorite thing was the variety of projects. From small to large, from full fuse to tack fuse to slumping. I was surprised I could be successful at adapting an inspiration piece to create a colorful design. I loved being able to use color and frit to make the cast pieces. Fun!” – Pat B.

“Thank you, Lisa, for jump starting my fusing!! My favorite thing about the class was everything. What surprised me was watching Lisa and Joe make videos.” – Monica F.

“Lisa is a deep wealth of knowledge. What surprised me was my ability to pick the project I wanted to create. My favorite thing was the creativeness I was allowed to explore.” – Kathy W.

Watch the Class Highlights Video Here!

Follow my blog for weekly inspiration sent to your inbox! 

Happy Fusing!

Lisa

Upcoming Class!

Advanced Glass Fusing Class

4-Day, Hands-on Class, Wesley Chapel, FL

May 28-31, 2024, SOLD OUT!

October 22-25, 2024, only 3 Seats Left.

YOU can make gallery quality fused glass art! You’ll love the personalized instruction in this exciting advanced technique, artistic awakening and skill building workshop. This is the turning point experience you’ve been waiting for.

Someday is here! What are you waiting for? You’re in your prime. You’re at the peak of your interest in glass fusing. Take the next step and raise your artwork to an exciting new level of sophistication.

Join me for this intense workshop held in my private studio.
Wesley Chapel, Florida, 4-Day, Hands-on, Class size is limited.

In this class, you will push the boundaries art glass imposes. Students will explore innovative approaches to design and combine multiple advanced techniques to construct original art that reflects their own personal style. You’ll enjoy: the one-on-one instruction, making multifaceted projects, the well-equipped classroom, and the intimate class size.

You’ll love the concentrated, in-depth study and creative momentum you’ll gain while actively producing, nonstop for four consecutive days. You’ll leave class with a working knowledge of kiln operation, custom project specific firing guides, and the inspiration you’ve been craving to go bigger and do more elaborate works of fused glass art!

Join me and take your glass fusing to the next level!


Knowledge – Confidence - Inspiration

Premium Video Courses by Lisa