Posted on Leave a comment

Success Feels So Good!

Fruits of Our Labor Vlog 13

Vlogging is Niki’s idea. She’s my vlog creative director. She videos my routine activity, or my project development processes while I’m in my glass studio. It hadn’t occurred to me that sharing my everyday activity with you would be so fun and have so much educational potential.

The other aspect that surprised me is how much time and effort I put into learning myself. I’ve always enjoyed developing new techniques and design ideas. It’s not work. It’s play.

The length of time and extensive testing I dedicate to achieve my artistic goals is plain in the flower and mushroom cap vlog series. I do extensive firing tests like this all the time. But I conducted them in between other project firings. Up until now my project development steadily moved forward without getting any special attention. Now that I documented my creative process it has even greater instructional value for me and by extension you. That’s exciting!

Let’s start at the beginning.

I purchased 2 new 5-inch ceramic fluted mushroom drape molds that I had never used before. I wanted to make flowers not mushrooms. I purposely did not consult the manufacturer’s directions. I wanted to developed my own shape without being influenced by what everyone expected to get using the mold. Right or wrong. Easy or hard. I’d learn what worked for me along the way.

I measured the molds and cut clear glass circles based on my experience with drape molds. The first circles were 6 inch. (I use clear fusible glass for my testing because it’s the least expensive glass.) I draped the glass using a firing guide I wrote, based on my years of experience. The results were disappointing. The glass draped like a bad taco shell, plus the glass blank was too big. It looked nothing like a flower or a mushroom!

Try again.

I cut a new clear glass circle to 5 ½ inch and I designed a five star shape that loosely resembled a flower. I adjusted my firing guide and tried again. I fired 5 unsuccessful sets of clear glass. I grew tired of my inconsistent results with the plain clear glass, but I didn’t give up.

I reshaped my flower design and added frit to give the clear glass color. I also added notches to separate the petals. I adjusted my firing guide again adding more and longer hold times. The new flower shape with the color and notches worked great. I wasn’t totally unhappy with the draped shape of the round glass either. I thought, if I added pattern and color, maybe I’d actually like the round pieces as mushroom caps.  

The increase in hold times caused the flowers to stick to the primed ceramic mold. On the next firing I cut ThinFire fiber paper to size and placed it between the glass flower and the mold. It worked like a cushion and prevented the glass from adhering to the ceramic mold. I finally had success and draped flowers I really liked.  I also really liked the addition of color to the mushrooms caps. Instead of plain and boring, they are lively and bold.

Now what?

My next challenge was to figure out how to display the draped flowers and mushroom caps artistically and safely. I’ve had good luck bending and shaping thin copper tubing in the past. It’s flexible yet sturdy and it’s easy to cut with pliers or a hack saw. I cut a piece of tubing to length then flatten about 1 inch of one end with a hammer. Then I glue the flat area to the glass with E6000 adhesive. It works great and I love the curvy flower stems I’m able to create.

I took the mushroom caps to my home improvement store to look for something to make study stems. I tested the fit on 8 inch nails. The head of the nail fit perfectly inside the mushroom cap. I liked the length and thickness of the nail with the draped glass. The proportions were pleasing, and the silver color added interest. Back in the studio I glued the mushroom caps to the nails with E6000. Overall, I’m very happy with the outcome. The flowers and mushrooms are welcome bright, cheerful additions to my garden.

This is just the beginning.

I’m not stopping here. Everything I learned during this lengthy process will be put to good use in the development of my new Premium Video Membership projects. I’ll keep blazing new trails and bringing you along for the ride. We’ll learn and nurture our artistic spirit together, while having fun making amazing new pieces of art.

Flower & Mushroom Cap Include Vlog 7, 8, 9, 10, 11, 12 &13

Happy Fusing!

Lisa

Follow my blog for weekly inspiration sent to your inbox! 

Fire & Ice Webinar

July 11, 2023

Fire & Ice by Lisa Vogt

Get fired up for advanced design techniques that invigorate your artistic spirit. You’ve loved making all the simple projects. Now experience the thrill of breaking away from familiar shapes to create striking freeform fused glass designs. 

It’s easy! In this comprehensive webinar, I’ll guide you step-by-step from beginning to end. I’ll share my methods of glass selection, show how to lay out organic shaped projects for success and offer fabrication tips for professional quality results. I’ll also demonstrate how to display your sculptural artwork beautifully and safely.   

Join me and I’ll show you how to create freeform projects that ramp up the visual elegance of your work. You’ll love my easy-to-follow instruction and seeing how I create intricately detailed designs in just a few steps. You’ll be amazed by the shortcuts and construction tips I offer that result in polished works of art with a gorgeous three-dimensional flair. 

Beginner, intermediate and advanced fusers alike will enjoy applying the many simple, yet effective techniques I share in this in-depth, live event. 

I include my custom firing guides, project patterns and materials list in PDF form. 

Get excited about your glass work again! Attend this inspiring event and you will leave with the burning excitement and the cool confidence to create your own striking pieces of art. You’ll be eager to break out of your comfort zone and reinvent the possibilities while taking your glass art in a new and exciting advanced design direction.   

Become a Premium Video Member

NEW Artwear T’s are here!

Artwear Designed for Artists by Artists Tell them how you really feel with bold T-shirts, Eco-conscience tote bags and sassy mugs.

Artwear Eco-totes by Lisa Vogt
Artwear Mugs by Lisa Vogt

Downloadable instructional videos for every skill level.

Posted on Leave a comment

5 Reasons Why Pro Glass Fusing Artists Take Notes

If you have been following my Vlog you know the practical importance of taking notes. But if you’re stubborn like me and need more convincing here’s some helpful advice.

Being artsy and creating original art is exciting. It feeds the mind, body and soul with inner joy and peace. 

Glass fusing has broad appeal due to the ease at which plain sheet glass can be transformed into flashy pieces of art. It’s this facet that makes this medium attractive to artists and crafters who love hands-on immersion.   

But glass fusing is different from other mediums. Kiln operation and following firing guidelines make glass fusing science as much as art. Of course, you can ignore that reality. Stay in the safe zone, using pre-programmed kilns and adhering to standard firing schedules. Copy and make the same reliable projects that everyone else is sharing. But the real exciting creations are inspired by re-imagining the possible. To stretch your imagination and take your art to an all new level of amazing, you must take your work more seriously.

Approach your hobby like a pro.

Get organized. The best way to master the technical aspects of science, and benefit from your process is to take notes of your work in progress. Once the technical aspects are under control, the artist is free to focus on the creative development of the art.

You argue, why stop the creative flow to take boring notes? Here’s why the pros take notes.

1 Creative inspiration.

We’re human. We forget intricate details. Remembering the big, broad strokes is easy. It’s the tiny nuances that drift away like fluffy dandelion seeds on the wind. These seemingly insignificant concepts are what make your art your own, unique creations.

Pros take notes even when making routine pieces. They know that new design ideas come from recycling and reorganizing old tried and trusted design ideas. Often, my groundbreaking innovations are the product of combining an unlikely variety of tiny concepts. I pull minor techniques from previously made art and merge them to develop a single new creation.

Plus, if you’re consistent and establish good note talking habits, you’ll free up mind space previously dedicated to remembering your methods. This open-air gives new ideas room to live and grow.        

2 Find encouragement.

A notebook is black and white proof you’re making progress. No matter how small, every entry is positive reinforcement that you’re learning new things, trying new techniques, and growing your creative style. It’s a tribute to hard work and an ego boost whenever you need encouragement to forge ahead.

Success is a terrific confidence builder. When you have a notebook full of great success stories it promotes cheerful production. At any time, you can flip through those messy pages and marvel over all the beautiful pieces you’ve made.

It’s a thrill to revisit simple projects you thought you’d outgrown. You remember how much fun it was to lose yourself in the creative zone and consider remaking old favorites for the joy of it. That’s priceless. 

3 Build self-confidence.

By taking detailed notes of a project’s progress as its made, it’s easy to repeat successful projects with confidence. I consult my notes when I want to repeat projects quickly and easily with accuracy.

Notes are also a great reference for new project development. With them I can plan new design directions knowing what outcome to expect from certain advanced techniques. This knowledge frees me to focus my full attention on creating a revolutionary new design.  

4 Learn from your mistakes.

Another, huge benefit to cataloging your methods is you can retrace your steps backwards when disaster strikes to pinpoint where things went wrong. It’s a valuable teaching tool you can use to learn from your mistakes. With notes you can efficiently repeat your successes and avoid failures in the future.

In my experience, taking notes drastically improves the overall quality and success of my projects. Documenting assembly and firing methods minimizes problems and gives me the self-confidence to experiment. 

5 Trail blaze new ideas.

Pioneering new design concepts is exciting and scary. When I’m commissioned to design original art, I consult my fusing notebook for guidance. I look up projects that are similar in size and thickness to the new job. I study projects that are larger and projects that are smaller. With that information, I develop a custom firing schedule for the new job. I write a program that’s conservative, to avoid breakage, and yet gives me the desired results I promised the client.  Like you, I don’t want to waste time, money, or material on failures. We all want to start a project knowing that the finished artwork will bring our beautifully imagined vision to life. If it doesn’t, the failure is devastating. By taking notes, you can approach new design ideas with greater confidence. By knowing the parameters that have worked successfully in the past, you can take on more challenging projects and enjoy success in the future.   

Pros make it a habit.

Taking notes is the best thing you can do to improve the quality and increase the complexity of your art. Good habits are as hard to break as bad habits. Form good habits.

Be a pro.

This post is from my Free Firing Guides and More page of my website. Visit the page for more helpful glass fusing tips and tricks.

Happy Fusing!

Lisa

Follow my blog for weekly inspiration sent to your inbox! 

Become a Premium Video Member

NEW Artwear T’s are here!

Artwear Designed for Artists by Artists Tell them how you really feel with bold T-shirts, Eco-conscience tote bags and sassy mugs.

Artwear Eco-totes by Lisa Vogt
Artwear Mugs by Lisa Vogt

Downloadable instructional videos for every skill level.

Posted on 1 Comment

Follow My Vlog and Learn My Creative Process in My Studio Unedited

What’s a Vlog?

It’s a video blog taped in the moment complete with surprises, mistakes, and funny slips. For me, this is a new method of providing new material to you. Truth is, I love it! The spontaneity is refreshing. In addition I feel like we’re providing solid information but in a one-on-one way that brings us all closer to understanding the many facets of glass fusing.

My beautiful blue haired daughter, Niki, has been working with me for several months now. She has been integral in driving this new authentic direction. Her young perspective and her sassy attitude is infusing new excitement into my routine. It was Niki’s idea to tape me in my studio just doing what I do. And then we share it with you in raw form for the sake of education, entertainment, connection and of course fun.

It’s working! We’re getting a lot of positive feedback. We’re getting great questions that will translate into future Vlog topics and so many sincere thank yous we love to hear. If you haven’t been following along, this is your invitation to join us on our ever changing path to discovery.       

Experimentation is the Mother of Invention!

I’m known for blazing my own trail. I enjoy learning by trial and error. It’s the challenge to achieve success that drives me forward. A few weeks ago I suggested to Niki that we Vlog about a new drape mold I hadn’t used yet. I thought it would take a few test firings to get the results I wanted.

I was wrong!

These small 5 inch ceramic Fluted Mushroom Drape Molds are kicking my butt! The wonderful thing is you get to witness the extra effort that goes into this project development. Under different circumstances this material would have been cut from the footage you see in my how-to videos.

The 5 inch ceramic drape mold is intended to be used to make mushroom caps. I want to use it to make flowers instead. Armed with 35 years’ experience I wanted to create a fluid floral shape with a uniform drape. I’m 5 test firings in and still question my decisions when I close the kiln and re-fire new glass blanks on the molds. Fortunately, I have the luxury of time, plenty of material and a forgiving electric budget to work with.

In my Vlogs I share how I determine what direction to take when I get unexpected results. So far, I changed the firing times and temperatures several times. More than once, I adjusted the size and shape of the clear glass blanks. I even changed kilns all in an effort to improve the outcome. With each new test I make small adjustments that I hope will influence my results in a desirable way. I take notes to learn from the failures and to confidently reproduce the positive outcome once I’m successful. 

You can follow my progress by watching my new videos on YouTube and on my website. The Vlogs that cover the mushroom cap mold challenge include Studio Time Vlog Part 7, When things don’t go the way, you planned Vlog 8, Experimenting in the studio (Vlog 9), Frit Happens Vlog 10 and just added today Nearing the end Vlog 11.

We’re not done yet!

I still have a few more kinks to work out before I’m content and feel like I can predict consistent results. Once we’re there the road ahead will be straight and smooth. Vlog 12 is coming soon!

I hope you are enjoying the journey as much as I am!

GIVEAWAY WINNER!

CONGRATULATIONS Patricia I. the winner of our Vote for Your Favorite T-shirt GIVEAWAY! Patricia won a Do What You Love T-shirt and an I Love Fused Glass sticker!

As a special bonus ALL voting participants will receive an I Love Fused Glass sticker!

Thank you to all the participants! We’ll reach out to you for your contact information.

You Are Awesome!

Thank you to everyone who’s responded to my Vlogs and new videos with positive comments, helpful feedback, and great questions! Your encouragement is fueling the fire that motivates Niki and I to bring you more unrehearsed, practical information to elevate your working knowledge of the real creative life in my glass studio. 

PS Let me brag! Here’s another credit to Niki and the benefit of aligning yourself with the daring spirit of youth. She’s responsible for the new wacky, fearlessly authentic style pictures of me that likely make you giggle. I’ve stopped cringing and objecting to the images and let her follow through with her own creative ideas.

Now that I’ve happily relinquished total control and have relaxed my stiff teaching style, I’m having more fun than ever at work. From the excited comments we receive every day you’re having more fun than ever learning new techniques. We’re all winners!   

Happy Fusing!

Lisa

Follow my blog for weekly inspiration sent to your inbox! 

Become a Premium Video Member

NEW Artwear T’s are here!

Artwear Designed for Artists by Artists Tell them how you really feel with bold T-shirts, Eco-conscience tote bags and sassy mugs.

Artwear Eco-totes by Lisa Vogt
Artwear Mugs by Lisa Vogt

Downloadable instructional videos for every skill level.

Posted on 1 Comment

Creative Slumping

The term creative slumping has a broad range of potential directions. Isn’t that awesome! We have a huge array of handling techniques to feed our ever curious artistic spirit, and challenge our glass crafting skills. For me, creative slumping means taking ready-made molds and using them in ways that result in extraordinarily unique 3-dimensional forms. The great thing about this approach is that super simple ideas applied in combination often make the most exciting pieces of art.

How do you get started?

It’s about looking at your materials with fresh eyes. Because of past experience, you easily envision the outcome of using your favorite molds. But what happens if you place the fused glass on the mold in a different direction? Or maybe next time cut your glass in a different shape? Better yet, use two molds at the same time for a single project. How will that alter your results? The answers are in test pieces. 

Nothing goes to waste.

Clear glass is the least expensive glass. When I’m in the mood to experiment with creative slumping I start by planning my project shape. Then I cut that shape out of clear glass. I fuse two pieces of clear glass together, so I have the same thickness I would later when I transition to color glass. Then I test fire the fused glass over my mold configuration taking notes every step of the way. If my results are unexpected or undesirable I try again. Once I have the look I want, I repeat the process with color glass. I keep the clear glass samples that are successful for reference in the future. The ugly samples are broken into mosaic size pieces and used as filler in my cast projects.  

If I can’t waste glass who can? 

I do a lot of testing. I figure if I can’t afford to waste glass considering how much teaching I do, then who can? I cut the glass, fire the kilns, and make the mistakes, so you don’t have to. Plus, I’m stubborn. I like a challenge. When a project goes wrong, it becomes a personal mission to figure out how to make it right. And I love sharing my processes and giving you the information needed to be successful the first time.

That’s what my upcoming Creative Slumping webinar is all about. Showing you step-by-step how I come up with my ideas and how I execute them. Plus, I share my project specific firing guides that I’ve developed and tested to ensure your success. If that isn’t enough to convince you to join me, the projects are striking. Watching flat glass go from a lifeless single plane to a glistening, energetic sculptural work of art is amazingly satisfying.  

I hope to see you in my Creative Slumping webinar.        

Excerpt from Creative Slumping Webinar

Webinars are a wonderful way to stay connected to other fusers and keep the creative flow strong between hands-on workshops. In this webinar, I show you how to use materials you likely already have in innovative ways to make new and unique shapes. You’ll be amazed at how simple combinations can transform ordinary shapes into sculptural works of art. I hope you’ll join me for this fun and informative live event.

Wherever you are in your artistic journey, you’re doing a great job! Bravo!

Happy Fusing!

Lisa

Follow my blog for weekly inspiration sent to your inbox! 

You’re Invited to Join me!

Creative Slumping Webinar

May 16, 2023

Learn to Make Free-Form Molds Using Fiber Blanket

Create Impressive Drop-Out Vessels

Learn to Build Unique Bases

Design Textures that are Easy and Fun!

Join me and see how thinking outside the box and using ready made molds in new ways offers numerous and exciting opportunities to produce unique forms. I’ll challenge and motivate you to transform your ordinary projects into inspiring, sculptural pieces of art! Don’t miss this opportunity!

In this detailed Webinar, I’ll reshape the way you slump and drape glass. You’ll learn how to make your own graceful, free form shaped molds from readily available materials with no laborious measuring or messy mixes needed.

Taking you one step further, I’ll show you how to use these different approaches, in combination, to transform ordinary projects into inspiring, sculptural pieces of art!

I hope you’ll join me!

Become a Premium Video Member

Learn how to make 9 advanced glass fusing projects!

NEW Artwear T’s are here!

T-shirt Giveaway! now -5/13/2023

How to win!

Check out my new Artwear T-shirts designed for artists on my website. Vote for your favorite T-shirt design on my YouTube channel by commenting which one you love most in the comments of my latest vlog. One winner will be picked at random. No purchase necessary. One entry per person. The winner must be 18 or older and live in the continental US. Allow 3-4 weeks for prize delivery. Vote by 12:00 midnight 5/13/2023.

NEW Artwear T’s by Lisa Vogt

Artwear Designed for Artists by Artists Tell them how you really feel with bold T-shirts, Eco-conscience tote bags and sassy mugs.

Artwear Eco-totes by Lisa Vogt
Artwear Mugs by Lisa Vogt

Downloadable instructional videos for every skill level.

Posted on Leave a comment

How To Design Striking Fused Glass Art From Your Scrap!

No Waste! That’s just one of the many great things I love about glass fusing! Even the tiniest piece of glass is usable/fusible.

It takes a lot more glass to build elaborate designs with intricate shapes than it does to build designs with simple square shapes. With the rising cost of material always in mind I want to get as much use out of my sheet glass as possible. Rather than let the cost of material inhibit my creative direction I trust in the process. While fabricating the project at hand I keep an eye out for interesting new design ideas that develop along the way.

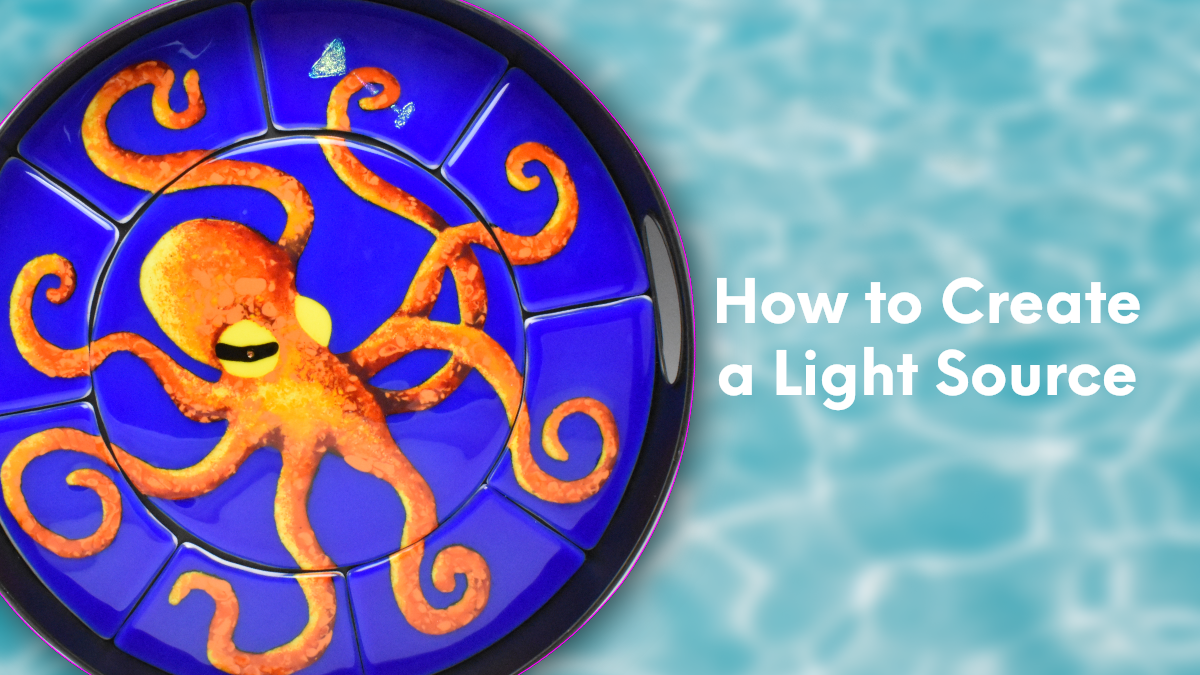
Octopus Tray

This flowing octopus design is an amazing example of how to repurpose cut offs. The movement of the tentacles combined with the vivid blue background and painterly quality of the frit make it so fun to build.

When I have a design idea in mind I draw the pattern without limitations. Then I decide on the best fabrication method to achieve the artistic look I want. I enjoy cutting glass by hand with my pistol grip cutter. I actually use my saw as little as possible and save it for deep cuts that would otherwise be impossible. But the ring saw was my tool of choice to get the smooth, graceful shapes I believed would bring this design to life.

The sweeping glass curls cut from the background of the octopus were prefect for a new complimentary design. I love the octopus tray for its whimsical design and its striking color. It’s a one-of-a-kind and should be appreciated as such. I wanted to created something different with the cutoffs, something equally as exciting and unique.

High Contrast Colors Get Attention

When approaching this piece I felt the distinctive shapes of the dark blue curls would carry the design. All these pieces needed was a simple, uncluttered field to perform their magic. I love the way the sweeping tentacles appear to come from behind and embrace the white glass. It contrasts the Octopus Tray where the design originates in the middle and spreads to the perimeter. The high contrast colors combined with the graceful shapes elevate the elegance of the finished piece of art.

In the future, when you’re looking for inspiration look no further than your scrap bin. There’s a literal gold mine of ideas just waiting to be discovered. Get cutting!

This Octopus Tentacle Tray is the newest project now available with my Premium Video Membership. You’ll enjoy seeing how easy it is to make. Not a member but still love this piece of art? No problem. It’s also available as a single video download.

Happy Fusing!

Lisa

Follow my blog for weekly inspiration sent to your inbox! 

You’re Invited to Join me!

Creative Slumping Webinar

May 16, 2023

Learn to Make Free-Form Molds Using Fiber Blanket

Create Impressive Drop-Out Vessels

Learn to Build Unique Bases

Design Textures that are Easy and Fun!

Join me and see how thinking outside the box and using ready made molds in new ways offers numerous and exciting opportunities to produce unique forms. I’ll challenge and motivate you to transform your ordinary projects into inspiring, sculptural pieces of art! Don’t miss this opportunity!

In this detailed Webinar, I’ll reshape the way you slump and drape glass. You’ll learn how to make your own graceful, free form shaped molds from readily available materials with no laborious measuring or messy mixes needed.

Taking you one step further, I’ll show you how to use these different approaches, in combination, to transform ordinary projects into inspiring, sculptural pieces of art!

I hope you’ll join me!

Become a Premium Video Member

Learn how to make Fire & Ice!

NEW Artwear T’s are here!

NEW Artwear T’s by Lisa Vogt

Artwear Designed for Artists by Artists Tell them how you really feel with bold T-shirts, Eco-conscience tote bags and sassy mugs.

Artwear Eco-totes by Lisa Vogt
Artwear Mugs by Lisa Vogt

Downloadable instructional videos for every skill level.