I use plain water and clean cotton towels. Avoid using cleaners or chemicals to clean your glass to prevent the introduction of contaminants that could react adversely with the glass.
2 Use the right tool for the job.
Streamline your project assembly, improve accuracy and reduce material waste with specialized tools. Use a strip cutter, circle cutter, wet saw and mosaic nippers when applicable for professional quality results.
3 Pick a color pallet and stick with it.
Be selective. Don’t use every crayon in the box. Choose a specific combination of glass colors to create an impactful design that shows an elevated level of sophistication and professionalism.
4 Use high contrast colors.
Selecting bold colors adds energy and excitement to your artwork.
Tree of Tranquility by Lisa Vogt
5 Include a focal point.
A focal point can be subject, shape or color related. A recognizable and relatable subject draws the viewers’ attention and makes your art memorable.
6 Do your best work.
Accuracy matters. If you ask yourself, is this good enough? It’s not. Redo that part to make the most professional quality art you can. Spend the time to make sure your shapes are smooth, and your pieces fit together nicely.
Crystal Garden by Lisa Vogt
7 Design like a pro.
Assemble your projects to be both attractive and durable. Build your projects with two full layers of glass plus accents. This type of assembly ensures your project has uniform thickness throughout, smooth edge quality and an overall attractive appearance.
8 Take your time.
Don’t rush the firing process. If you’re in doubt, fire your glass slower to ensure your project is successful. No peeking! You know who you are. After firing, let the kiln cool to room temperature before opening the lid.
9 Slump your project.
Slump or drape your flat fused glass to give it an interesting shape and unique form that increases the visual intricacy and graceful presence of your art.
10 Get creative with your display.
Make it sculptural. Create an attractive display that enhances the artwork. Give it lift so light passes through and illuminates the design.
You got this!
Apply these tips and see a dramatic improvement in the quality and attractiveness of your fused glass art.
Follow my blog for weekly inspiration sent to your inbox!
If you enjoy reading my blog, I have a feature on my website you’ll like. From the home page click on any page. On the side bar you can read my Top 10 Blog Posts. The list updates every 48 hours so check back often.
You’re wondering why is this subject important? You’ve likely had success working some element of shading into your pieces and that’s great. However, you may not know about the seldom discussed advanced techniques experienced artists use to produce more sophisticated compositions. With thoughtful planning, you can apply these simple techniques and drastically increase the richness of your work.
When creating shading, it’s natural to reach for black frit or black glass. Black efficiently separates the foreground from the background. Black is also great for outlining your subject. However, there’s a better solution that adds richness to your scene.
When you use black to make shadows it creates a visual hole in your work. This void pulls the viewer’s attention away from your composition. For this reason, I use black as little as possible. I apply it with purpose for specific details in my designs. Instead of black, I use very dark blue, chocolate brown, deep purple or ruby red to make shadows in my pieces. I select the dark color that best suits the color scheme in my artwork. Using powerful high contrast colors adds velvety depth and an incredible richness to the setting.
How to create shadows with color.
Wine Glass as seen in my Simple Pleasures Video
Here I used dark blue to establish the linear details that translate into a grape vineyard behind the wine glass. The deep shadows the blue color creates, give the scene a relaxing late afternoon mood. The border is dark purple which mimics the color of grapes and wine.
Octopus Tray as seen in my Premium Video Membership
Here I used dark red to make shadows on the underside of the octopus tentacles. This application also makes the tentacle visually round and full. Dark red also worked beautifully to outline the octopus body and place it in front of the tentacles that curl behind its body. The only black in this piece is the eye detail.
Fairy tale Forest as seen in my Painting with Frit Video
There’s no black in this lush scene. The dark shadows in the trees and along the path are made with dark blue. The shadow cast on the woodland path is a combination of purple and dark amber frit. Get creative with your color combinations to build up dark recesses that make your highlighted details pop.
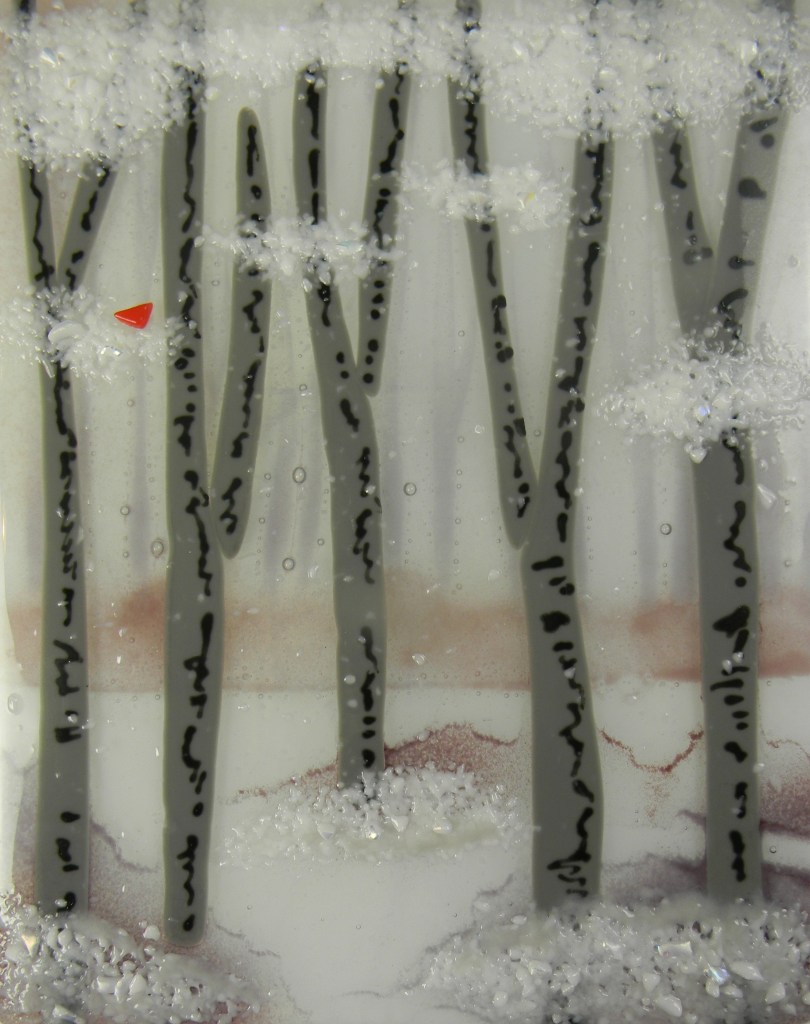
Winter Landscape as seen in the winter issue G.P.Q. Magazine Jan 2023
In this piece of art, black is limited to the lines on the tree trunks. I selected muted tones to create a quiet, calm, and relaxing setting. The shadow under the trees are created with medium purple frit. It simultaneously gave me depth and softness which I wanted to portray in this winter scene.
Welcome Fall as seen in my Premium Video Membership
When making this seasonal piece I wanted to maintain a warm yet rich color palette. I used a small amount black in the word welcome and in some of the letters that spell out FALL. When it came to adding shadows to the pumpkin, I used orange opal frit. The contrast is subtle but effective. I’m pleased with the stylized design and the inviting warmth it adds to my home.
You got this!
Don’t worry about missing black. Once you substitute colors for black, you’ll love the effects you’re able to create. You’ll be amazed how switching to dark colors transforms your art and brings it to life.
Artists take what they see and make it new.
We take an ordinary scene and turn it into something new that reflects our sense of drama and whimsy. Using rich colors, instead of black, is a fabulous way to push designs in any direction you want to establish a personalized mood and tone. Give it a try. The possibilities are endless. You’re only limited by your imagination.
We’re a chatty society. We favor T-shirts with funny sayings and wall art with inspirational messages written on them. It’s only natural to want to add a similar touch to your fused glass art. But creating text that’s attractive and legible in glass is difficult because the medium is bulky.
I’ve been including words in my art for years. It takes extra effort, but I’m willing to put in the time when the inclusion of a written message will strengthen the impact of my artwork. The techniques outlined here are fun, fast, and easy. They’re great compliments for seasonal pieces, personalized gifts, and stylized art.
Let’s get started.
Great Fall is a super fun project! The step-by-step tutorial and full size pattern are now available in the Fall 2023 issue of Glass Patterns Quarterly. I included it here because it’s a terrific example of combining different methods in the same piece of art.
Great Fall
I wanted the word Great to be compact and graceful. I painted it on the glass with black Glassline outlining medium. After the paint dries, I go back and touch up the lettering to make the line width uniform. I use the point of a wooden toothpick or a razor knife to scrape the unwanted paint away.
When it came time to render the word Fall, I had a few ideas in mind. I could simply cut thin strips of glass or use noodles to write the word. Then it occurred to me that using colorful stringers would give me visual texture and look like sticks. This was the first time I tried that method and I’m really pleased with the results.
Welcome Fall
Welcome Fall is a new video course that will be released soon. Premium Video Members can look forward to having access to this fun project with their membership.
Batty
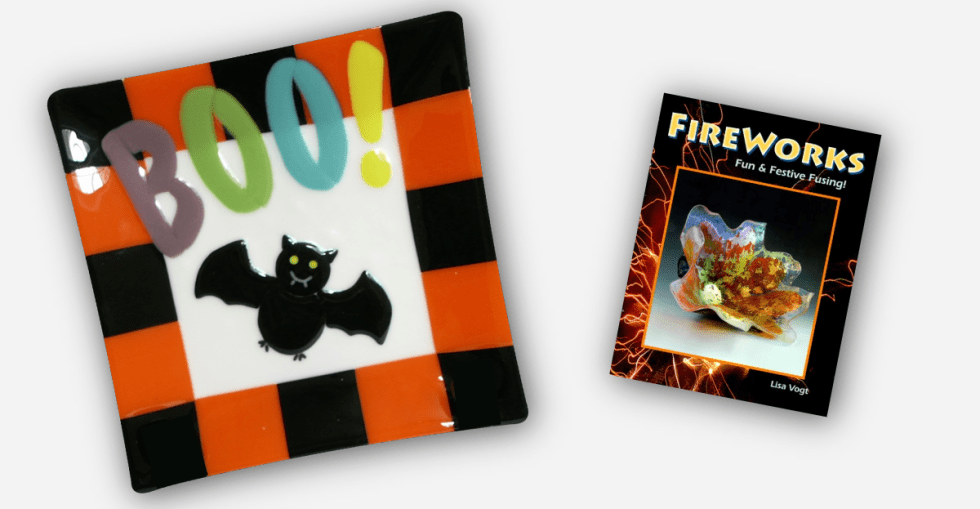
Batty utilizes the cut glass method to include text. The balloon style lettering is easy to cut out of glass and the oversized word adds an additional splash of color to the simple design. This bouncy lettering style is well suited for short impactful words. The Batty pattern is in my eBook Fireworks.
Love
Love also uses the cut glass method to achieve lettering. Here the lettering is the design and so, bold bright colors are key to delivering the lively message. These straight letters are fast and easy to cut. They’re a great choice for writing names. The Love how-to video and pattern eBook is available through my Premium Video Membership.
Cookies for Santa
Cookies for Santa is a wonderful example of using frit to write intricate messages on your fused glass designs. Simply sift powder frit over the glass then write your words in the frit with a small paint brush or the eraser end of a pencil. For the best results, use high contrast colors and apply a thick layer of frit. Have fun with it! The Cookies for Santa pattern is in my eBook Fireworks.
Wish
Wish features delicate, whimsical lettering. The word is made by sifting powder frit, over a stencil. This easy technique is great for quick projects that call for intimate details. Hint, use more than one color frit to get a paintbrush stroke quality to the lettering. Also, use high contrast colors to ensure good readability.
Wedding Heart
Wedding Heart is a little more complicated than the other techniques shown here. The advantage of using this method is it’s extremely effective and the results are graceful and elegant. Here the lettering is handwritten in liquid platinum with a needle type applicator pen. These items are available from your art glass supplier. The liquid platinum is fired onto the glass in the kiln for a permanent finish. The lettering is fired face down, in contact with a primed ceramic kiln shelf. Tip, the lettering does not adhere well if fired on fiber paper. It comes out dull and blotchy instead of uniform and shiny.
The lettering on the front of the heart is written with a silver sharpie marker. It’s not permanent and will wash off if the glass gets wet. We used these hearts for seating markers at my daughter’s wedding. They were memorable keepsakes and the guests loved them!
Including words in your projects is a fun way to ramp up the visual intricacy of your art.
Whether you keep it simple or combine multiple techniques you’re sure to enjoy the process and the outcome. I hope you found this spotlight on easy ways to include lettering in your fused glass designs helpful. Now get writing!
Watch the How to Include Words in Your Designs with Lisa Vogt video here.
Excerpt from my, How to Think like an Artist Lecture.
You’re artistic, crafty, gifted, talented, whatever title you favor, like me, you’re a hands-on creative who loves making exciting art. Being a veteran member of this inspired group, it’s likely you already apply some of these design concepts in your work and in your everyday life. My intention here is to bring to light the increased value of purposefully incorporating these ideas in all of your artistic endeavors.
Stand-out glass art is the result of careful planning and mindful execution. Yes, it takes forethought. But once you see the incredible benefits a little preparation can bring, you’ll actually enjoy the process as much as I do.
Elements of good design that’ll take your glass artwork to the next level.
1. Rule of thirds.
This rule refers to the way the artistic composition of a piece of art is planned and laid out. Begin by dividing the project shape into three even pieces vertically and horizontally. Think of it like the lines of an imaginary tic-tact-toe board are superimposed over the project. Then place design elements along the imaginary lines, or better yet where two lines intersect. This placement creates desirable tension that engages the viewer and therefore holds their attention much longer.
Unless the design is geometric, avoid placing design elements in the center of the artwork. This type of symmetry creates a calming setting that’s easily ignored.
Rule of thirds.
2. Work in odd numbers.
When designing your pattern include an odd number of design elements. If you’re drawing flowers, have 3, 5 or 7 blossoms. This pleasing setup meets the viewer’s expectation, plus it amps up the tension and the repeat adds continuity to the overall design.
Work in odd numbers.
3. Include a focal point.
Every design can benefit from having a focal point. The focal point can be literal and pictorial like a bird or tree. Or it can be abstract like a specific design element, an unexpected shape, a field of contrasting color or an unusual texture. Focal points anchor the viewer to the art. They lure them in and invite them to stay awhile and look around to see how the focal point relates to the remainder of the artwork.
Include a focal point.
4. Place design elements in a triangular fashion.
Placing design elements in a triangular pattern creates a visual flow that encourages the viewer’s eyes to move around the design. Your artist guidance, in the form of strategically placed design elements, is a personal invitation to interact and communicate with the viewer. That’s powerful stuff!
Place elements in a triangle.
5. Repeat shapes, elements, and patterns.
If you use a shape, design element or pattern in one place consider repeating it two more times. For example, if a circle appears in one place, add two more. This level of planning shows your commitment to your design and the confidence you have in your work. Plus, it adds continuity that raises the sophistication level of the work as a whole.
6. Repeat colors.
Repeat colors.
Color plays an important role in the visual impact of art. It sets the tone and mood for the work. It also unifies the piece. You can increase the dramatic impact of your work by repeating colors at least three times. This adds continuity and shows the artist’s higher level of seriousness and commitment to the art.
When selecting colors plan to use multiple shades of the same color, like yellow, sunflower yellow, light amber, medium amber and dark amber in combination to create shading and add contrast.
Small changes have a BIG impact!
When you stop to think about it, it’s likely you’re using many of these concepts every day. When you decorate the coffee table you arrange three candles in a corner, not in the middle. The candles are likely three different heights that visually forms a triangle. You selected candle colors that are repeated in your decor.
Now, put it all together. Purposely apply these simple design tips when making your glass art and you’ll see a wonderful increase in the beauty and desirability of your finished artwork.
Want to learn more? Join me for my live How to Think Like an Artist Lecture
Carnival by Lisa Vogt
Peacock by Lisa Vogt
Happy Fusing!
Lisa & Niki
Follow my blog for weekly inspiration sent to your inbox!
Fall in Florida is like spring up north in the sense that we’re coming off of months spent inside due to extreme temperatures outside. In Florida we were inside to avoid the heat, up north it’s to avoid the cold. Aa a result, Autumn’s crisp air and colorful foliage inspires renewed creativity and a longing to spend time in my glass studio.
Autumn also marks the upcoming holiday season. It means it’s time to start thinking about making fun seasonal themed fused glass projects to decorate my home and give as gifts. In recent years, I’ve really enjoyed displaying sparkling fused glass lanterns in my home, office, and yard. Lanterns are an easy way to include art glass in my decor to bring a special brightness and cheerful joy to these personal spaces.
Especially around the holidays, I enjoy having soft accent lights around my home. So, I created a collection of lanterns I could switch out seasonally to add a festive atmosphere to my rooms all year long. And best of all, having a variety of design themes keeps the construction fresh and fun.
In my video Lumin-Essence I show how to make 8 shimmering lanterns. The lanterns range in complexity, but anyone with a flair for fusing can easily make them all. I will tell you though, they will challenge your fabrication skills. But in a good, try something new way that you’ll love.
Fall Leaf is a quick and easy design to get you fired up and bring a seasonal touch to your home. It’s organic shape and bright, cheery colors make it the perfect complement to your fall decorations. Plus, the compact size makes it the perfect accent in small spaces or in dark areas where a little light would warm up your space.
Brilliant gift ideas just in time for the holidays.
The first lantern I designed was inspired by relaxing summer vacations spent on a serene lake. A sailboat glides over calm waters with a picturesque view of mountains and pine trees behind. The custom made glass base provides a lift and an attractive pedestal to showcase the scenic setting. The front panel of the lantern bows out. The back panel bows in the opposite creating the perfect space for a candle or LED lights.
Weave is an especially fun lantern to make. It looks complicated and fragile, when in reality it’s easy and sturdy once assembled. Plus, it’s a terrific size for adding a touch of light to small or confined spaces. The assembly is simple. You cut a bunch of strips, lay them out in 4 alternating layers and then tack the pieces together in your kiln. The 4 sides are then glued together around a clear glass base. I like to add dichroic glass strips to mine for that super shine that lights up the room. The best part is Weave looks amazingly beautiful when lit. The open construction and rich colors cast a rainbow of colors on the table and surrounding walls.
Winter Wonderland is my favorite lantern. The clear glass backdrop is the perfect complement to the white and dichroic snowflakes. This dazzling lantern requires extra steps as the snowflakes are tacked together and then tacked on the clear front and back panels. Let me tell you, this one is worth your time. Winter Wonderland is a spectacular, glistening addition to any room.
Dogwood reminds me of flower gardening and the rebirth of nature in the spring. I selected a crisp, clean, simple color palate for this lantern. I used clear glass for the lattice because I wanted this lantern to have structure, but also a light, airy feel. The flowers are fun to make. They’re tacked together and then slumped in small bowl molds to give them form. Dogwood is assembled it multiple easy steps. The lantern sides are glued around a clear base. After the glue is dry the flowers are glued on one side at a time. When lit, Dogwood makes a dazzling centerpiece.
Blue Mountains was inspired by the cool gradient colors of the Great Smoky Mountains. We all enjoy a refreshing trip to the mountains where stunning views and peaceful moments linger in our hearts. With this lantern you can relive those tranquil times every day. This lantern is super easy to make. You just layer several shades of blue. The beauty of Blue Mountains is in its simplicity of design and construction. You’ll love making this restful lantern.
Red Heart is a darling combination of vivid color and lacy pattern. The great thing about this lantern is the small, fused glass design combined with a ready-made candle shelter, make it quick and easy to construct. You’ll definitely want one of these around come February. This dainty lantern is a perfect personalized gift to show family and friends they hold a special place in your heart.
Purple Heart may be dainty, but it lights up the room with an impressive glow. It’s another quick and easy project that makes a great gift. Just fuse glass strips and then glue them on a ready-made candle shelter. It doesn’t get easier.
I hope this illuminating collection inspires you to be creative and celebrate family, friends, and all that we have to be thankful for.
All of my multi-project videos come with a printable full size pattern eBook.
If you enjoy reading my blog, I have a feature on my website you’ll like. From the home page click on any page. On the right hand side bar you can read my Top 10 Blog Posts. The list updates every 48 hours so check back often.
Follow my blog for weekly inspiration sent to your inbox!