Sunny, relaxing summer days are here! It’s time for delicious family picnics, breezy boat rides and warm sand between your toes. This series of bowls combines simple lines, a pleasing color palate and a whimsical touch of nature with classic seaside style. Beach Day Bowls are perfect accents for creating beach style comfort in your home all summer long.
When I come across a pattern that really brings me joy, I like to recreate that design in different sizes. Then I display the companion pieces around my kitchen and family room to set a seasonal mood throughout our living space. If you’re attracted to this pattern, consider making it in a few different sizes to get the most out of the simple, yet stylized ocean theme.
Beach Day Bowls as seen in Artful Home Video
How-to make the bowls.
These bowls are made with two layers of glass. The base layer is clear glass. The second, design layer is made up of cut glass pieces. Start by cutting the clear base.
Enlarge the pattern to your desired dimension. Use the pattern as a guide to cut the design layer. Cut the paper up. Glue it to the glass with a glue stick. Cut the glass as close to the paper pattern as possible to minimize the amount of grinding needed.
There are some deep, inside cuts in my pattern. Cut the glass as accurately as you can. Grind the pieces to improve the edge quality and overall fit of the design. Assemble the cut glass pieces on top of the clear base. Use fuser’s glue to affix the design layer to the base layer. It’s okay if your pieces don’t fit perfectly. Let the glue dry. This will prevent the glass from moving when you apply the frit.
Wave Pattern from Artful Home Video
Use a spoon and pour fine blue frit on top of the glass. Use a paint brush to move the frit into the gaps between the pieces to fill in the space and add a linear detail. Remove any excess frit by sweeping it off the glass. Be meticulous about your cleanup. Attention to detail make a difference. Doing your best work on every step will dramatically improve the quality of your finished artwork.
Use a razor knife and cut a bird footprint stencil out of stiff paper. I use file folders or poster board. You can also use plastic stencils available at your local craft store in the scrap booking department. Place the stencil on the area of the design that represents the sand. Sift powder brown frit over the stencil. Carefully lift the stencil off the glass.
Fire the assembled project to a full fuse temperature using the firing guide below.
Place the fused glass on a slumping mold and fire it to a slumping temperature using the guide below.
My bowls measure 10 inch x 10 inch, 6 inch x 6 inch and 4 inch by 4 inch. You can make these bowls in different sizes and get the same beautiful results.
Firing your own projects is exciting. It empowers you to make your own decisions and gives you the freedom to try new advanced techniques. The best way to gain confidence in your fusing is to build consistency into your firings. You want to get to know how your particular kiln works and define the results you want to achieve. At first, you’ll make mistakes and have varying results. That’s okay. You’ll learn something valuable from every firing. Plus, you’ll gain experience and learn to trust your process.
Start with project assembly.
How projects are assembled has a direct effect on the durability and, “look” of the finished piece. Most of my projects are assembled using two full layers of glass.
Glass settles at a thickness of ¼ inch when it’s heated to the full fuse temperature. By assembling with two layers of glass, I maintain control over the size and shape of my finished piece.
Fusing one layer of glass will cause the project to shrink. And it will have a fragile, sharp, irregular edge. While fusing three layers of glass will result in the project growing in size, which changes the original shape considerably.
Since two layers is my go-to type of assembly, the projects I made for these comparisons are made with the 2 layers of glass. If your go-to is a different type of assembly, you’ll want to duplicate that for the following firing comparisons.
I fired several 6” x 6” square projects made with 2 layers of glass for these comparisons.
Characteristics of a terrific full fuse firing.
The full fused glass retains its shape and original size. It also has a uniform thickness, smooth surface, rounded edges, and a clean back side. The design accent details melt into the top layer giving the project a shiny, smooth surface.
Characteristics of an under-fired full fuse firing.
An under fired project will retain its rigid shape and its original size. The edges are hard, angular, and sometimes sharp. Since the two layers are not completely fused together, a seam may appear on the edge showing how the layers were stacked. The back side of the project is clean and smooth. Design details, like frit have texture and are not fully melted into the top layer.
The solution to an under fired project is to re-fire it a little hotter. To get more heat results, I usually add ten degrees to the target temperature. The target temperature is the temperature that gives me the desired results.
Firing Target Temperatures for 96 COE & 90 COE.
Full Fuse:96 COE1465°F (796°C), 90 COE1480°F (804°C), hold 10 minutes
Slump:96 COE1265°F (685°C), 90 COE 1265°F (685°C), hold 10 minutes
Characteristics of an over-fired full fuse firing.
An over fired project will grow in size. The outside edges will round out. The glass will lose its square shape and be larger than the original 6 inch by 6 inch size. Kiln wash may stick to the backside and may be difficult to remove. The design details, like frit will be completely fired in giving the project a smooth shiny surface.
The solution for an over fired project might be to grind the edges to regain the square shape. Or you can remake and re-fire the project at a lower temperature.
Characteristics of a successful slump.
A successfully slumped glass project conforms to the shape of the mold. It also retains a clean shape and the sides of the project retain their height.
Characteristics of an under-slumped project.
An under-slumped project does not conform to the mold. The glass project doesn’t have enough drop and so the piece is shallow. The piece may also wobble on the table because it didn’t come in contact with the flat bottom of the mold like it should have.
The solution is to re-fire the glass in the mold and hold it at the target temperature a little longer than the first time. I usually add 10 minutes hold to the original program.
Characteristics of an over-slumped project.
The backside of an over-slumped project will pick up unwanted texture from the mold. It also loses some of its shape because the sides slide down into the mold. The result is an uneven top edge or rim. The solution is to call it somethingnew or remake the project.
Tack fusing test.
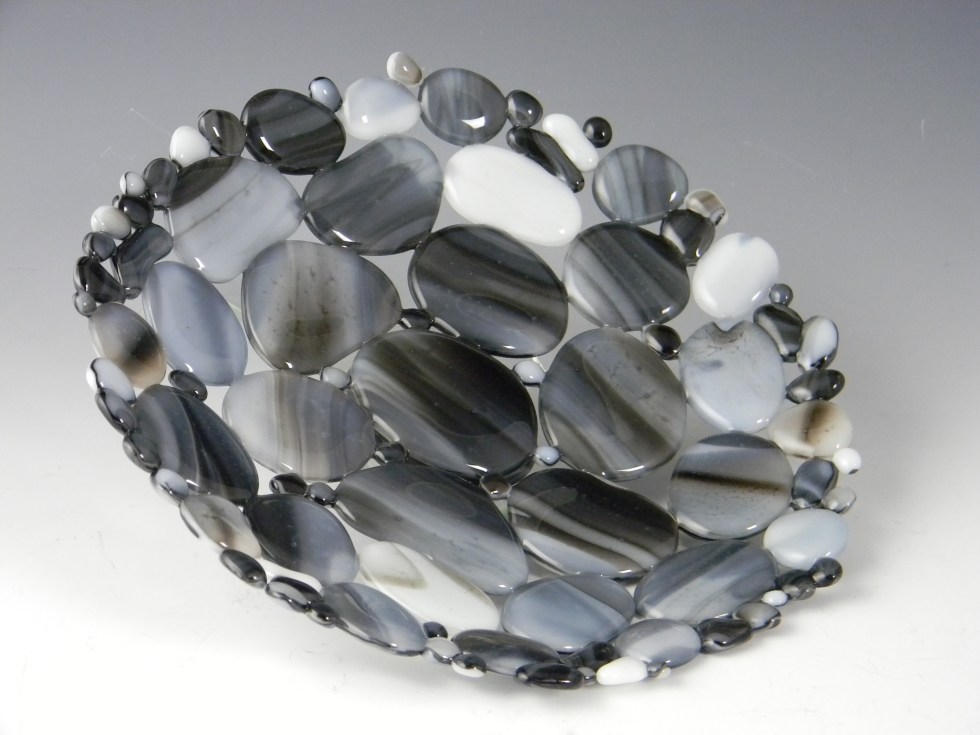
I made three different size nuggets to make a bowl that would look like it was made out of rocks. I cut a bunch of round shapes out a grey glass. Then I cut matching pieces out of clear glass. I capped the grey with the clear and fired the stacked glass nuggets to a full fuse temperature. The pieces came out great.
Don’t hesitate to customize your programs.
Then I arranged the fused glass nuggets on a kiln shelf to make a circular design. I tried using the Auto Mode on my kiln and set the controller to tack fuse the glass together. The finished project looked great, but the pieces didn’t stick together. In Auto Mode the kiln didn’t fire hot enough to tack the glass pieces together while they were resting next to each other. The lower temperature was intended to tack fuse glass pieces stacked on top of each other.
The solution was to enter my own program in the kiln controller and re-fire the glass to a hotter temperature. It worked! I then slumped the tacked piece to make a shallow bowl. The finished art was a beautiful success!
Take notes.
I recommend taking notes outlining how you assemble your pieces and on your firing steps. This way you can easily reproduce your successes and learn from the pieces that didn’t come out as you expected.
You can do it. I believe in you!
It takes a time to get comfortable firing a kiln on your own. The upside is you’ll learn new and exciting things every step of the way. Relax and enjoy your process. No matter what your results are be grateful for your creative development. And take advantage of the opportunity to make your own personalized pieces of art.
Happy Fusing!
Lisa & Niki
Follow my blog for weekly inspiration sent to your inbox!
I’ve been teaching how to work with glass for more than 30 years. I’ve helped thousands of students create beautiful, unique pieces of art. With my lengthy teaching experience, I get a lot of questions from students. I thought I’d share some with you.
Students try to get absolute, it’s only done this way, fusing advice from me. My advice to them is there is no always or never in glass fusing. I approach every project with the intention of getting the best results possible. I use any and all means and combination of materials I have available to achieve my artistic goals. There are many ways to approach glass fusing. The following list is intended to be a guide to help you understand different aspects of the craft and improve your results.
Here we go:
Q. Do you have to re-coat the ceramic kiln shelf with primer every time you use it?
A. I do re-coat my ceramic shelf with primer every time I use it. I apply three coats of shelf primer on top of the used primer. However, if the shelf shows signs of wear, I scrape it down to the bare ceramic with a single edge razor blade. I then re-coat the shelf with 3 fresh coats of primer. Visible signs of wear would include the primer looks thin, the coating has cracks in it or it’s flaking off the shelf.
Q. Why does the kiln wash stick to the back of the project?
A. This is usually the result of exhausted kiln wash; the shelf should have been reprimed prior to use. It may also occur when the glass has been fired to too hot a temperature or kept at full fuse too long. Kiln wash can be removed with fine steel wool or a scraping tool. Stubborn spots can be soaked off with a bathroom cleaning product used to remove hard water stains.
Q. After the project is fused, how close to room temperature does the kiln have to be before opening the kiln lid?
A. How badly do you want the project inside? Room temperature is usually well below 100 degrees Fahrenheit. If you open the lid prematurely thermal shot can occur; breakage caused by changing temperatures too fast. Just a quick peek in the kiln, done too early can ruin your day. Wait, it will be worth it!
Q. What causes tiny bubbles and how do I get rid of them?
A. Air becomes trapped between the layers of glass when it is heated. The number and size of the air bubbles can be reduced by heating the glass more slowly between the temperatures of 1000 to 1465 degrees Fahrenheit. This gives the air more time to escape before the glass edges become sealed.
Q. How do I avoid big bubbles?
A. Large dome shaped bubbles sometimes form in the middle of medium to large size projects. This is usually the result of firing too fast on a smooth surface like a ceramic kiln shelf. The outer edges of the project become soft first and form a “seal” like a suction cup on the shelf. Air becomes trapped under the glass. When it expands it lifts the glass and forms an unattractive bubble. This is less likely to happen when using shelf paper or a fiberboard kiln shelf, as the air can escape through the porous material. The best advice is to slow down the firing process.
Q. Can I stack kiln shelves?
A. Not recommended. Unlike ceramics, glass is thin and reacts to heat quickly. Stacking shelves causes uneven heating. The outer edges of the project become molten before the center has a chance to react; your firing results may be inconsistent.
Q. How does the thickness of the glass relate to my target temperature?
A. A project made with two layers of thin fusible 2mm glass will usually reach the desired “look” before a project made with two layers of 3mm glass. When you change project sizes or materials (2mm vs. 3mm) you will want to monitor the first few firings and make any necessary adjustments to your firing schedule.
Q. Can more than one project be fired in the kiln at one time?
A. Yes, if the projects are similar. They should be made from the same thickness of glass, have the same number of layers and be close in size. Use a firing speed for the largest project. Small projects will not be harmed by firing slowly but the large project will suffer if rushed.
Q. What causes sharp edges on the project?
A. Dragging is usually caused by over firing a project that is resting on fiber paper. As the glass contracts and draws in on itself the paper resists, sharp edges are the result. This edge can be made safe with a file or grinder. After grinding the project, it can be put back into the kiln and heated until the ground edge is polished.
Q. Why is there debris between the glass layers?
A. Too much glue. Small amounts of glue will burn off leaving no trace. I avoid using glue if possible. When I do use glue, I apply a few pin head size dots on the backside of the glass. If you use an excessive amount of glue, it will burn, becoming sealed between the layers, leaving dark blotches. Excess glue can also cause small eruptions that will blow a hole through the glass or cause pieces to jump and move in the kiln.
Q. What is the difference between using a ceramic kiln shelf or fiber paper?
A. Ceramic Shelf:
Fused glass will take on the texture/pattern of whatever it is fired on. If you fire on a ceramic kiln shelf your project will have a smooth back surface. (Great for bowls, plates, fine art pieces; projects where a sleek underside is desired.)
A Ceramic shelf can be used repeatedly.
A ceramic shelf is dense; it retains heat which allows the glass to pass through the critical stages slowly.
Ceramic shelves must be primed frequently; this can be time consuming.
Fiber Paper:
Shelf paper comes in a variety of thicknesses and finishes. Generally, the thinner the material the smoother the fusing surface. (Great for coasters, pins, wall art; projects where a textured back side will make it easy to glue accessories on like rubber feet, pin back, etc.)
The thin material can only be used once. The medium material can sometimes be reused; it leaves a matte finish on the back of the project. The thick material can be used multiple times but the texture on the back of the project will be course.
The fiber paper is porous. Air can circulate, therefore large air bubbles are less likely to form between the glass and the shelf.
Shelf paper must be cut to size and can be costly if you are using it every time you fire.
Q. What are the differences between ceramic molds and stainless-steel molds?
A. Ceramic Molds:
Ceramic molds come in a wide variety of sizes and shapes. They must be primed like the ceramic kiln shelf. The primer tends to last longer on a form than on a shelf because slumping temperatures are lower than fusing temperatures. Slumping occurs at approximately between 1200-1300 degrees.
Ceramic molds are inexpensive and durable, but they will break if dropped or used unprimed.
Ceramic molds should be sanded and re-primed if there are pits or cracks in the primer coating.
Ceramic molds cool more slowly than glass. Therefore, most molds are shaped so the glass slumps down into the mold, allowing the glass to contract first.
Stainless-Steel Molds:
Stainless steel molds come in a variety of shapes and sizes as well. They must be primed also. The slick surface makes priming more difficult. The mold can be sanded, sandblasted, or heated to make the priming process easier.
Stainless steel molds are extremely durable “forever” molds. But they tend to be several times more expensive than ceramic molds.
Stainless steel molds should also be sanded and re-primed if there are pits or cracks in the coating,
Stainless steel cools more quickly than glass. The metal contracts underneath the glass which gives the room needed to slide the draped glass off a floral former style mold.
Some advice:
Enjoy the creative process. Don’t rush it. Take your time. Make small test pieces to establish a relationship with your kiln and with fusing materials. Take before and after pictures. Take accurate notes so you can repeat the successful projects and learn how to avoid failures. Don’t worry that the test pieces won’t be fun. Some of my best work originated as a small sample. Trust that as your confidence and skills grow, so will the size and complexity of your projects.
This FAQ’s is from the Free Firing Guides and More page of my website. Find more helpful there.
Vlogging is Niki’s idea. She’s my vlog creative director. She videos my routine activity, or my project development processes while I’m in my glass studio. It hadn’t occurred to me that sharing my everyday activity with you would be so fun and have so much educational potential.
The other aspect that surprised me is how much time and effort I put into learning myself. I’ve always enjoyed developing new techniques and design ideas. It’s not work. It’s play.
The length of time and extensive testing I dedicate to achieve my artistic goals is plain in the flower and mushroom cap vlog series. I do extensive firing tests like this all the time. But I conducted them in between other project firings. Up until now my project development steadily moved forward without getting any special attention. Now that I documented my creative process it has even greater instructional value for me and by extension you. That’s exciting!
Let’s start at the beginning.
I purchased 2 new 5-inch ceramic fluted mushroom drape molds that I had never used before. I wanted to make flowers not mushrooms. I purposely did not consult the manufacturer’s directions. I wanted to developed my own shape without being influenced by what everyone expected to get using the mold. Right or wrong. Easy or hard. I’d learn what worked for me along the way.
I measured the molds and cut clear glass circles based on my experience with drape molds. The first circles were 6 inch. (I use clear fusible glass for my testing because it’s the least expensive glass.) I draped the glass using a firing guide I wrote, based on my years of experience. The results were disappointing. The glass draped like a bad taco shell, plus the glass blank was too big. It looked nothing like a flower or a mushroom!
Try again.
I cut a new clear glass circle to 5 ½ inch and I designed a five star shape that loosely resembled a flower. I adjusted my firing guide and tried again. I fired 5 unsuccessful sets of clear glass. I grew tired of my inconsistent results with the plain clear glass, but I didn’t give up.
I reshaped my flower design and added frit to give the clear glass color. I also added notches to separate the petals. I adjusted my firing guide again adding more and longer hold times. The new flower shape with the color and notches worked great. I wasn’t totally unhappy with the draped shape of the round glass either. I thought, if I added pattern and color, maybe I’d actually like the round pieces as mushroom caps.
The increase in hold times caused the flowers to stick to the primed ceramic mold. On the next firing I cut ThinFire fiber paper to size and placed it between the glass flower and the mold. It worked like a cushion and prevented the glass from adhering to the ceramic mold. I finally had success and draped flowers I really liked. I also really liked the addition of color to the mushrooms caps. Instead of plain and boring, they are lively and bold.
Now what?
My next challenge was to figure out how to display the draped flowers and mushroom caps artistically and safely. I’ve had good luck bending and shaping thin copper tubing in the past. It’s flexible yet sturdy and it’s easy to cut with pliers or a hack saw. I cut a piece of tubing to length then flatten about 1 inch of one end with a hammer. Then I glue the flat area to the glass with E6000 adhesive. It works great and I love the curvy flower stems I’m able to create.
I took the mushroom caps to my home improvement store to look for something to make study stems. I tested the fit on 8 inch nails. The head of the nail fit perfectly inside the mushroom cap. I liked the length and thickness of the nail with the draped glass. The proportions were pleasing, and the silver color added interest. Back in the studio I glued the mushroom caps to the nails with E6000. Overall, I’m very happy with the outcome. The flowers and mushrooms are welcome bright, cheerful additions to my garden.
This is just the beginning.
I’m not stopping here. Everything I learned during this lengthy process will be put to good use in the development of my new Premium Video Membership projects. I’ll keep blazing new trails and bringing you along for the ride. We’ll learn and nurture our artistic spirit together, while having fun making amazing new pieces of art.
Flower & Mushroom Cap Include Vlog 7, 8, 9, 10, 11, 12 &13
Pattern and shape are two of the simplest elements that can easily be manipulated to dramatically increase the appeal of fused glass art. By adding unique patterns and building new shapes you can draw the viewer in and lock their attention tight. In the end, isn’t that our goal, to inspire people with our art?
You’ve enjoyed success making the usual plates, bowls and vases following practices and guidelines laid out by the experts. But the element of surprise and the thrill of the unexpected success has gone missing. If you find yourself blindly staring at the glass wishing for inspiration, then it’s time to break the rules. Make art that excites you again.
Before you run wildly through your glass studio, be sure to set this excursion up for success. Start by studying finished art that you find attractive. Define what it is about the piece that appeals to you. Is it the shape, the colors, the pattern, or the design? Take that element and put it aside temporarily. Maybe loosely sketch it out on paper for quick reference later. Do this for three individual pieces of art.
Brilliant Bubbles by Lisa Vogt as seen in Fusing For the Adventurous Webinar
Small details can have a huge impact on the visual appearance of your art.
Don’t underestimate the power of minor changes to customary pieces. When trying to navigate a new territory, you’ll have the greatest success if you take what has worked for you in the past and then expand on it to create something all new and unexpected.
Here’s how to get started.
Anchor the viewer’s eye with an interesting pattern. Unexpected bubbles are usually considered undesirable. But when made into a uniform design, bubbles can add a whole new dimension to the glass art. Designing with bubbles is a terrific way to add decoration and a little sparkle. Light dances inside the tiny dome shapes which increases the appearance of depth and the overall intricacy of the finished piece.
Here, I’m using stringers to establish the pattern. They’re placed even distances apart in two directions on a base glass and then capped with clear glass. The cool thing about this technique is the assembly method dictates the placement, size and shape of the bubbles. If the openings between the stringers are square, then the bubbles are round. Rectangular openings result in oval shaped bubbles. While triangular openings give you tear drop shaped bubbles.
Making small, 2” x 2” test pieces will give you an opportunity to try unusual color combinations. It also builds confidence because you know what to expect when you go bigger. The best part of this technique is the possibilities for imaginative designs are endless. Try it. You’ll be blown away!
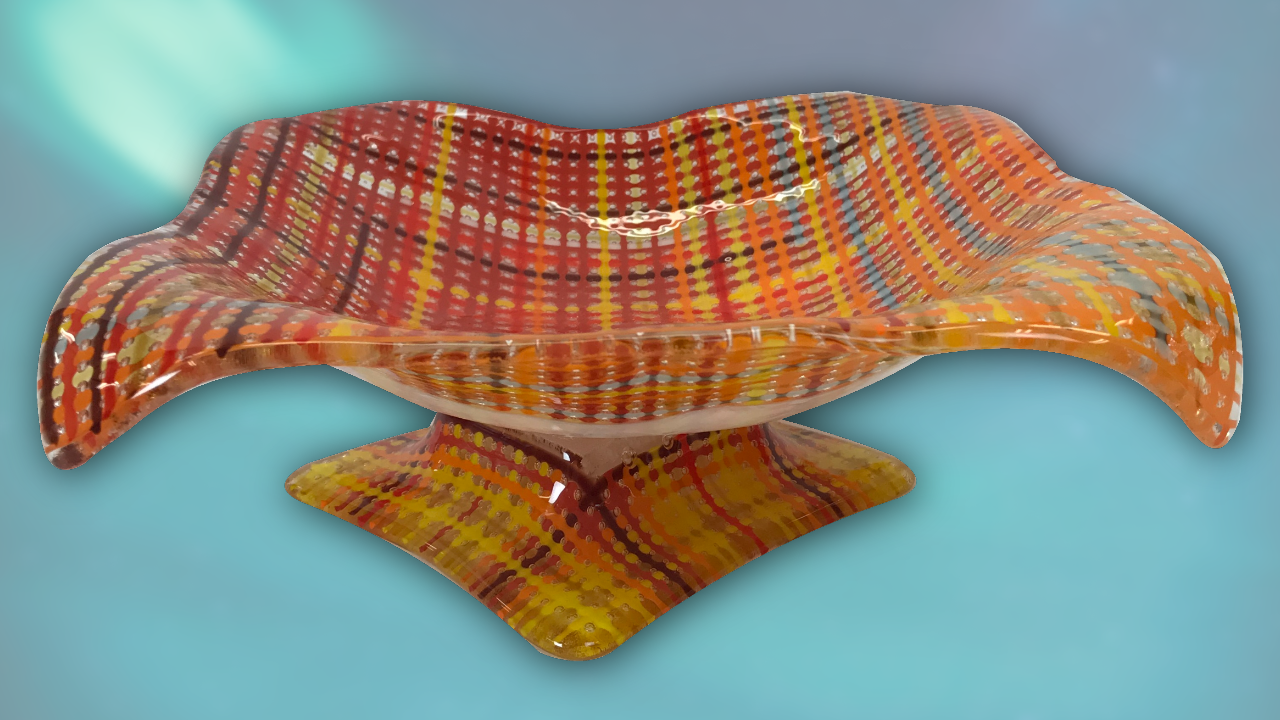
Black Tie by Lisa Vogt as seen in Sculptural Fused Glass Video
Sculpture romances the viewer.
Sculpture romances the viewer. It pulls them in like a magnet. Give your art unique shape and the viewer will be hooked. With so many fusing materials at your disposal, it’s never been easier to get creative with your art’s profile. The easiest way to get funky shapes is to drape fiber material over an existing slumping mold. Give the fiber paper exaggerated contours by tucking kiln posts or fiber board between the mold and the fiber.
You can also achieve new shapes by combining different ceramic or stainless-steel slumping molds together. Some of my most exciting pieces have been made this way.
If you’re shy to jump in, build a sample out of clear glass. Make the sample the same shape, size, and thickness as the intended project. Clear is the best choice because it’s the least expensive glass. And you can see through it to see where the glass rests on the mold assembly. Then you’re able to adjust the final piece as needed. Plus, there’s no waste. The clear sample can be smashed and used for casting filler. It’s a win, win.
The wonderful thing about this technique is every piece of glass slumped has a one-of-a-kind flare. They’re making your own personal original. Now that’s exciting!
Get crazy and combine both techniques and you have a showstopper. The biggest drawback to this in-depth approach is the amount of time necessary to plan an exceptional project. True, not all projects warrant this much effort. But if you work in stages on a few, you’ll find the outcome is extremely rewarding.
Design developer.
Take it a step further and create your own design. Go back to the three pieces of art you studied earlier. Take the three elements that attracted you and combine them with a unique pattern and a sculptural shape. Now you’re on the threshold of greatness!
These are just a few examples of breaking the rules. If you’re ready to rush into your studio, excited about the possibilities, don’t stop here. These techniques have great potential for expansion in so many directions. Take them and run and set your imagination free.
For more advanced instruction check out my Sculptural Fused Glass Video.