


Advanced fusing is a broad term. What does it mean to advance?
Advancing is moving beyond your current skill level. It’s challenging your abilities and developing your talent and learning how you can make exceptional artwork that exceeds everyone’s expectations.
If this sounds like a huge insurmountable task or an unrealistic goal for you, you’re not alone. Compressed into one sentence, the enormity of advancing ones craft can be a daunting motivation crusher. But don’t worry. Once we break down the steps you’ll be primed, ready and truly excited about taking action.
Here are three top tips pros use to break through and make exhibition quality art.

- Be a Master of Color.
Color plays an important role in the effectiveness of your art. The colors you select convey your message. You, as the artist have the power to swing the viewers mood from tranquil, bright and cheery to thought-provoking, stirring and stormy. When planning a new project, I consider what type of impression I want to leave and then select colors that support that intention. Reds are active and emotional. Blues are soothing, they suggest tranquility. While yellows represent happiness and contentment. Choose your colors carefully and then use them with purpose to draw the viewer into your magical world.

- Pick A Pattern.
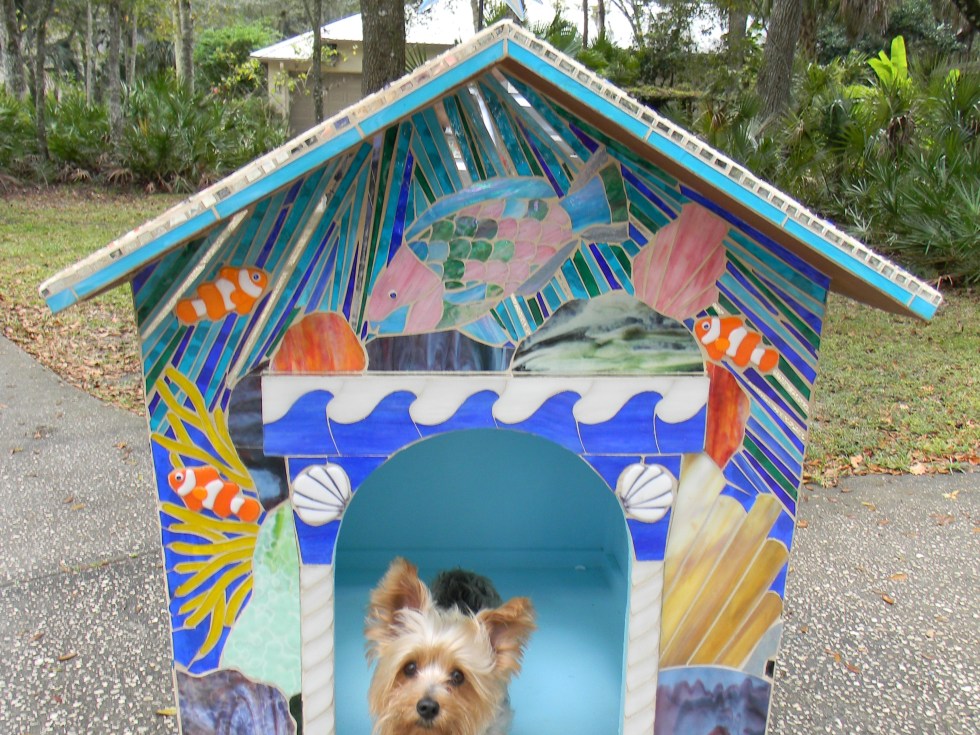
Including patterns in your art is an essential way to increase the visual intricacy and attractiveness of your artwork. The idea is to capture interest and hold it as long as possible. Patterns add dimension which increases interest. This entices the viewer and engages them longer. Pattern also shows an increase in artistic exploration and creative skill on your part, and that always gets noticed.
Patterns can be simple and geometric or intricate and organic. I decide how to use pattern based on the artistic style I’m going for. For traditional designs, I like to use structured, linear patterns that illustrate organization and planning, while contemporary designs are great places to use free-flowing patterns. In effect they increase the visual movement throughout the artwork. Whatever style you chose, pattern adds drama that increases the visual quality of any piece.

- Go Sculptural.
Shape up. The fastest and simplest way to ramp up your artwork and advance to the next level, is to create a unique shape, and go sculptural. Sculptural pieces always have higher visual impact that translates into an increased perceived value. This is the key to taking your work from a craft or a hobby to the threshold of fine art. We are so fortunate to be working with a medium that we can manipulate and shape any way we want. Take advantage of that and you can transform ordinary into the extraordinary.
Try using slumping molds in different ways. I combine molds to build unique shapes no one else has seen. Or I fuse several small pieces and then glue them together to create a freestanding, three dimensional tower. You can do it too. Start small. Then as you gain confidence go bigger and more elaborate.
The key difference between making ordinary pieces and repeatedly producing one-of-a-kind original art is planning.
When it’s time to make something new and exciting I begin by asking myself, what style do I want to create. Then I consider what mood the art should provoke and select an appropriate color palate. Then I layout a pattern that will reinforce my selected style. My next step is to plan what form the finished artwork will take. I ask myself, how can I manipulate the shape of the glass and display it in a unique and unexpected way that will be amazing? Then I begin the process of construction.
I don’t always have all the answers at the beginning. But I do follow my original plan to its natural end. Often, new directions present themselves during fabrication, but I stay true to my original plan. I’ll take notes on the new possibilities and revisit them later with my next new undertaking. Sometimes deviations are inevitable, like when an idea or technique fails to produce the results I had hoped. Then I go back to the first three tips listed above, regroup and forge ahead.
I hope this insight helps you overcome obstacles so you can make the art of your dreams.
Big Thanks!
I wanted to take a moment to tell you I appreciate your time and your dedication to your art. If you’re here reading this blog every week you are growing artistically and your participation in our community makes it better for all of us.
Wherever you are in your artistic journey, you’re doing a great job! Keep going. Never settle. You are an amazing talent. Shine on!
Happy fusing!
Lisa
Follow my blog for more tips and tricks!
YouTube http://www.youtube.com/watch?v=dhOifd7wukk
Facebook www.Facebook.com/LisaJVogt
Twitter https://twitter.com/lisajvogt
Instagram https://www.instagram.com/lvogt_originalsinglass/

Creative Slumping Webinar November 19, 2019
In this detailed Webinar, I’ll reshape the way you slump and drape glass. See how thinking outside the box and using ready made molds in new ways offers numerous and exciting opportunities to produce unique forms.
You’ll learn how to make your own graceful, free-form shaped molds from readily available materials with no laborious measuring or messy mixes needed. Taking you one step further, I’ll show you how to use these different approaches, in combination, to transform ordinary projects into inspiring, sculptural pieces of art!
Watch it NOW! Start fusing today!
Downloadable instructional videos for every skill level.

Check out my eBooks for elegant patterns and detailed fusing instructions.


 dichroic glass. Did you notice the cute heart design on his chest? The dynamic weather vane also turns.