

Posted on — 8 Comments

Priming Stainless Steel Molds Made Easy

Picture1

Stainless steel molds are wonderful, versatile additions to any glass fusing studio. I love stainless steel molds for the artistic freedom they’ve given me. Recently, I’ve been exploring new, innovative ways to use these molds. I’m having so much fun with the results, I thought I’d share some of my techniques with you.

Stainless steel slumping molds offer fusers a nice variety of styles and shapes. There are some specific advantages to using stainless steel molds over ceramic molds. Stainless steel molds are light weight, and therefore easy to move in and out of the kiln. They’re durable, unbreakable, forever molds you can expect to get years of enjoyment out of. And, most styles and shapes are reversible. You can slump glass on the mold right-side-up or upside-down, depending on the artistic results you want to achieve.

One drawback to using stainless steel molds is they can be difficult to coat with kiln wash. Kiln wash, or shelf primer whichever term you prefer, prevents the hot glass from sticking to the mold during the slumping phase. Priming a mold is integral to the success of your projects. Once you understand why priming a new mold is difficult, it’s an easy problem to solve.

DSCN3831

The stainless steel mold manufacturer uses oil to lubricate the flat metal when they form the stillness steel into a shape. The oil residue is present on new molds when you buy them. This oil prevents the kiln wash from sticking to the mold. Instead of sticking, the kiln wash just runs off the mold. Simply remove the oil and the mold will take the primer easily.

DSCN3839

There are several ways to remove the oil. In my experience, the fastest and easiest way is to season the mold. The first time I fire my new stainless steel molds I fire them without any glass on them. I heat the molds to the temperature I intend to use when I slump a project on the mold. The high heat burns off the oil. It also changes the color of the metal and leaves a finish that helps the primer stick.

It’s that easy.

Fire the mold alone to 1265 degrees. Let it cool. Apply a coat or two of primer, let the primer dry and you’re ready to slump glass. I use Bullseye shelf primer. Other primers will work as well.

This S shape stainless steel mold has traditionally been used to make horizontal projects that are free standing. They’re beautiful. But I thought; suppose I make two vertical shapes on one mold and then combine them in such a way to make something totally new? Something sculptural.

Picture5

For an even greater artistic impact, I made my own glass for this project using my Free Flow method. It’s a great technique to use when you want to make your own sheet glass with a fluid, painterly quality. With the Free Flow method, you blend your own custom color mixes. And you control the visual direction of the pattern in your glass. It’s a fabulous way to expand your color palate and truly personalize your art glass.

Picture6

Picture7

Picture10

But the fun doesn’t stop there. After so much effort, I wanted a custom base that would present and show off this dramatic piece of art. I decided a simple clear base would enhance the art by giving it lift and allowing light to pass underneath. I fused three pieces of ¼ inch thick clear glass together. I used ½ inch thick fiber board strips to contain the three thick layers of glass while they were firing.

Picture11

My favorite thing about this piece, Wonderous is the different profiles it has from different angles. The viewer is treated to fresh new contours and different perspectives as they move around the art. The unique twists create an interactive experience that entertains and engages the viewer from every angle.

Picture3

Picture4

Let your imagination run wild. Think outside the box. Try using stainless steel molds in new ways. You’ll be surprised how easy it is to make interesting and unique shapes. Through the process you’ll enjoy renewed excitement and thrilling new sculptures. The possibilities are endless. Get fusing!

9 Sculptural Fused Glass with Lisa Vogt video cover - Copy

Wonderous, is from my Sculptural Fused Glass Video.

Happy fusing!
Lisa

Follow my blog for more tips and tricks!

YouTube http://www.youtube.com/watch?v=dhOifd7wukk
Facebook www.Facebook.com/LisaJVogt

Twitter https://twitter.com/lisajvogt

Instagram https://www.instagram.com/lvogt_originalsinglass/

2 Currents

Last Chance to Register, 1 Seat Left

Sculptural Fused Glass, 4-Day, Hands-on Workshop

October 15-18, 2019

Register www.lisavogt.net

Wesley Chapel, Florida, 4-Day, Hands-on, Class size is limited.

In this class I’ll show you all the pro tips and tricks I use to make stunning 3-dimnesional art. You’ll learn how to combine advanced techniques in new ways to create extraordinary sculptural pieces.

All skill levels can attend. Beginner, intermediate and advanced students alike will learn how to advance their glass fusing skills and expand their artistic style.

Materials are included. That’s a $150.00 value! Plus, a professional photo shot of your artwork is also included.

You’ll leave class with several completed glass sculptures, my custom firing guides and a deeper understanding of sculptural fused glass fabrication. You’ll have the knowledge, confidence and inspiration you’ve been craving to take your artwork to the next level.

IMG_7299

Creative Slumping Webinar

November 19, 2019

https://www.glasspatterns.com/glass-patterns-quarterly-store/product/1240-creative-slumping-with-lisa-vogt-november-15-2018.html

In this detailed Webinar, I’ll reshape the way you slump and drape glass. See how thinking outside the box and using readymade molds in new ways offers numerous and exciting opportunities to produce unique forms.    

You’ll learn how to make your own graceful, free-form shaped molds from readily available materials with no laborious measuring or messy mixes needed. Taking you one step further, I’ll show you how to use these different approaches, in combination, to transform ordinary projects into inspiring, sculptural pieces of art!

Get it now! Start fusing today!
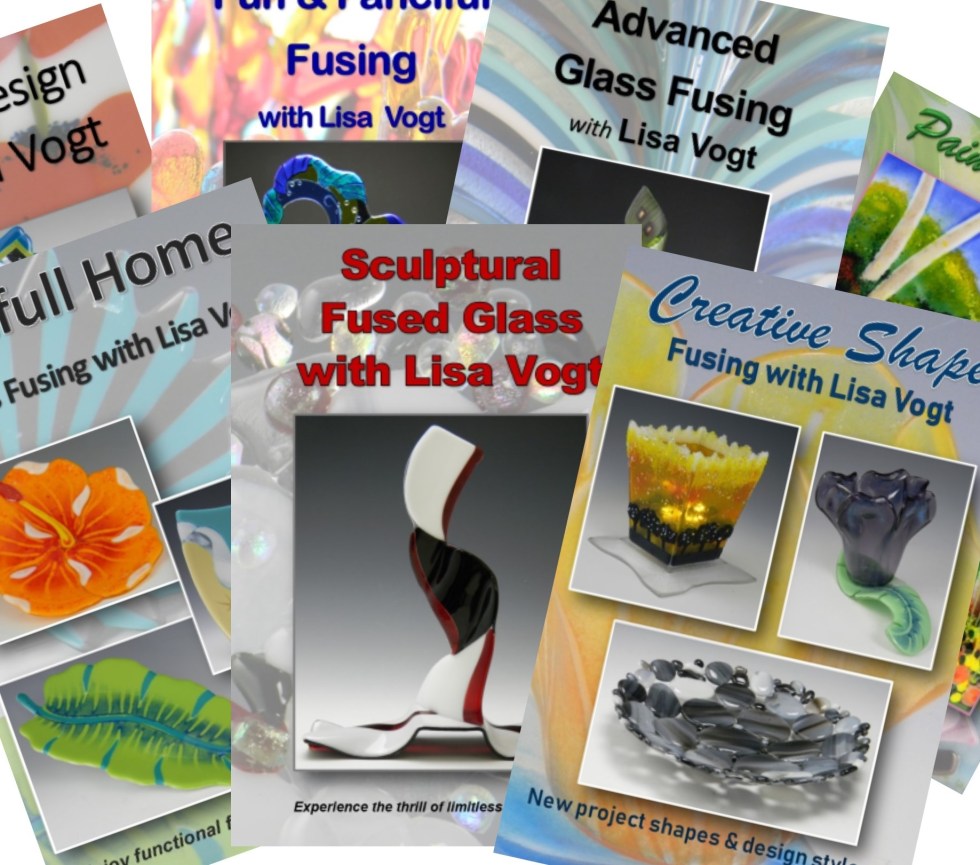
Video covers - Copy

Learn at home at your own pace. Instructional Videos are here!

Book covers


Pattern eBooks for every interest!

Picture3


Posted on — Leave a comment

Advanced Glass Fusing – 3 Pro Tips to Take Your Artwork to the Next Level

Golden Aspen
Golden Aspen from Breaking Through Video

Advanced fusing is a broad term. What does it mean to advance?

Advancing is moving beyond your current skill level. It’s challenging your abilities and developing your talent and learning how you can make exceptional artwork that exceeds everyone’s expectations.

If this sounds like a huge insurmountable task or an unrealistic goal for you, you’re not alone. Compressed into one sentence, the enormity of advancing ones craft can be a daunting motivation crusher. But don’t worry. Once we break down the steps you’ll be primed, ready and truly excited about taking action.

Here are three top tips pros use to break through and make exhibition quality art.

Farytale Forest 2
Fairy Tale Forest from Painting with Frit DVD


  1. Be a Master of Color.

Color plays an important role in the effectiveness of your art. The colors you select convey your message. You, as the artist have the power to swing the viewers mood from tranquil, bright and cheery to thought-provoking, stirring and stormy. When planning a new project, I consider what type of impression I want to leave and then select colors that support that intention. Reds are active and emotional. Blues are soothing, they suggest tranquility. While yellows represent happiness and contentment. Choose your colors carefully and then use them with purpose to draw the viewer into your magical world.

Moss
Moss, from Advanced Glass Fusing Video
  1. Pick A Pattern.

Including patterns in your art is an essential way to increase the visual intricacy and attractiveness of your artwork. The idea is to capture interest and hold it as long as possible. Patterns add dimension which increases interest. This entices the viewer and engages them longer. Pattern also shows an increase in artistic exploration and creative skill on your part, and that always gets noticed.

Patterns can be simple and geometric or intricate and organic. I decide how to use pattern based on the artistic style I’m going for. For traditional designs, I like to use structured, linear patterns that illustrate organization and planning, while contemporary designs are great places to use free-flowing patterns. In effect they increase the visual movement throughout the artwork. Whatever style you chose, pattern adds drama that increases the visual quality of any piece.

3
Black Tie, from Sculptural Glass Fusing Video
  1. Go Sculptural.

Shape up. The fastest and simplest way to ramp up your artwork and advance to the next level, is to create a unique shape, and go sculptural. Sculptural pieces always have higher visual impact that translates into an increased perceived value. This is the key to taking your work from a craft or a hobby to the threshold of fine art. We are so fortunate to be working with a medium that we can manipulate and shape any way we want. Take advantage of that and you can transform ordinary into the extraordinary.

Try using slumping molds in different ways. I combine molds to build unique shapes no one else has seen. Or I fuse several small pieces and then glue them together to create a freestanding, three dimensional tower. You can do it too. Start small. Then as you gain confidence go bigger and more elaborate.

The key difference between making ordinary pieces and repeatedly producing one-of-a-kind original art is planning.

When it’s time to make something new and exciting I begin by asking myself, what style do I want to create. Then I consider what mood the art should provoke and select an appropriate color palate. Then I layout a pattern that will reinforce my selected style.  My next step is to plan what form the finished artwork will take. I ask myself, how can I manipulate the shape of the glass and display it in a unique and unexpected way that will be amazing? Then I begin the process of construction.

I don’t always have all the answers at the beginning. But I do follow my original plan to its natural end. Often, new directions present themselves during fabrication, but I stay true to my original plan. I’ll take notes on the new possibilities and revisit them later with my next new undertaking. Sometimes deviations are inevitable, like when an idea or technique fails to produce the results I had hoped. Then I go back to the first three tips listed above, regroup and forge ahead.

I hope this insight helps you overcome obstacles so you can make the art of your dreams.

Big Thanks!

I wanted to take a moment to tell you I appreciate your time and your dedication to your art. If you’re here reading this blog every week you are growing artistically and your participation in our community makes it better for all of us.

Wherever you are in your artistic journey, you’re doing a great job! Keep going. Never settle. You are an amazing talent. Shine on!

Happy fusing!
Lisa

Follow my blog for more tips and tricks!

YouTube http://www.youtube.com/watch?v=dhOifd7wukk
Facebook www.Facebook.com/LisaJVogt

Twitter https://twitter.com/lisajvogt

Instagram https://www.instagram.com/lvogt_originalsinglass/

IMG_7299

Creative Slumping Webinar November 19, 2019

https://www.glasspatterns.com/glass-patterns-quarterly-store/product/1240-creative-slumping-with-lisa-vogt-november-15-2018.html

In this detailed Webinar, I’ll reshape the way you slump and drape glass. See how thinking outside the box and using ready made molds in new ways offers numerous and exciting opportunities to produce unique forms.    

You’ll learn how to make your own graceful, free-form shaped molds from readily available materials with no laborious measuring or messy mixes needed. Taking you one step further, I’ll show you how to use these different approaches, in combination, to transform ordinary projects into inspiring, sculptural pieces of art!

Watch it NOW! Start fusing today!

Video covers - Copy

Downloadable instructional videos for every skill level.

Book covers

Check out my eBooks for elegant patterns and detailed fusing instructions. 

Envy 1
Envy, from Advanced Glass Fusing Video


Posted on — 2 Comments

Strawberry Farm Plank Bowl How-to

11 Strawberry Sensation 1

10” x 10”

Dish up sweet fun with this refreshingly fun wood tone berry bowl.

Breaking free from the ho-hum square is easy when you start thinking beyond the limitations of four straight sides. The fastest and easiest way to jazz up any project is to give it a unique shape. The shape doesn’t have to be super complex to get attention. Just add a little unexpected something to the edge and you’ll have a project that everyone admires.

The bulk of my projects are assembled on a single, solid base layer of clear glass. The second, design layer is usually made up of pieces that create a pattern. The third layer is minimal and made with a few accent pieces. This type of construction is convenient because I can comfortably put the project together on my worktable and then simply carry it to the kiln when it’s ready to be fired. It’s a quick easy way to build strong pieces, but the straightforward perimeter shape can lack originality.

For this project we’re going to break tradition and shake things up with an irregular edge that flatters our sweet strawberries. In this type of construction, the base layer and the design layer are both made up of multiple pieces. What makes this project even more unique is that we’ll use the same pattern to make both the base and design layers. We simply cut the base layer out of clear glass and the second layer out of a warm colored streaky glass that mimics aged wood.

Strawberry Fields Forever

To make this project, the clear base layer is cut and assembled on a primed, or shelf paper lined, kiln shelf. The design layer is cut and then turned 90 degrees, so the glass overlaps the breaks in the base layer. It’s then stacked on top of the base layer.

Now for the sweet part. The red strawberries and green leaves are cut according to the pattern. They’re ground to improve the rounded shapes. The strawberry’s seeds are detailed by applying black paint with a fine applicator tip. Next, the berries and leaves are arranged on top of the brown glass.

Strawberry Fields Forever 2

For added color and a nice linear detail I bent yellow stringers in a candle. The stringers represent a wild vine. I bent them and placed them so they would frame the bowl.

Bending stringers is fun and easy. The trick is to hold the stinger in the candle flame and apply a little pressure until the glass bends. Then move the stringer through the flame until you have a shape you like. Keep in mind, the stringer will be hot within an inch of the flame. And, it’s a lot hotter than you think, and a lot longer than you think it should be. I bend a bunch and set them aside, so I’m not tempted to pick the bent stringers up before they’re cool to the touch.

12 Strawberry Sensation 2


The bent stringers are sized by snapping them by hand. The pieces are then arranged decoratively around the berries. The assembled glass is full fused and then slumped in a square mold.

Fusing Guide

Segment 1: Ramp 300 F/hr to 1300 and hold 30 min.

Segment 2: Ramp 500F/hr to 1465 and hold 10 min.

Segment 3: Ramp 9999(AFAP*) to 960 and hold 40 min.

Segment 4: Cool to room temperature.

*As fast as possible

Slumping Guide

Segment 1: Ramp 300 F/hr to 1265 and hold 10 min.

Segment 2: Ramp 9999(AFAP*) to 960 and hold 40 min.

Segment 3: Cool to room temperature.

*As fast as possible

NOTE: Kilns fire diffidently. Test fire these guides in your kiln and then make adjustments as needed.

Oceanside Glasstile Compatible Glass

100SF Clear for the Base Layer

60-5005-96-4 Chocolate & White Streaky for Design Layer

60-2503-96 Red Opal for Strawberries

60-755-96-4 Green Opal for Leaves

Yellow stringers for Vines

I used black Glassline Lining and Shading Material to make the strawberry seeds.

You got this!

Happy fusing!

Lisa

Follow my blog for more tips and tricks!

YouTube http://www.youtube.com/watch?v=dhOifd7wukk
Facebook www.Facebook.com/LisaJVogt

Twitter https://twitter.com/lisajvogt

Instagram https://www.instagram.com/lvogt_originalsinglass/

I’m offering a 4-day workshop with a focus on sculptural fused glass. You’re invited to join me and take your fused glass to a sculptural level.

2 Currents

Sculptural Fused Glass, 4-Day, Hands-on Workshop

October 15-18, 2019

Register www.lisavogt.net

Wesley Chapel, Florida, 4-Day, Hands-on, Class size is limited.

This class is for you! Any skill level can attend. Beginner, intermediate and advanced students alike will learn how to advance their glass fusing skills and expand their artistic style.

In this class I’ll show you all the pro tips and tricks I use to make stunning 3-dimnesional art. You’ll learn how to combine advanced techniques in new ways to create extraordinary sculptural pieces of art.

But it’s so much more than that! You’ll get personal instruction. I’ll show you pro tips and tricks to improve your glass cutting. We’ll mix different fusible materials.

On day 1 you’ll make a free flow. You’ll be firing your first project before lunch. Learn how to use Skutt’s Touchscreen Controller and the KilnLink app. Then you’ll design and cut glass for a combed piece.

On day 2 you’ll comb molten glass and weave glass. You’ll love the personalized class structure. You get to pick your own glass colors and get to choose the style and shape of the sculptures you make. I cater the class to each individual student’s skill level, plus their unique needs and artistic goals. I have 35 years’ experience teaching glass art. It’s what I love to do.

On day 3 you’ll design, build and fire your sculptures. You’ll also slump components for complex pieces. I’ll show you how to use slumping molds in new ways to create unique shapes.

On day 4 you’ll put your slumped components together and learn how to photograph your art. In this hands-on class you’ll learn how to load, program and fire kilns. You’ll fuse, slump and tack glass together. Plus, learn how to make graceful glass stands to display your pieces of art.

You’ll love the stunning three-dimensional results you get from combining all these concepts.

Materials are included, that’s a $150.00 value! Plus, a professional photo shot of your artwork is also included.

You’ll leave class with several completed glass sculptures, my custom firing guides and a deeper understanding of sculptural fused glass fabrication. You’ll have the knowledge, confidence and inspiration you’ve been craving to take your artwork to the next level.

Come to my glass studio and we’ll make beautiful sculptural art together. This is the turning-point workshop you’ve been waiting for.

Join me October 15-18, 2019 and we’ll get fired up!

IMG_7299

Creative Slumping Webinar

November 19, 2019

https://www.glasspatterns.com/glass-patterns-quarterly-store/product/1240-creative-slumping-with-lisa-vogt-november-15-2018.html

In this detailed Webinar, I’ll reshape the way you slump and drape glass. See how thinking outside the box and using readymade molds in new ways offers numerous and exciting opportunities to produce unique forms.    

You’ll learn how to make your own graceful, free-form shaped molds from readily available materials with no laborious measuring or messy mixes needed. Taking you one step further, I’ll show you how to use these different approaches, in combination, to transform ordinary projects into inspiring, sculptural pieces of art!

Video covers - Copy

Watch it NOW! Start fusing today!

Downloadable instructional videos for every skill level.

Book covers

Check out my eBooks for elegant patterns and detailed fusing instructions. 

11 Strawberry Sensation 1


Posted on — Leave a comment

Festive Fall Pumpkin How-to

1

What better way to usher in Autumn and welcome the bountiful harvest of Fall than with a spicy pumpkin bowl? And this tasty treat is so fast and easy to bake you’ll be tempted to fuse up an entire field full. Don’t let the subtle shading and intricate details of this piece fool you into thinking this project is time consuming. The beauty of this seasonal bowl is the speed and ease at which you can bring a rich combination of materials together to make a striking arrangement.

To make this elegant pumpkin bowl draw a 10 ½ inch circle on paper. Give your pumpkin shape be adding a few curves to the top and bottom of the circle. Using the pattern as a guide, cut layer 1 out of Marigold. Cut a second piece of glass, for layer 2 the same shape and size out of Yellow patterned glass. Cut a stem shape out of opal green glass for layer 3. Grind the cut pieces and test the fit for accuracy. After grinding, be sure to clean and dry all the ground glass pieces. I use plain water and a cotton towel. A single edge razor blade works well to remove any stubborn glue or paint based marker.

2

Create lush shadows and contours with frit.

Use a sifter to apply an even layer of red powder frit on top of the marigold layer. Concentrate the frit and make gradual curved lines that accentuate the plump roundness of a vine ripened pumpkin. Use a small, dry paint brush to perfect your curves. Stack the yellow pattern glass on the frit coated marigold base. Add the green stem and fuse. Slump the fused glass in a shallow mold.

3

Note: The finished size of this delightful pumpkin bowl is 10 ½ inches. The fused glass is slumped into a shallow 11-inch ceramic mold. You can make the pumpkin larger or smaller to fit any size or shape mold you have.

4

Fusing Guide

Segment 1: Ramp 300 F/hr to 1300 and hold 30 min.

Segment 2: Ramp 500F/hr to 1465 and hold 10 min.

Segment 3: Ramp 9999(AFAP*) to 960 and hold 40 min.

Segment 4: Cool to room temperature.

*As fast as possible

Slumping Guide

Segment 1: Ramp 300 F/hr to 1265 and hold 10 min.

Segment 2: Ramp 9999(AFAP*) to 960 and hold 40 min.

Segment 3: Cool to room temperature.

*As fast as possible

NOTE: Kilns fire differently. Test fire these guides in your kiln, adjust as needed.

Pumpkin Patch Bowl, 10 1/2 Inch

Oceanside Glasstile Uroboros Glass – System 96®

Marigold Opal, 60-355-96, 1 Sq. FT. for Base

Yellow Stringer & Frit on Clear, 13-2602-96, 1 Sq. Ft. for Top

Oasis Green Opal & Dark Green Opal, 60-77-96, Scrap for Stem

Cherry Red Transparent Frit, F1-151-96, Powder

Supplies Dust mask, sifter, 11-inch slumping mold

Check out the Pumpkin Patch Bowl Video! Pumpkin Patch Bowl Video Tutorial https://www.youtube.com/watch?v=VgeNgieip6Y

Happy fusing!

Lisa

Follow my blog for more tips and tricks!

YouTube http://www.youtube.com/watch?v=dhOifd7wukk
Facebook www.Facebook.com/LisaJVogt

Twitter https://twitter.com/lisajvogt

Instagram https://www.instagram.com/lvogt_originalsinglass/

Interwoven

Now Registering!

Sculptural Fused Glass, 4-Day, Hands-on Workshop

October 15-18, 2019

Register www.lisavogt.net

Wesley Chapel, Florida, 4-Day, Hands-on, Class size is limited. Register today!

Exceed your expectations!

This workshop is ideal for ambitious glass fusers determined to go bigger and explore more in-depth kiln forming techniques! Join me in this comprehensive, 4-day workshop and enjoy, one-on-one instruction, step-by-step guidance to develop your own design style and an individualized project program – make what inspires YOU!

This class is for you! Any skill level can attend. Beginner, intermediate and advanced students alike will learn how to advance their glass fusing skills and expand their artistic style. You’ll love the creative momentum you gain from working four consecutive days.

Materials are included, that’s a $150.00 value! Plus, a professional photo shot of your artwork is also included.

You’ll leave class with several completed glass sculptures, my custom firing guides and a deeper understanding of sculptural fused glass fabrication. You’ll have the knowledge, confidence and inspiration you’ve been craving to take your artwork to the next level.

IMG_7299

Creative Slumping Webinar

November 19, 2019

https://www.glasspatterns.com/glass-patterns-quarterly-store/product/1240-creative-slumping-with-lisa-vogt-november-15-2018.html

Reshape the way you slump and drape glass!

See how thinking outside the box and using readymade molds in new ways offers numerous and exciting opportunities to produce unique forms. Learn how to make your own graceful, free-form shaped molds from readily available materials. Learn how to use these different new approaches, in combination, to transform ordinary projects into inspiring, sculptural pieces of art!

You’ll learn how to make your own graceful, free-form shaped molds from readily available materials with no laborious measuring or messy mixes needed. Taking you one step further, I’ll show you how to use these different approaches, in combination, to transform ordinary projects into inspiring, sculptural pieces of art!

Video covers - Copy

Watch it NOW! Start fusing today! Downloadable instructional videos for every skill level.

Book covers

Check out my eBooks for elegant patterns and detailed fusing instructions.

1

Posted on — 2 Comments

It’s 5:00 Somewhere. Let’s celebrate!

179

Introducing Ocean Paradise an Art Glass Mosaic Doghouse

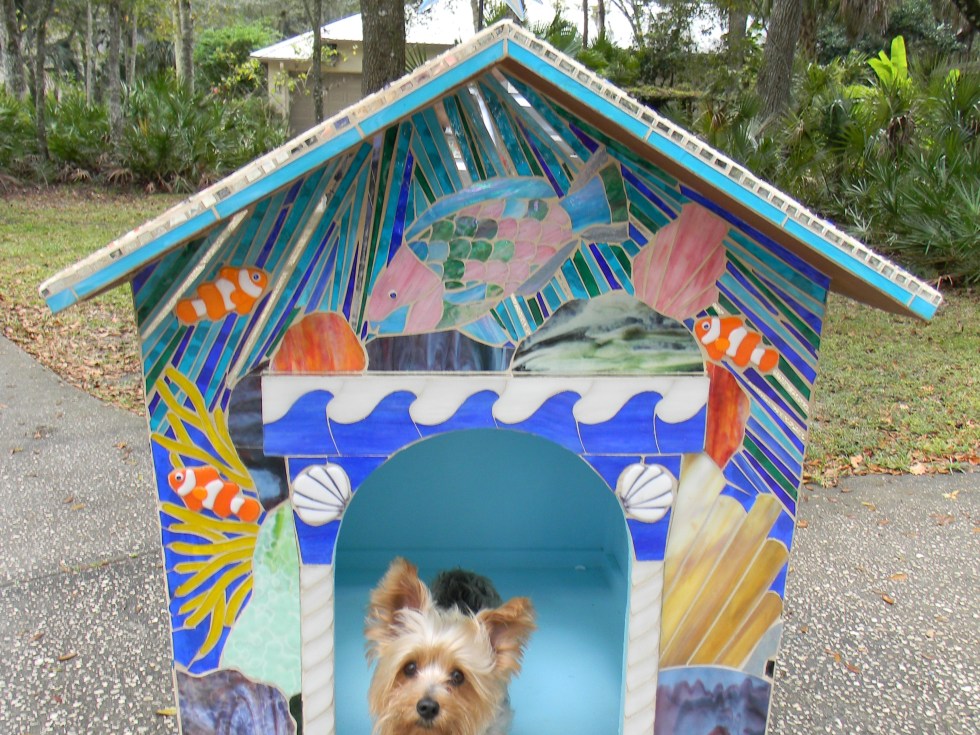
Finally, the day I’ve been looking forward to for months is here! I’m unveiling the large scale mosaic project you’ve seen close up, teaser pictures of for months. Ocean Paradise is a full size, functional doghouse covered with an art glass mosaic design. It was made for the Outdoor Arts Foundation, BowWow Haus Tampa II. The doghouse is on public display and will be sold to benefit the Outdoor Arts Foundation.

As the saying goes, pictures are worth a thousand words. Here are some fun facts and images of the construction and fabrication of the doghouse. Enjoy!

1

Outdoor Arts Foundation

Presents

BowWow Haus Tampa II

Ocean Paradise Dog House

Designed and built by Lisa and Joe Vogt

Medium, Wood Frame and Art Glass Mosaic

Dimensions 3’ x 4’ x 4’

207


Ocean Paradise Fun Facts

It took hundreds of hours to decorate the dog house with the stained glass mosaic. The project took us 8 months to complete. The ocean was my inspiration for the mosaic designs. The front gateway design was inspired by the lost city of Atlantis.

Joe built the sturdy plywood substructure with his amazing wood working skills. The house is made with 1” x 2”, 1” x 8” boards and ½” thick plywood, so it would be strong and light weight. The feet were made with 2” x 8” pressure treated boards to improve longevity if it’s ever displayed outside.

47

There are more than 75 square feet of stained glass on the dog house. Each piece of glass was hand-cut one at a time. There are thousands of pieces of art glass in the mosaic design. Some of the beautiful glass used to make the mosaic is no longer available.

Family and friends helped me cut and glue glass on the wood frame. Everyone who worked on the dog house said they had fun. Some of my helpers had never cut glass before. With a little coaching, they did a great job!

116

I’ve always loved hidden picture drawings. I wanted to give the viewer different treasures to discover on every side of the dog house. I designed different subjects on each side to keep the fabrication fun and engaging. An iridized green moray eel swims on the back side. There’s a small sting ray on the side with the mermaid.

I drew some of the designs on the computer and then transferred them to the wood frame. The octopus celebrates a stunning sunset with a flashy dichroic martini glass.

101

Thanks to watermelon martinis, the mermaid’s scales were glued on upside down! The next day, I scraped each scale off and re-glued them the correct way, and then celebrated with another martini.

80

It took days to cut and layout the glass strips to make the subtle color transitions on the roof of the dog house. One side of the roof is a beautiful sunset. The other side of the roof is twilight, complete with an exotic ripple textured glass moon.

205

The clown fish, sea turtle, and dog weather vane are fused glass. The clown fish turned out so cute, I almost didn’t use them. I wanted to keep them for myself. But they added so much to the design I had to include them.


The dog weather vane is made out of CBS 270dichroic glass. Did you notice the cute heart design on his chest? The dynamic weather vane also turns.

The glass was glued onto the wood substructure one piece at a time with clear caulk. We used four tubes of caulk. The background glass pieces were custom cut and glued to fit around the fish, mermaid, and octopus.

69

A silver thread of mirror winds around the dog house, visually connecting all of the sides. The hibiscus flowers are made with pink iridized glass. There’s a cute window box with sea weed growing out of it on the back side.

It took five pounds of grout to seal the stained glass mosaic. It took 6 hours to grout and clean the dog house. The finished dog house weighs about 100 pounds.

6a

I signed the artwork on a piece of glass near the front door with a diamond bit and Dremel. I don’t have a favorite image in the design. I love everything! We spent many fun, family nights and weekends cutting and gluing glass.

203

Pictures don’t do Ocean Paradise justice. The live, in person 3-D experience is amazing, almost overwhelming. I took thousands of process pictures. It took hours to sort and arrange the images. It was easier to cut pictures of my kids than pictures of our pets.

9

After so much time and effort, it’s not hard to see it go. I’m happy the rest of the world will now be able to enjoy our dog house as much as we enjoyed making it.

4

Why did I do it? I love new creative projects, sharing the beauty of art glass and making people smile. I enjoy inspiring others to wonder and explore their potential for giving their own gifts generously. It’s not much, but I hope my art makes a positive impact and brings a little magic to everyone who sees it.

273

Ocean Paradise was made for the Outdoor Arts Foundation, BowWow Haus Tampa II.

Ocean Paradise is my second full size, functioning mosaic dog house. Tropical Retreat was my first BowWow Haus mosaic dog house. It was built in 2003.

Thank you to Jay Gould at the Outdoor Arts Foundation for inviting us to participate in the BowWow Haus Tampa II project. Thank you to our sponsors, Jay’s Aunt Rochelle and Uncle David.

283

Special thanks to my family and friends who generously helped me with the doghouse. Joe and Niki Vogt, Jessie and Jake Battin, Kelly and Emily Miller, Tony Varandas, Elise Hardesty, Caitlyn Ward, Barb Chenowith and Jonathon Amerman.

Thank you to our furry family who supervised the entire project beginning to end. Trixie, Titan, Tyke, Natsu and Lucy. Special thanks to Titan for being a very patient doghouse model. He earned extra cookies.

Ocean Paradise is currently on display at the Reeves, Volkswagen showroom in Tampa, Florida.

For more information about the Outdoor Arts Foundation visit. https://www.outdoorartsfoundation.org/

To see more fun process pictures, check out the construction and fabrication video here.

Cheers!

Lisa

Follow my blog for more tips and tricks!

Artist Website www.LisaVogt.net
YouTube http://www.youtube.com/watch?v=dhOifd7wukk
Facebook www.Facebook.com/LisaJVogt

Author Website https://lisajvogtcom.wordpress.com/

Twitter https://twitter.com/lisajvogt

Instagram https://www.instagram.com/lvogt_originalsinglass/

3

Sculptural Fused Glass, 4-Day, Hands-on Workshop, October 15-18, 2019

I’m offering a 4-day workshop with a focus on sculptural fused glass. You’re invited to join me and take your fused glass to a sculptural level. Register www.lisavogt.net

Wesley Chapel, Florida, 4-Day, Hands-on, Class size is limited.

IMG_7299

Creative Slumping Webinar, November 19, 2019

https://www.glasspatterns.com/glass-patterns-quarterly-store/product/1240-creative-slumping-with-lisa-vogt-november-15-2018.html


Video covers - Copy

Videos for every skill level and interest.

Book covers

Pattern eBooks for fun, easy to make fusing patterns.

179