


It’s amazing how much art and engineering have in common. Art concepts are born from a small spark. But it takes hot, burning desire, coupled with ingenuity, to actually transform such obscure ideas into physical reality.

I’ve been making fused glass sinks for years. In the beginning, I constructed them using the layered method. This type of construction has a beautiful, round finished edge when the fused glass comes out of the slumping mold.

It wasn’t long before I expanded my techniques and started building sinks using the cast method. This sink style is much thicker. The glass comes out of the mold with a slightly textured edge. This type of sink construction requires grinding and polishing to make the thick sink edge smooth and shiny.

I recently shared how to construct a sink with a Sailboat design. Here, I’m going to focus on drilling a drain hole and finishing a thick sink edge. This Poppy sink is made with the cast method, which simply means the glass has a thick profile. I create the thickness by containing mosaic size glass pieces with a 1 inch wide strip of 1/8 inch thick fiber paper. I built this sink on a primed fiber board kiln shelf. The fiber paper is held in place with U shaped copper wire pins pressed into the fiber board kiln shelf. After fusing, the fiber paper leaves a slight texture in the edge of the fused glass disc. My conservative sink slumping temperature isn’t hot enough to polish the edge. Therefore, the edge has to be cold-worked to achieve the professional quality shine that makes this sculptural sink style so appealing.

But first let’s drill the drain hole.

You can drill first or grind and polish first. It doesn’t matter which step you do first, they both have to be done. We use a variable speed drill along with a core drill and hone to cut the drain hole in the glass sink. I line the inside of the sink with a piece of contact paper with a drain hole size circle cut out of the middle. The vinyl protects the glass from scratches if the drill bit accidentally slips. We start at a slight angle and then gradually bring the drill upright. It takes a few minutes to drill through the glass. We take our time. Patience is our friend here. After the hole is drilled the next step is to countersink the opening to accommodate a strainer drain. The drain should sit below the glass on the inside of the sink. This ensures the water drains properly. Again, we take our time and test the drain assembly often to ensure a good fit.

Grinding and Polishing the Sink Edge
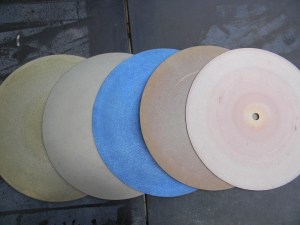
In my studio we use a 12 inch machine with a variable speed motor and adjustable water feed. We use five different discs. We start by adjusting the water feed so the glass and grinding wheel are constantly wet. The first disc is a 100-diamond disc. We use this course disc to quickly remove material and level the sink edge. Once the edge is level, we switch to a 260-dianmond disc. This lighter disc removes the scratches left behind by the 100 grit disc. When the edge is uniform, we switch to the blue-mesh disc. This disc removes fine scratches in the sink edge. Once satisfied with the edge quality, we use the brown-mesh disc. This pre-polish disc further smooths the edge. Once the edge quality is uniform, we move on to the felt wheel. We us this disc along with a polishing compound to create a deep, lustrous professional quality shine.

This is a simplified introduction to a process that requires practice and patience to master. That said, it’s also a process that I find very relaxing and therapeutic. A lot of my studio time is spent deep in thought designing new pieces of art. Whereas, grinding and polishing is a relaxing mechanical process that requires little brain power. I like to switch between the different types of tasks to really enjoy my time in my studio. Think of cold-working as another way to expand your creativity and advance your artistic style. Hopefully, I’ve given you enough information to tempt you to explore and take new directions with your art.

Here’s how to make the glass sink polishing stand we used to support the sink while grinding and polishing.
Sinks are advanced projects that involve a considerable amount of time to construct, a sizable amount of material and a skilled craftsman to complete successfully. When it comes time to cold-work your masterpiece, you want to feel confident that the job will go smoothly. And so it was our intention, to build consistency into this otherwise unstable task. That’s why we modified a readily available carpenter’s roller stand, into a customized sink support/guide that would provide us with reliable results time after time.

If it worked for us, it’ll work for you.
This new, re-purposed tool significantly streamlined my workflow and improved my success rate. Here’s how you can make your own sink stand/guide.
Start with your standard, home improvement store variety roller stand. Remove the metal roller. It comes off easily by depressing two buttons, one on each end of the roller. The mechanism works similar to toilet paper roll holder. Cut a 2” x 2” block of wood to fit between the uprights. Secure the wood in place with wood screws, one on each end.
Cover the surface of the wood with a strip of nylon, like the white cutting board used in your kitchen. The nylon holds up longer than the bare wood and it won’t scratch your glass as the edge becomes polished. Hold the nylon strip in place with two wood crews.
Be sure to countersink the screws so they don’t come in contact with or damage your glass. Pre-drill two holes for the dowels behind the nylon strip. Press two hardwood dowels into the holes in the wooden base. These dowels serve as stops that help you maintain a consistent distance from the grinding wheel throughout the grinding and polishing process. Tip: Don’t glue the dowels in place. They wear out quickly, and therefore will need to be replaced every few sinks.
Once you have one of these stands, you’re certain to find multiple uses for it. So don’t hesitate to add this handy tool to the supply of tools in your studio.


Watch the drilling, grinding and polishing process here: https://youtu.be/exI2Rr7g2Ss

For detailed instructions and firing guides to make sinks check out my video, Fused Vessel Sinks available here: https://lisajvogt.com/product/fused-vessel-sinks-with-lisa-vogt-video-download/
Supplies
Roller stand
Wood screws
2” x 2” strip of wood cut to size
1”- 1 ½” wide strip of nylon cut to size
3/8” thick hardwood dowel cut to size
You got this!
Lisa
Follow my blog for more tips and tricks!
Website www.LisaJVogt.com
YouTube http://www.youtube.com/watch?v=dhOifd7wukk
Facebook www.Facebook.com/LisaJVogt
Twitter https://twitter.com/lisajvogt
Instagram @lvogt_originalsinglass
Instagram @through_the_artists_lens

New Webinar Date
Watercolor Techniques & Advanced Fusing Design with Lisa Vogt June 1, 2021
Register here: https://www.glasspatterns.com/glass-patterns-quarterly-store/product/1536-watercolor-techniques-advanced-fusing-design-with-lisa-vogt-june-1-2021.html
Learn how to make gorgeous, vividly decorated nature themed fused glass designs in this comprehensive webinar.
Master the art of design, pattern, and color.
Join me and I’ll show you how quickly and easily you can ramp up the visual intricacy of your work in just a few steps. I’ll share my personally developed, “watercolor style,” approach to shading and highlighting glass.
You will love the easy-to-follow instruction and seeing how to create elaborately detailed works of art with a gorgeous three-dimensional flair.
In this webinar you will learn how to use advanced artistic techniques like a pro. Beginner, intermediate and advanced fusers alike will enjoy applying the many simple, yet effective techniques I share in this in-depth, live event.
Plus, as a special bonus I include step-by-step instruction on how to use failed projects. I’ll explain in detail how to solve problems and how to ensure successful projects moving forward.
I also include my custom firing guides, project patterns and materials list in PDF form.
You will be fired up and eager to apply these new techniques to enhance the beauty and charm of your work.

Next Available Date!
Sculptural Fused Glass, 4-Day, Hands-on Workshop September 21 – 24, 2021
Register today! 4 seat available.
Register here!
Wesley Chapel, Florida, 4-Day, Hands-on, Class size is limited.
This is the turning-point workshop you’ve been waiting for.
It’s hard to describe what it’s like when I’m feeling the creative flow. Time flies. Hours pass in what I thought were minutes. My naturally distracted mind is focused on what my hands are doing, and nothing else. I get lost in my own world. When I return to reality, I feel rejuvenated and spiritually uplifted. That’s why I like sharing my studio space with others. I try to give them that experience and hope they feel the same inspiration and fulfillment I do. -Lisa
This class is for you! Any skill level can attend. Beginner, intermediate and advanced students alike will learn how to advance their glass fusing skills and expand their artistic style.
Join me and I’ll show you all the pro tips and tricks I use to make stunning 3-dimnesional art. You’ll learn how to combine advanced techniques in new ways to create extraordinary sculptural pieces of art.
You’ll leave class with several completed glass sculptures, my custom firing guides and a deeper understanding of sculptural fused glass fabrication. You’ll have the knowledge, confidence, and inspiration you’ve been craving to take your artwork to the next level.
Materials are included, that’s a $150.00 value!
Here’s what students from my February 2021 class are saying about the workshop.
“I feel I got the movement toward developing my own creativity this week. I was surprised that the things I already knew fit into the new knowledge I was getting in this class. Lisa is an excellent teacher who is tuned into what is going on in the class. She puts no pressure on the students when I know she could when we were dragging our feet. I was absolutely comfortable with the classroom set up and cleanliness of the studio. Will see you again soon.” -Judy
Here’s what the students from my November 2020 class are saying about the workshop.
“There is a wealth of material, tools and possible projects. Lisa is very motivating, informative, and supportive. The variety of materials is amazing. The number of projects we made in 4 days is beyond what I expected. The classroom set up was very well organized. I felt completely comfortable and safe with plenty of space and sanitizer. This class was beyond my expectations.” -Jane
“My favorite thing was Lisa’s knowledge and wealth of information. I was surprised by how many projects we made. I was very comfortable with the classroom set up and loved everything about this class. I learned so much and it was fun. My least favorite part was Friday at 4:00 pm.” -Liz
“My favorite thing about this class was the variety of glass and other materials. Unlimited dichroic! I was comfortable with the classroom set up; Lisa had lots of little personal touches that made it special. Thanks for the wonderful lunches!” -Gail
Student comments from previous classes.
“My favorite part about the class was the non-stop building and the generous amount of materials available. What surprised me about the class was how full the schedule was. Usually, you do 1 project. We did 5 in 4 days. Thank you so much for your generosity.” -Christine
“My favorite part about the class was the variety of projects we made. What surprised me was the number of projects we completed. Awesome experience – will come again in the future.” -Monica
“Instruction was clear, help was always available, and Lisa’s explanation of the equipment was great.” -Sherry
“My favorite thing about the class was the friendly atmosphere that encouraged open thoughts and sharing ideas.” -Lyn
“I enjoyed making all the projects, especially the flow piece and the freedom to be creative with our work.” -Joy
“My favorite thing about the class was the ability to see multiple pieces of art that originated from concepts taught.” -Vicki
“Lisa is very professional, knowledgeable and freakishly talented. House, art, mosaic, her work – really fun and beautiful.” -Lorna
“Incredible class. Lisa shared her artistic knowledge of color flow and her technical knowledge of glass.” -Larry
“I had so much fun! Lisa is a great teacher!” -Brenda
Artwear Designed for Artists by Artists Tell them how you really feel with bold T-shirts, Eco-conscience tote bags and sassy mugs.

Watch it NOW! Start fusing today!

Downloadable instructional videos for every skill level.

Check out my eBooks for elegant patterns and detailed fusing instructions.