Posted on Leave a comment

Turkey Candle Shelter or Flower Vase How-To

6โ€ x 8.5โ€

Let the festivities begin!

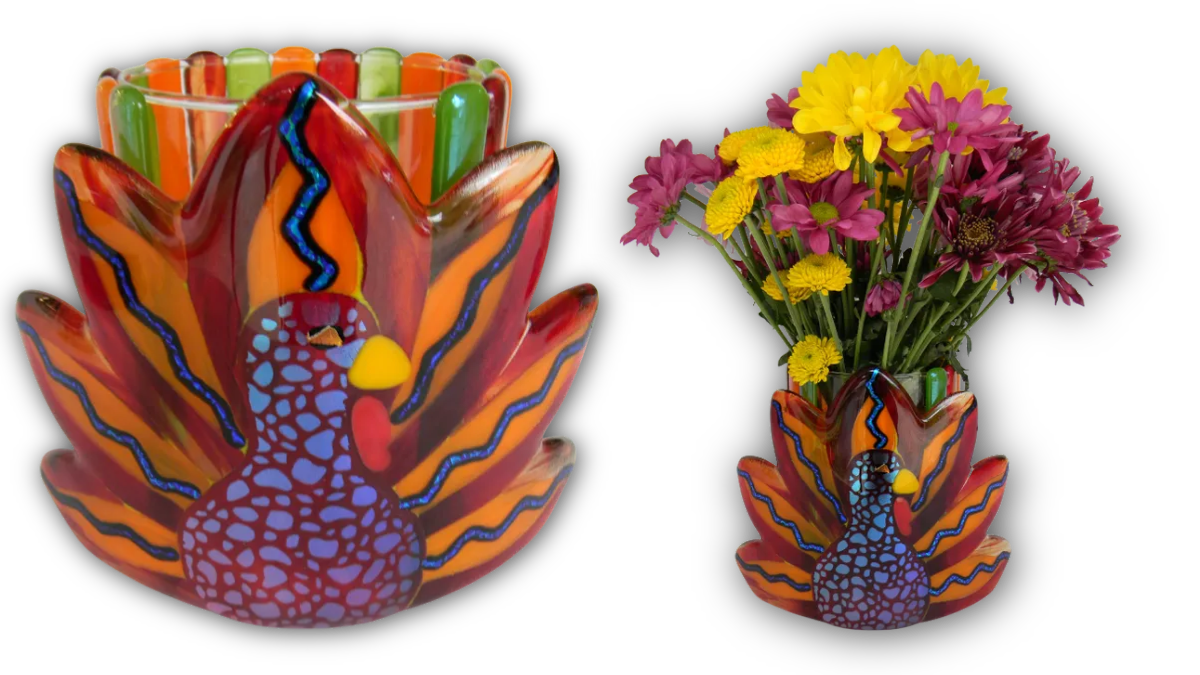
Fall is the season for celebrating family, friends and feasting. At my house, the dining room table is the center of attention at this time of year. Accordingly, I like to decorate the table with a special piece of art that brings cheerful energy to our gatherings. This brightly colored turkey is the perfect adornment for such joyous occasions. It may look complicated, but itโ€™s actually fast and easy to make.

To get started, cut out the paper pattern with scissors. To make the base, trace the turkey shape on clear glass with a marker. Cut as much of the clear glass as possible by hand. Use a glass saw to detail the inside cuts. The clear base layer can be made up of pieces if you donโ€™t have access to a saw. Grind the clear glass to remove sharp edges and improve the shape.

Add color.

For the colorful design layer, cut the pattern up with scissors. Affix the paper pieces to the appropriate colored glass with a glue stick. Cut the pieces as closely to the paper as possible. Cut a second turkey body out of patterned dichroic on clear. Then grind the cut glass pieces to improve the shapes and remove any sharp edges.

Place the clear base on a second pattern. Apply a small amount of fuserโ€™s glue to the clear base and then assemble the colorful design layer on top. Stack the dichroic body on top. Allow the glue to dry until the pieces are secure. If you move to the next step too soon, the glass pieces will slide around when you apply the frit. This causes blurred edges that I feel distract from the design.

Add detail.

Using a spoon, pour a small amount of fine frit onto the turkey. Work the frit down into any gaps with a paint brush. This step gives the finished artwork a nice added detail. I selected a complimentary yellow to highlight this bold color palate. When using this technique, I intentionally pick fine frit instead of powder. The excess fine frit is easier to clean off the surface of the project than powder which tends to stick.

Next add a dichroic dot for an eye and a yellow triangle for a beak. Now for a little bling. Nip wavy Firestrips to size and place them on the turkeyโ€™s feathers for a flashy zinger.

Assembly.

The assembled turkey is fused and then slumped over a barrel shaped mold. The slumped turkey is then glued to the front of the clear candle shelter. Colored fused glass strips cover the remainder of the clear candle shelter to give it a festive flare all the way around.

Using a strip cutter cut 16 strips total ยฝโ€ wide, 5 7/8โ€ long out of red, orange and green glass. Cut 16 strips of iridized clear the same size. Stack the clear iridized strips on the color strips.

Fire.

Fuse the turkey and strips to a full fuse temperature using the guide on my website. See the FREE Fusing Guides button below.

Slump the fused turkey over the ceramic mold. See the FREE Fusing Guides button below.

Glue the slumped turkey to the clear candle shelter with E6000 adhesive. Tape the fused glass to the clear shelter to ensure it doesnโ€™t slide off. Let the glue dry overnight.

Glue the fused glass strips to the remainder of the clear shelter. Tape them in place. Let the glue dry overnight.

Enjoy!

Double duty. This fancy turkey project can be used as a candle holder or a flower vase. Either way, itโ€™s a beautiful seasonal addition to any dรฉcor.

This Turkey pattern is available FREE on my website.

Follow my blog for weekly inspiration sent to your inbox! 

Happy Fusing!

Lisa

NEW Premium Video Course by Lisa


Posted on Leave a comment

Creative Slumping

The term creative slumping has a broad range of potential directions. Isnโ€™t that awesome! We have a huge array of handling techniques to feed our ever curious artistic spirit, and challenge our glass crafting skills. For me, creative slumping means taking ready-made molds and using them in ways that result in extraordinarily unique 3-dimensional forms. The great thing about this approach is that super simple ideas applied in combination often make the most exciting pieces of art.

How do you get started?

Itโ€™s about looking at your materials with fresh eyes. Because of past experience, you easily envision the outcome of using your favorite molds. But what happens if you place the fused glass on the mold in a different direction? Or maybe next time cut your glass in a different shape? Better yet, use two molds at the same time for a single project. How will that alter your results? The answers are in test pieces. 

Nothing goes to waste.

Clear glass is the least expensive glass. When Iโ€™m in the mood to experiment with creative slumping I start by planning my project shape. Then I cut that shape out of clear glass. I fuse two pieces of clear glass together, so I have the same thickness I would later when I transition to color glass. Then I test fire the fused glass over my mold configuration taking notes every step of the way. If my results are unexpected or undesirable I try again. Once I have the look I want, I repeat the process with color glass. I keep the clear glass samples that are successful for reference in the future. The ugly samples are broken into mosaic size pieces and used as filler in my cast projects.  

If I canโ€™t waste glass who can? 

I do a lot of testing. I figure if I canโ€™t afford to waste glass considering how much teaching I do, then who can? I cut the glass, fire the kilns, and make the mistakes, so you donโ€™t have to. Plus, Iโ€™m stubborn. I like a challenge. When a project goes wrong, it becomes a personal mission to figure out how to make it right. And I love sharing my processes and giving you the information needed to be successful the first time.

Thatโ€™s what my upcoming Creative Slumping, and Breaking Through videos are all about. Showing you step-by-step how I come up with my ideas and how I execute them. Plus, I share my project specific firing guides that Iโ€™ve developed and tested to ensure your success. If that isnโ€™t enough to convince you, the video projects are striking. Watching flat glass go from a lifeless single plane to a glistening, energetic sculptural work of art is amazingly satisfying.  

Check out my Creative Slumping and Breaking Through videos for more in-depth instruction.

Follow my blog for weekly inspiration sent to your inbox! 

If you enjoy reading my blog, I have a feature on my website youโ€™ll like. From the home page click on any page. On the side bar you can read my Top 10 Blog Posts. The list updates every 48 hours so check back often.

Happy Fusing!

Lisa

NEW Premium Video Course by Lisa


Posted on 1 Comment

Whatโ€™s the Difference Between Stained Glass & Fusing Glass

A YouTube follower asked this great question. In the past, we had a local stained-glass studio to visit. The owner/artists were generous with their knowledge and eager to share their passion for making lead-style glass, stained glass and fused glass art. You could drop into their store as a stranger. After a friendly visit youโ€™d leave with a sense of understanding and in awe of the many facets of glass art.  

In fact, many of us veteran glass artists, myself included, got our start with a 4-week beginner class at one of these treasured hubs of creativity.

Now glass fusing has a vibrant life of its own and sometimes the very history and story of how we all got here is lost. But like most great beginnings the tale is woven with wonder, amazement and inspiration.

To better understand, letโ€™s identify the different types of art glass.      

Art Glass

Art glass is an umbrella term used to describe decorative and colored sheet glass thatโ€™s used to create ornamental designs. This classification includes but isnโ€™t limited to; clear glass with texture and pattern, single color transparent glass, single color opal glass, wispy glass that has transparent and opal characteristics, plus a wide variety of specialty sheet glass that combines all the above.

Different types of art glass.

Clear glass with texture.

Clear glass with texture and pattern is great for making leaded glass front doors and sidelights. The sparkling combination is elegant and timeless. Clear glass allows light to flood the interior space while the texture provides privacy that plain window glass doesnโ€™t. Clear textured glass also pairs beautifully with beveled glass clusters in free-hanging leaded glass panels.  

Stained glass.

Stained glass refers to sheet glass with color. It can be transparent or opal or a combination of both. It may have some clear and some texture depending upon the individual product.

Technically stained glass isnโ€™t stained, which suggests that clear glass has a surface treatment like paint or dye to provide color. Instead, the color is produced by the manufacturer.

Metals and minerals are added to the clear glass batch at the molten stage to produce specific colors. The hot mix is stirred and then rolled into a sheet and slowly cooled. The blending and rolling processes distribute permanent color throughout the sheet of glass.

Stained glass is used to make decorative window panels. Designs can be geometric, pictorial or a combination of both. Sometimes the panels are custom built to size and permanently installed on site to provide decoration and privacy. Think of ornate garden tub windows.

Other times the panels are used to add a splash of color and a whimsical scene to a room. These pieces are often hung from a chain in a window where natural light brings them to life.

Skilled craftsmen make the panels by cutting stained-glass sheets up into pieces to match a pattern. Itโ€™s like cutting your own pieces for a custom puzzle.

There are two methods of assembly. The cut glass is held together with copper foil tape covered with solder. Or the panel is built using H shaped lead came thatโ€™s soldered together where the cut metal strips intersect. In both types of assembly, the panels are constructed by fitting shaped pieces of glass together side by side. The copper foil or the lead came become the skeletal structure. They bond the individual pieces to make one panel that can stand vertically and support itself.  

NEW Chaotic Symmetry by Lisa Vogt

Fusing glass

Fusing glass is made alongside stained glass by the same manufactures.

The difference is that fusing glass is specifically formulated and tested to be fusing compatible. Fusing glass is labeled tested compatible.

Why is this important?   

When we heat the glass in a kiln it expands. As it cools the glass contracts. Tested compatible glass expands and contracts at the same rate. This is crucial for successful fusing projects because we use the high heat of the kiln to bond the cut pieces together. Working with specific glass fusing material results in consistent, attractive, durable projects and artwork.

Fusing with incompatible glass will deliver inconsistent results, loss of time, waste of material, breakage and unnecessary disappointment.

Be smart.    

Organization is key. It’s good practice to store your different types of art glass so you wonโ€™t risk mixing materials. Label your fusing glass and keep it separate from your stained glass. Only work with one type of glass at a time to prevent accidental contamination.

The wonderful thing about working with art glass is the many ways we can utilize this medium to express our creativity. As you continue your artistic journey with glass write your own story of wonder and amazement.   

Follow my blog for weekly inspiration sent to your inbox! 

If you enjoy reading my blog, I have a feature on my website youโ€™ll like. From the home page click on any page. On the side bar you can read my Top 10 Blog Posts. The list updates every 48 hours so check back often.

Happy Fusing!

Lisa

NEW Premium Video Course by Lisa


Posted on Leave a comment

10 Tips for Better Glass Fusing Projects

1 Clean your glass before cutting it.

I use plain water and clean cotton towels. Avoid using cleaners or chemicals to clean your glass to prevent the introduction of contaminants that could react adversely with the glass.

2 Use the right tool for the job.

Streamline your project assembly, improve accuracy and reduce material waste with specialized tools. Use a strip cutter, circle cutter, wet saw and mosaic nippers when applicable for professional quality results.

3 Pick a color pallet and stick with it.

Be selective. Donโ€™t use every crayon in the box. Choose a specific combination of glass colors to create an impactful design that shows an elevated level of sophistication and professionalism.   

4 Use high contrast colors.

Selecting bold colors adds energy and excitement to your artwork.

Tree of Tranquility by Lisa Vogt

5 Include a focal point.

A focal point can be subject, shape or color related. A recognizable and relatable subject draws the viewersโ€™ attention and makes your art memorable.

6 Do your best work.

Accuracy matters. If you ask yourself, is this good enough? Itโ€™s not. Redo that part to make the most professional quality art you can. Spend the time to make sure your shapes are smooth, and your pieces fit together nicely.

Crystal Garden by Lisa Vogt

7 Design like a pro.

Assemble your projects to be both attractive and durable. Build your projects with two full layers of glass plus accents. This type of assembly ensures your project has uniform thickness throughout, smooth edge quality and an overall attractive appearance.    

8 Take your time.

Donโ€™t rush the firing process. If youโ€™re in doubt, fire your glass slower to ensure your project is successful. No peeking! You know who you are. After firing, let the kiln cool to room temperature before opening the lid.

9 Slump your project.

Slump or drape your flat fused glass to give it an interesting shape and unique form that increases the visual intricacy and graceful presence of your art.

10 Get creative with your display.

Make it sculptural. Create an attractive display that enhances the artwork. Give it lift so light passes through and illuminates the design.   

You got this!

Apply these tips and see a dramatic improvement in the quality and attractiveness of your fused glass art.

Follow my blog for weekly inspiration sent to your inbox! 

If you enjoy reading my blog, I have a feature on my website youโ€™ll like. From the home page click on any page. On the side bar you can read my Top 10 Blog Posts. The list updates every 48 hours so check back often.

Happy Fusing!

Lisa

Premium Video Courses by Lisa


Posted on Leave a comment

5 Reasons Why Pro Fuserโ€™s Take Notes

Being artsy and creating original art is exciting. It feeds the mind, body and soul with inner joy and peace.  

Glass fusing has broad appeal due to the ease at which plain sheet glass can be transformed into flashy pieces of art. Itโ€™s this facet that makes this medium attractive to artists and crafters who love hands-on immersion.    

But glass fusing is different from other mediums. Kiln operation and following firing guidelines make glass fusing science as much as art. Of course, you can ignore that reality. Stay in the safe zone, using pre-programed kilns and adhering to standard firing schedules. Copy and make the same reliable projects that everyone else is sharing. But the real exciting creations are inspired by re imagining the possible. To stretch your imagination and take your art to an all-new level of amazing, you must take your work more seriously.

Approach your hobby like a pro.

Get organized. The best way to master the technical aspects of science, and benefit from your process is to take notes of your work in progress. Once the technical aspects are under control, the artist is free to focus on the creative development of the art.

You argue, why stop the creative flow to take boring notes?

Hereโ€™s why the pros take notes.

1 Creative inspiration.

Weโ€™re human. We forget intricate details. Remembering the big, broad strokes is easy. Itโ€™s the tiny nuances that drift away like fluffy dandelion seeds on the wind. These seemingly insignificant concepts are what make your art your own, unique creations.

Pros take notes even when making routine pieces. They know that new design ideas come from recycling and reorganizing old tried and trusted design ideas. Often, my groundbreaking innovations are the product of combining an unlikely variety of tiny concepts. I pull minor techniques from previously made art and merge them to develop a single new creation.

Plus, if youโ€™re consistent and establish good note talking habits, youโ€™ll free up mind space previously dedicated to remembering your methods. This open-air gives new ideas room to live and grow.         

2 Find encouragement.

A notebook is black and white proof youโ€™re making progress. No matter how small, every entry is positive reinforcement that youโ€™re learning new things, trying new techniques and growing your creative style. Itโ€™s a tribute to hard work and an ego boost whenever you need encouragement to forge ahead.

Success is a terrific confidence builder. When you have a notebook full of great success stories it promotes cheerful production. At any time, you can flip through those messy pages and marvel over all the beautiful pieces youโ€™ve made.

Itโ€™s a thrill to revisit simple projects you thought youโ€™d outgrown. You remember how much fun it was to lose yourself in the creative zone and consider remaking old favorites for the joy of it. Thatโ€™s priceless.  

3 Build self-confidence.

By taking detailed notes of a projectโ€™s progress as its made, itโ€™s easy to repeat successful projects with confidence. I consult my notes when I want to quickly and easily repeat projects with accuracy.

Notes are also a great reference for new project development. With them I can plan new design directions knowing what outcome to expect from certain advanced techniques. This knowledge frees me to focus my full attention on creating a revolutionary new design.  

4 Learn from your mistakes.

Another, huge benefit to cataloging your methods is you can retrace your steps backwards when disaster strikes to pinpoint where things went wrong. Itโ€™s a valuable teaching tool you can use to learn from your mistakes. With notes you can efficiently repeat your successes and avoid failures in the future.

In my experience, taking notes drastically improves the overall quality and success of my projects. Documenting assembly and firing methods minimizes problems and gives me the self-confidence to experiment.  

5 Trail blaze new ideas.

Pioneering new design concepts is exciting and scary. When Iโ€™m commissioned to design original art, I consult my fusing notebook for guidance. I look up projects that are similar in size and thickness to the new job. I study projects that are larger and projects that are smaller. With that information, I develop a custom firing schedule for the new job. I write a program thatโ€™s conservative, to avoid breakage, and yet gives me the desired results I promised the client.  

Like you, I donโ€™t want to waste time, money or material on failures. We all want to start a project knowing that the finished artwork will bring our beautifully imagined vision to life. If it doesnโ€™t, the failure is devastating. By taking notes, you can approach new design ideas with greater confidence. By knowing the parameters that have worked successfully in the past, you can take on more challenging projects and enjoy success in the future.    

Pros make it a habit.

Taking notes is the best thing you can do to improve the quality and increase the complexity of your art. Good habits are as hard to break as bad habits. Form good habits.

Be a pro.

Follow my blog for weekly inspiration sent to your inbox! 

If you enjoy reading my blog, I have a feature on my website youโ€™ll like. From the home page click on any page. On the side bar you can read my Top 10 Blog Posts. The list updates every 48 hours so check back often.

Happy Fusing!

Lisa

Premium Video Courses by Lisa