What better way to usher in Autumn and welcome the bountiful harvest of Fall than with a spicy pumpkin bowl? And this tasty treat is so fast and easy to bake you’ll be tempted to fuse up an entire field full. Don’t let the subtle shading and intricate details of this piece fool you into thinking this project is time consuming. The beauty of this seasonal bowl is the speed and ease at which you can bring a rich combination of materials together to make a striking arrangement.
To make this elegant pumpkin bowl draw a 10 ½ inch circle on paper. Give your pumpkin shape be adding a few curves to the top and bottom of the circle. Using the pattern as a guide, cut layer 1 out of Marigold. Cut a second piece of glass, for layer 2 the same shape and size out of Yellow patterned glass. Cut a stem shape out of opal green glass for layer 3. Grind the cut pieces and test the fit for accuracy. After grinding, be sure to clean and dry all the ground glass pieces. I use plain water and a cotton towel. A single edge razor blade works well to remove any stubborn glue or paint-based marker.
Create lush shadows and contours with frit.
Use a sifter to apply an even layer of red powder frit on top of the marigold layer. Concentrate the frit and make gradual curved lines that accentuate the plump roundness of a vine ripened pumpkin. Use a small, dry paint brush to perfect your curves. Stack the yellow pattern glass on the frit coated marigold base. Add the green stem and fuse. Slump the fused glass in a shallow mold.
Note: The finished size of this delightful pumpkin bowl is 10 inch. The fused glass is slumped into a shallow 11-inch ceramic mold. You can make the pumpkin larger or smaller to fit any size or shape mold you have.
Follow my blog for weekly inspiration sent to your inbox!
If you enjoy reading my blog, I have a feature on my website you’ll like. From the home page click on any page. On the side bar you can read my Top 10 Blog Posts. The list updates every 48 hours so check back often.
We’re a chatty society. We favor T-shirts with funny sayings and wall art with inspirational messages written on them. It’s only natural to want to add a similar touch to your fused glass art. But creating text that’s attractive and legible in glass is difficult because the medium is bulky.
I’ve been including words in my art for years. It takes extra effort, but I’m willing to put in the time when the inclusion of a written message will strengthen the impact of my artwork. The techniques outlined here are fun, fast, and easy. They’re great compliments for seasonal pieces, personalized gifts, and stylized art.
Let’s get started.
Great Fall is a super fun project! The step-by-step tutorial and full size pattern are now available in the Fall 2023 issue of Glass Patterns Quarterly. I included it here because it’s a terrific example of combining different methods in the same piece of art.
Great Fall
I wanted the word Great to be compact and graceful. I painted it on the glass with black Glassline outlining medium. After the paint dries, I go back and touch up the lettering to make the line width uniform. I use the point of a wooden toothpick or a razor knife to scrape the unwanted paint away.
When it came time to render the word Fall, I had a few ideas in mind. I could simply cut thin strips of glass or use noodles to write the word. Then it occurred to me that using colorful stringers would give me visual texture and look like sticks. This was the first time I tried that method and I’m really pleased with the results.
Welcome Fall
Welcome Fall is a video course Premium Video Members can enjoy and having access to this fun project with their membership.
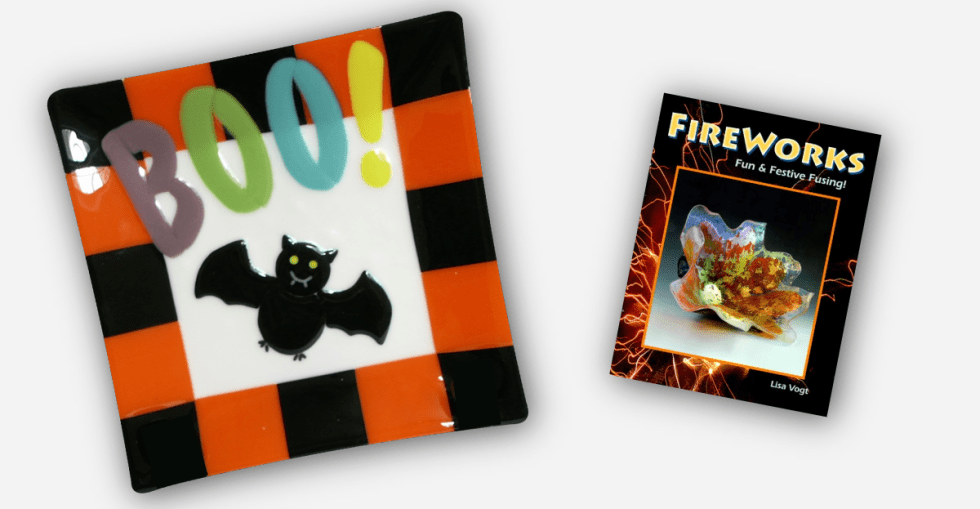
Batty
Batty utilizes the cut glass method to include text. The balloon style lettering is easy to cut out of glass and the oversized word adds an additional splash of color to the simple design. This bouncy lettering style is well suited for short impactful words. The Batty pattern is in my eBook Fireworks.
Love
Love also uses the cut glass method to achieve lettering. Here the lettering is the design and so, bold bright colors are key to delivering the lively message. These straight letters are fast and easy to cut. They’re a great choice for writing names. The Love how-to video and pattern eBook is available through my Premium Video Membership.
Cookies for Santa
Cookies for Santa is a wonderful example of using frit to write intricate messages on your fused glass designs. Simply sift powder frit over the glass then write your words in the frit with a small paint brush or the eraser end of a pencil. For the best results, use high contrast colors and apply a thick layer of frit. Have fun with it! The Cookies for Santa pattern is in my eBook Fireworks.
Wish
Wish features delicate, whimsical lettering. The word is made by sifting powder frit, over a stencil. This easy technique is great for quick projects that call for intimate details. Hint, use more than one color frit to get a paintbrush stroke quality to the lettering. Also, use high contrast colors to ensure good readability.
Wedding Heart
Wedding Heart is a little more complicated than the other techniques shown here. The advantage of using this method is it’s extremely effective and the results are graceful and elegant. Here the lettering is handwritten in liquid platinum with a needle type applicator pen. These items are available from your art glass supplier. The liquid platinum is fired onto the glass in the kiln for a permanent finish. The lettering is fired face down, in contact with a primed ceramic kiln shelf. Tip, the lettering does not adhere well if fired on fiber paper. It comes out dull and blotchy instead of uniform and shiny.
The lettering on the front of the heart is written with a silver sharpie marker. It’s not permanent and will wash off if the glass gets wet. We used these hearts for seating markers at my daughter’s wedding. They were memorable keepsakes and the guests loved them!
Including words in your projects is a fun way to ramp up the visual intricacy of your art.
Whether you keep it simple or combine multiple techniques you’re sure to enjoy the process and the outcome. I hope you found this spotlight on easy ways to include lettering in your fused glass designs helpful. Now get writing!
Watch the How to Include Words in Your Designs with Lisa Vogt video here.
Murrine are fusible glass rods with tiny patterns inside. They make great accents for fused glass designs. The rods come in a variety of patterns and colors. I think of them as exotic decorations. The small pattern details add a lot of interest to your art. For that reason, I generally used them sparingly to create a striking focal point.
Other times, I like to experiment with mini creations using materials in unexpected ways. This brightly colored sculpture is a perfect example. It demonstrates the surprisingly impactful artistic display you can achieve with small scale art.
In addition this Mini Murrine Sculpture is fun, fast, and easy to make! You’ll love playing with the vividly colored rods and arranging them in ways that inspire your imagination.
How it’s made.
Here’s the fun part. I used a square stainless steel cookie cutter to contain the glass while fusing. My cookie cutter, measures 1-inch tall, 3-inch wide by 3-inch long. You can use any size or shape you have available. The heart shape is always an adorable choice. I buy my stainless steel cookie cutters online. There’s a wide assortment available.
The prep.
Line the metal cookie cutter with 2 layers of fiber paper. On the cooling stage of firing the stainless steel mold cools and contracts faster than the fused glass. To prevent breakage I create a cushion by lining the inside of the metal mold with 1/8-inch thick fiber paper. I then line the inside of that with Thinfire fiber paper. The Thinfire produces smooth edge quality and beautiful round shoulders.
Cut the murrine.
Measure the glass rods and cut them to size with mosaic nippers. Arrange about 7-8 pieces at a time in a row on your worktable. Cover the top with a length of clear tape. The tape will burn off during firing. Roll the taped pieces into a cluster and place them inside the metal mold. Repeat until the mold is full.
Fire the glass to the full fuse temperature using the guide provided.
Make the base. Cut 2 pieces of clear glass into 2-inch by 2-inch squares. Stack one on the other and fire to the full fuse temperature.
Display your cutie.
Grind one corner flat. Glue the mini sculpture to the clear base and enjoy!
The beauty of glass fusing is it offers artists of all skill levels, working with any size kiln, the opportunity to create stunning works of art. Whether you’re working big or small the thrill and excitement of creating art is the same. Enjoy the process and remember small is powerful!
Watch the Make a Mini Murrine Sculpture Vlog here.
Excerpt from Breaking Through-Making Exhibition Quality Art Video by Lisa Vogt
Are you ready to take your work to the next level?
I’m sure you’ve noticed the dramatic increase in outstanding, professional quality fused glass artwork being made by your fellow artists. You admire their originality and the advanced skills it takes to produce such striking art. But then you find yourself wondering what makes them so special. Why aren’t your pieces getting noticed?
What’s missing?
To answer that question, we first have to consider what makes artwork stand out. There are two key features that make artwork exceptional. The two elements are unique form and dramatic imagery. Design your projects with these basic concepts in mind and you’ll immediately see an increase in the desirability of your work.
Unique Form
Sculptural Fused Glass Video
Shape up! Move away from the simple square, rectangle, and circle. These shapes are tired. They have their place when making a production series where minimizing material, fabrication, and labor costs is essential for profit.
But if you want your work to rise to gallery status, give your artwork an unexpected or brand new shape. This elevates your fused glass from a practical or functional container, to a glamorous, three dimensional, fine art sculpture.
Get creative, combine slumping molds to make one-of-a-kind shapes. Use fiber paper or fiber board to change the profile of your fused glass. You’ll quickly find, the possibilities are endless.
Dramatic Imagery
Painting with Frit Video
What makes a painting memorable? They’re generally rectangular in shape, so what makes one unforgettable? It’s the subject matter, of course. Taken a step further, it’s the artist’s distinctive composition, their unique way of interpreting the focal point and the special way the scene in rendered. Give the viewer a fresh look at something familiar and they’re hooked.
There are several ways to engage the viewer and hold their attention longer with your subject matter. Render a recognizable subject in a surprising way. Use unexpected colors or add props, like a hat on a dog or a tutu on a cat. Include an interesting background that enhances the subject. Place your focal point in an unusual setting. Put a flower on the moon. Or, put the moon on a flower. Visualize a composition that extends beyond the rectangular limits of your glass canvas. And then build it with enthusiasm that shows.
The Winning Combination
Go with the Flow Video
Combine both unique form and dramatic imagery and your work will rise above the rest and get noticed. It’s easy. Start simple with the basic shapes and add your own twist. Put notches in a square, put curves in the straight edges of a rectangle, give your circle a free form shape. Then reshape the fused glass by slumping or draping it on a combination of molds and other kiln furniture. There are no rules. Just make it your own and you’ll come out a winner.
Once you integrate these design concepts into your work, you’ll be amazed how quickly your work rises to a higher level of sophistication. And in the process, thinking in a broader scope will open the door to all new, exciting possibilities.
Happy Fusing!
Lisa & Niki
Follow my blog for weekly inspiration sent to your inbox!
Firing your own projects is exciting. It empowers you to make your own decisions and gives you the freedom to try new advanced techniques. The best way to gain confidence in your fusing is to build consistency into your firings. You want to get to know how your particular kiln works and define the results you want to achieve. At first, you’ll make mistakes and have varying results. That’s okay. You’ll learn something valuable from every firing. Plus, you’ll gain experience and learn to trust your process.
Start with project assembly.
How projects are assembled has a direct effect on the durability and, “look” of the finished piece. Most of my projects are assembled using two full layers of glass.
Glass settles at a thickness of ¼ inch when it’s heated to the full fuse temperature. By assembling with two layers of glass, I maintain control over the size and shape of my finished piece.
Fusing one layer of glass will cause the project to shrink. And it will have a fragile, sharp, irregular edge. While fusing three layers of glass will result in the project growing in size, which changes the original shape considerably.
Since two layers is my go-to type of assembly, the projects I made for these comparisons are made with the 2 layers of glass. If your go-to is a different type of assembly, you’ll want to duplicate that for the following firing comparisons.
I fired several 6” x 6” square projects made with 2 layers of glass for these comparisons.
Characteristics of a terrific full fuse firing.
The full fused glass retains its shape and original size. It also has a uniform thickness, smooth surface, rounded edges, and a clean back side. The design accent details melt into the top layer giving the project a shiny, smooth surface.
Characteristics of an under-fired full fuse firing.
An under fired project will retain its rigid shape and its original size. The edges are hard, angular, and sometimes sharp. Since the two layers are not completely fused together, a seam may appear on the edge showing how the layers were stacked. The back side of the project is clean and smooth. Design details, like frit have texture and are not fully melted into the top layer.
The solution to an under fired project is to re-fire it a little hotter. To get more heat results, I usually add ten degrees to the target temperature. The target temperature is the temperature that gives me the desired results.
Firing Target Temperatures for 96 COE & 90 COE.
Full Fuse:96 COE1465°F (796°C), 90 COE1480°F (804°C), hold 10 minutes
Slump:96 COE1265°F (685°C), 90 COE 1265°F (685°C), hold 10 minutes
Characteristics of an over-fired full fuse firing.
An over fired project will grow in size. The outside edges will round out. The glass will lose its square shape and be larger than the original 6 inch by 6 inch size. Kiln wash may stick to the backside and may be difficult to remove. The design details, like frit will be completely fired in giving the project a smooth shiny surface.
The solution for an over fired project might be to grind the edges to regain the square shape. Or you can remake and re-fire the project at a lower temperature.
Characteristics of a successful slump.
A successfully slumped glass project conforms to the shape of the mold. It also retains a clean shape and the sides of the project retain their height.
Characteristics of an under-slumped project.
An under-slumped project does not conform to the mold. The glass project doesn’t have enough drop and so the piece is shallow. The piece may also wobble on the table because it didn’t come in contact with the flat bottom of the mold like it should have.
The solution is to re-fire the glass in the mold and hold it at the target temperature a little longer than the first time. I usually add 10 minutes hold to the original program.
Characteristics of an over-slumped project.
The backside of an over-slumped project will pick up unwanted texture from the mold. It also loses some of its shape because the sides slide down into the mold. The result is an uneven top edge or rim. The solution is to call it somethingnew or remake the project.
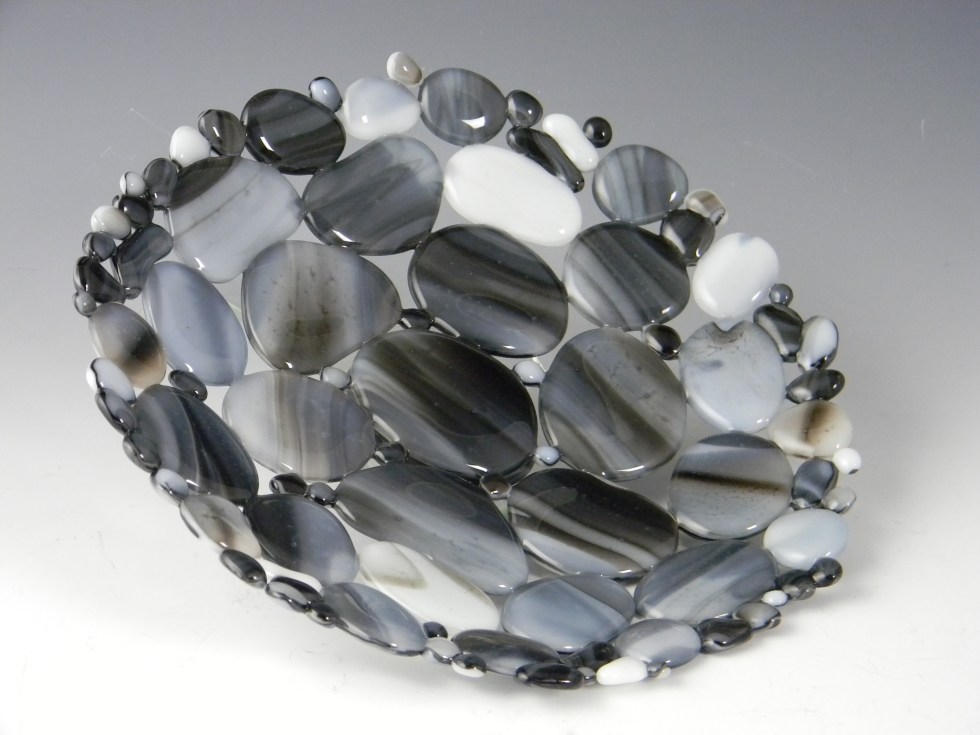
Tack fusing test.
I made three different size nuggets to make a bowl that would look like it was made out of rocks. I cut a bunch of round shapes out a grey glass. Then I cut matching pieces out of clear glass. I capped the grey with the clear and fired the stacked glass nuggets to a full fuse temperature. The pieces came out great.
Don’t hesitate to customize your programs.
Then I arranged the fused glass nuggets on a kiln shelf to make a circular design. I tried using the Auto Mode on my kiln and set the controller to tack fuse the glass together. The finished project looked great, but the pieces didn’t stick together. In Auto Mode the kiln didn’t fire hot enough to tack the glass pieces together while they were resting next to each other. The lower temperature was intended to tack fuse glass pieces stacked on top of each other.
The solution was to enter my own program in the kiln controller and re-fire the glass to a hotter temperature. It worked! I then slumped the tacked piece to make a shallow bowl. The finished art was a beautiful success!
Take notes.
I recommend taking notes outlining how you assemble your pieces and on your firing steps. This way you can easily reproduce your successes and learn from the pieces that didn’t come out as you expected.
You can do it. I believe in you!
It takes a time to get comfortable firing a kiln on your own. The upside is you’ll learn new and exciting things every step of the way. Relax and enjoy your process. No matter what your results are be grateful for your creative development. And take advantage of the opportunity to make your own personalized pieces of art.
Happy Fusing!
Lisa & Niki
Follow my blog for weekly inspiration sent to your inbox!