“I can’t begin to tell you how much your class meant to me. Your instruction, patience, pacing, and incredible projects were inspiring. It was so good to make beautiful glass and be inspired by others and be introduced to new glass. Thanks again for bringing the joy back! Blessings to you and yours!” -Susan
May 2021 Student Testimonials
“My favorite thing about the class was the creative freedom – we were not required to make the same thing the same way. I was surprised by the variety and number items we made and the flexibility we had to go our own way with our projects. The glass studio was very comfortable and very clean with plenty of room.” -Ron
“My favorite thing about the class was the projects were tailored to our interests with user specific glass choices and design options. This makes the best type of learning environment. I loved the continued technical information that was used in daily discussions. Loved the amount of space we had for working and the use of top-quality tools and the hands-on assistance Lisa gave each one of us. You will hear and see me again. Thank you for your time and talent.” – Donna
“My favorite thing about the class was the creativity – putting things together in new ways – using different materials – and how welcome I felt. I was surprised how much we were able to get done and by Lisa’s ability to coach those of us on different levels. My least favorite part was that the class ended. The classroom setup was excellent – well organized. I really feel like Lisa gave me the tools to advance to a new level. It was worth the cost of the workshop, airfare, B&B, animal care and house sitting! Can’t wait to put what I leaned into practice and return for another workshop.” -Sue
March 2021 Student Testimonials
“My favorite thing about the class was being more creative and learning how to set up and see the big picture. I was surprised we had so many options. Lisa was available, patient and shared her knowledge. The classroom was awesome in size with adequate tools. All the tools were explained which made me more confident using them. My least favorite thing about the class was leaving. Nice surroundings. Nice family. Thanks for everything!” -Leslie
“My favorite thing about the class was our choice of glass colors, the relaxed pace, and how organized everything was. I was surprised how wonderfully flexible everything was. Lisa has an excellent teaching style. Her class has a very pleasant, non-stress atmosphere.” -Sue
“My favorite thing about the class was making the 3 piece ladder and 2 piece basket weave sculptures. My least favorite thing was the outside tent and Florida humidity. Lunch was great-thank you!” -Pat
February 2021 Student Testimonials
“I feel I got the movement toward developing my own creativity this week. I was surprised that the things I already knew fit into the new knowledge I was getting in this class. Lisa is an excellent teacher who is tuned into what is going on in the class. She puts no pressure on the students when I know she could when we were dragging our feet. I was absolutely comfortable with the classroom set up and cleanliness of the studio. Will see you again soon.” -Judy
“There is a wealth of material, tools and possible projects. Lisa is very motivating, informative, and supportive. The variety of materials is amazing. The number of projects we made in 4 days is beyond what I expected. The classroom set up was very well organized. I felt completely comfortable and safe with plenty of space and sanitizer. This class was beyond my expectations.” -Jane
“My favorite thing was Lisa’s knowledge and wealth of information. I was surprised by how many projects we made. I was very comfortable with the classroom set up and loved everything about this class. I learned so much and it was fun. My least favorite part was Friday at 4:00 pm.” -Liz
Previous ClassStudent Testimonials
“My favorite thing about this class was the variety of glass and other materials. Unlimited dichroic! I was comfortable with the classroom set up; Lisa had lots of little personal touches that made it special. Thanks for the wonderful lunches!” -Gail
“My favorite part about the class was the non-stop building and the generous amount of materials available. What surprised me about the class was how full the schedule was. Usually, you do 1 project. We did 5 in 4 days. Thank you so much for your generosity.” -Christine
“My favorite part about the class was the variety of projects we made. What surprised me was the number of projects we completed. Awesome experience – will come again in the future.” -Monica
“Instruction was clear, help was always available, and Lisa’s explanation of the equipment was great.”-Sherry
“My favorite thing about the class was the friendly atmosphere that encouraged open thoughts and sharing ideas.”-Lyn
“I enjoyed making all the projects, especially the flow piece and the freedom to be creative with our work.”-Joy
“My favorite thing about the class was the ability to see multiple pieces of art that originated from concepts taught.”-Vicki
“Lisa is very professional, knowledgeable and freakishly talented. House, art, mosaic, her work – really fun and beautiful.”-Lorna
“Incredible class. Lisa shared her artistic knowledge of color flow and her technical knowledge of glass.” -Larry
“I had so much fun! Lisa is a great teacher!” -Brenda
Watercolor technique. That’s fun to say. It immediately paints a picture in my mind. I see soft color washes detailing the delicate images of a dreamy scene.
For artists familiar with the mechanics of glass fusing creating a painterly quality in glass is an exciting new concept. We’re comfortable with the rigid, linear appearance of our geometric designs. And why not, they’re easy to build and they deliver visually dramatic results.
I’m here to tell you that creating pictorial scenes, decorated with nature themed subjects is equally as rewarding and satisfying to fabricate and display. At first glance, these projects appear tedious to build. But once you see how easy it is to make lush backgrounds and three dimensional florals you’ll be hooked.
Finding inspiration.
I’m always on the lookout for inspiration for new design ideas and new techniques to try. When I’m actively on the hunt for fresh material I silent the conformist and let my muse run free. I look more closely at everyday items and routine scenes to find a hidden perspective I can build off. It’s especially fun when two unrelated items, that are unrelated to glass, merge and solidify a design image in my mind. My Succulent series was born as a result of such an unusual pairing.
I purchased a bowl that I thought would look pretty on my kitchen countertop. When we cut fresh vegetables for dinner, we put the trimmings in the bowl. Later, the contents are dropped in our compost bin in the back yard. I liked the bowl for the edgy floral pattern. The soft cranberry and green colors also attracted me. It inspired the beginning of a design, but it wasn’t enough. I wanted more than just flowers. I wanted to create a sense of space and a feeling of peaceful joy. I found the inspiration I was seeking on the label of a bottle of organic dog shampoo! My daughter bought it for our happily spoiled pups. One day the bottle was sitting on her bathroom counter. The label’s leafy design and earthy colors caught my attention. I liked the green and yellow colors and the shapes of the plant. I thought the vertical design direction would be the perfect complement to round shape of the succulent flowers.
Watercolor Technique and Advanced Fusing Design with Lisa Vogt
Advanced fusing design.
I took what I liked from each design and merged them together. I believe the spontaneity of the combination is what gives the artwork it’s refreshing appeal. Designing engaging patterns greatly adds to the pleasure of building personalized, original art. This approach to glass fusing is easy to apply once you allow yourself the freedom to reimagine the possible. Once you learn to trust your creative spirit, innovative ideas flood in.
Want to learn more?
I’m excited to announce that I’m presenting a comprehensive Watercolor Technique and Advanced Fusing Design webinar. In this LIVE event I share how to apply my watercolor technique and advanced fusing design concepts in person. I hope you’ll join me for this energetic, inspiring and educational event Tuesday, June 1, 2021.
I hope to see YOU Tuesday!
Watch the, Watercolor Technique and Advanced Fusing Design Webinar YouTube video here: https://youtu.be/1Q_g-8tUpCE
Learn how to make gorgeous, vividly decorated nature themed fused glass designs in this comprehensive webinar.
Master the art of design, pattern, and color.
Join me and I’ll show you how quickly and easily you can ramp up the visual intricacy of your work in just a few steps. I’ll share my personally developed, “watercolor style,” approach to shading and highlighting glass.
You will love the easy-to-follow instruction and seeing how to create elaborately detailed works of art with a gorgeous three-dimensional flair.
In this webinar you will learn how to use advanced artistic techniques like a pro. Beginner, intermediate and advanced fusers alike will enjoy applying the many simple, yet effective techniques I share in this in-depth, live event.
Plus, asa special bonus I include step-by-step instruction on how to use failed projects. I’ll explain in detail how to solve problems and how to ensure successful projects moving forward.
I also include my custom firing guides, project patterns and materials list in PDF form.
You will be fired up and eager to apply these new techniques to enhance the beauty and charm of your work.
Radiant Ribbons by Lisa Vogt
Fusing for the Adventurous Webinar with Lisa Vogt June 29, 2021
Get ready to push boundaries, challenge old ideas and enjoy the thrill of limitless possibilities. Join glass artist Lisa Vogt in this comprehensive hands-on webinar, and learn how easy it is to use tried and true methods in unlikely, innovative ways!
With 4 major projects and a few bonus pieces, you’ll get more than you bargained for!
Radiant Ribbons combines dichroic glass and patterned rods into three wavy sections that create beautiful wall art, a dazzling focal point for any living space.
Leaves involves cutting and layering glass surrounded by bits of dichro. Depth is produced by having all of the component parts “floating” in frit and edged in solid color to construct a scene reminiscent of a shadow box.
Fun with Rods gives you the opportunity to fabricate a light and airy project with curvy slumped colored rods.
Plus, you’ll have the fun of kiln casting with murrini creating Hearts on Fire.
All of these techniques will produce dramatic results in your art, and take your work to an exciting new level of sophistication. Beginning and advanced fusers alike will find inspiration, motivation, and a renewed sense of artistic freedom by combining the ideas presented in this webinar.
And of course you’ll receive my custom firing guides.
Armed with your newfound skills, you’ll be incorporating these techniques into your work in no time, while expanding your creative visions. You’ll gain the cool confidence to turn your glass visions into reality. Don’t miss this great opportunity to take your work and inspiration to greater heights!
Currents as seen In Sculptural Fused Glass with Lisa Vogt
Wesley Chapel, Florida, 4-Day, Hands-on, Class size is limited.
This is the turning-point workshop you’ve been waiting for.
It’s hard to describe what it’s like when I’m feeling the creative flow. Time flies. Hours pass in what I thought were minutes. My naturally distracted mind is focused on what my hands are doing, and nothing else. I get lost in my own world. When I return to reality, I feel rejuvenated and spiritually uplifted. That’s why I like sharing my studio space with others. I try to give them that experience and hope they feel the same inspiration and fulfillment I do. -Lisa
This class is for you! Any skill level can attend. Beginner, intermediate and advanced students alike will learn how to advance their glass fusing skills and expand their artistic style.
Join me and I’ll show you all the pro tips and tricks I use to make stunning 3-dimnesional art. You’ll learn how to combine advanced techniques in new ways to create extraordinary sculptural pieces of art.
You’ll leave class with several completed glass sculptures, my custom firing guides and a deeper understanding of sculptural fused glass fabrication. You’ll have the knowledge, confidence, and inspiration you’ve been craving to take your artwork to the next level.
Materials are included, that’s a $150.00 value!
Here’s what students from my April 2021 class are saying about the workshop.
“My favorite thing about the class was being more creative and learning how to set up and see the big picture. I was surprised we had so many options. Lisa was available, patient and shared her knowledge. The classroom was awesome in size with adequate tools. All the tools were explained which made me more confident using them. My least favorite thing about the class was leaving. Nice surroundings. Nice family. Thanks for everything!” -Leslie
“My favorite thing about the class was our choice of glass colors, the relaxed pace, and how organized everything was. I was surprised how wonderfully flexible everything was. Lisa has an excellent teaching style. Her class has a very pleasant, non-stress atmosphere” -Sue
“My favorite thing about the class was making the 3 piece ladder and 2 piece basket weave sculptures. My least favorite thing was the outside tent and Florida humidity. Lunch was great-thank you!” -Pat
Here’s what students from my February 2021 class are saying about the workshop.
“I feel I got the movement toward developing my own creativity this week. I was surprised that the things I already knew fit into the new knowledge I was getting in this class. Lisa is an excellent teacher who is tuned into what is going on in the class. She puts no pressure on the students when I know she could when we were dragging our feet. I was absolutely comfortable with the classroom set up and cleanliness of the studio. Will see you again soon.” -Judy
Here’s what the students from my November 2020 class are saying about the workshop.
“There is a wealth of material, tools and possible projects. Lisa is very motivating, informative, and supportive. The variety of materials is amazing. The number of projects we made in 4 days is beyond what I expected. The classroom set up was very well organized. I felt completely comfortable and safe with plenty of space and sanitizer. This class was beyond my expectations.” -Jane
“My favorite thing was Lisa’s knowledge and wealth of information. I was surprised by how many projects we made. I was very comfortable with the classroom set up and loved everything about this class. I learned so much and it was fun. My least favorite part was Friday at 4:00 pm.” -Liz
“My favorite thing about this class was the variety of glass and other materials. Unlimited dichroic! I was comfortable with the classroom set up; Lisa had lots of little personal touches that made it special. Thanks for the wonderful lunches!” -Gail
Student comments from previous classes.
“My favorite part about the class was the non-stop building and the generous amount of materials available. What surprised me about the class was how full the schedule was. Usually, you do 1 project. We did 5 in 4 days. Thank you so much for your generosity.” -Christine
“My favorite part about the class was the variety of projects we made. What surprised me was the number of projects we completed. Awesome experience – will come again in the future.” -Monica
“Instruction was clear, help was always available, and Lisa’s explanation of the equipment was great.”-Sherry
“My favorite thing about the class was the friendly atmosphere that encouraged open thoughts and sharing ideas.”-Lyn
“I enjoyed making all the projects, especially the flow piece and the freedom to be creative with our work.”-Joy
“My favorite thing about the class was the ability to see multiple pieces of art that originated from concepts taught.”-Vicki
“Lisa is very professional, knowledgeable and freakishly talented. House, art, mosaic, her work – really fun and beautiful.”-Lorna
“Incredible class. Lisa shared her artistic knowledge of color flow and her technical knowledge of glass.” -Larry
“I had so much fun! Lisa is a great teacher!” -Brenda
Artwear Designed for Artists by Artists Tell them how you really feel with bold T-shirts, Eco-conscience tote bags and sassy mugs.
Artwear
Watch it NOW! Start fusing today!
Videos for every skill level and interest.
Downloadable instructional videos for every skill level.
Inspiration is here. eBooks for all skill levels.
Check out my eBooks for elegant patterns and detailed fusing instructions.
It’s amazing how much art and engineering have in common. Art concepts are born from a small spark. But it takes hot, burning desire, coupled with ingenuity, to actually transform such obscure ideas into physical reality.
Poppy sink by Lisa Vogt
I’ve been making fused glass sinks for years. In the beginning, I constructed them using the layered method. This type of construction has a beautiful, round finished edge when the fused glass comes out of the slumping mold.
Poppy sink by Lisa Vogt
It wasn’t long before I expanded my techniques and started building sinks using the cast method. This sink style is much thicker. The glass comes out of the mold with a slightly textured edge. This type of sink construction requires grinding and polishing to make the thick sink edge smooth and shiny.
Poppy sink by Lisa Vogt
I recently shared how to construct a sink with a Sailboat design. Here, I’m going to focus on drilling a drain hole and finishing a thick sink edge. This Poppy sink is made with the cast method, which simply means the glass has a thick profile. I create the thickness by containing mosaic size glass pieces with a 1 inch wide strip of 1/8 inch thick fiber paper. I built this sink on a primed fiber board kiln shelf. The fiber paper is held in place with U shaped copper wire pins pressed into the fiber board kiln shelf. After fusing, the fiber paper leaves a slight texture in the edge of the fused glass disc. My conservative sink slumping temperature isn’t hot enough to polish the edge. Therefore, the edge has to be cold-worked to achieve the professional quality shine that makes this sculptural sink style so appealing.
Drill bit and hone.
But first let’s drill the drain hole.
Sink with drain hole.
You can drill first or grind and polish first. It doesn’t matter which step you do first, they both have to be done. We use a variable speed drill along with a core drill and hone to cut the drain hole in the glass sink. I line the inside of the sink with a piece of contact paper with a drain hole size circle cut out of the middle. The vinyl protects the glass from scratches if the drill bit accidentally slips. We start at a slight angle and then gradually bring the drill upright. It takes a few minutes to drill through the glass. We take our time. Patience is our friend here. After the hole is drilled the next step is to countersink the opening to accommodate a strainer drain. The drain should sit below the glass on the inside of the sink. This ensures the water drains properly. Again, we take our time and test the drain assembly often to ensure a good fit.
Grinding & Polishing a Fused Glass Sink with Lisa Vogt
Grinding and Polishing the Sink Edge
Poppy sink by Lisa Vogt
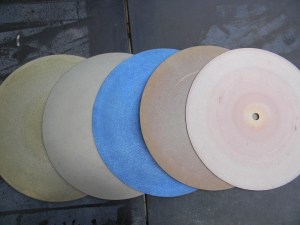
In my studio we use a 12 inch machine with a variable speed motor and adjustable water feed. We use five different discs. We start by adjusting the water feed so the glass and grinding wheel are constantly wet. The first disc is a 100-diamond disc. We use this course disc to quickly remove material and level the sink edge. Once the edge is level, we switch to a 260-dianmond disc. This lighter disc removes the scratches left behind by the 100 grit disc. When the edge is uniform, we switch to the blue-mesh disc. This disc removes fine scratches in the sink edge. Once satisfied with the edge quality, we use the brown-mesh disc. This pre-polish disc further smooths the edge. Once the edge quality is uniform, we move on to the felt wheel. We us this disc along with a polishing compound to create a deep, lustrous professional quality shine.
Poppy sink by Lisa Vogt
This is a simplified introduction to a process that requires practice and patience to master. That said, it’s also a process that I find very relaxing and therapeutic. A lot of my studio time is spent deep in thought designing new pieces of art. Whereas, grinding and polishing is a relaxing mechanical process that requires little brain power. I like to switch between the different types of tasks to really enjoy my time in my studio. Think of cold-working as another way to expand your creativity and advance your artistic style. Hopefully, I’ve given you enough information to tempt you to explore and take new directions with your art.
Poppy sink by Lisa Vogt
Here’s how to make the glass sink polishing stand we used to support the sink while grinding and polishing.
Sinks are advanced projects that involve a considerable amount of time to construct, a sizable amount of material and a skilled craftsman to complete successfully. When it comes time to cold-work your masterpiece, you want to feel confident that the job will go smoothly. And so it was our intention, to build consistency into this otherwise unstable task. That’s why we modified a readily available carpenter’s roller stand, into a customized sink support/guide that would provide us with reliable results time after time.
Poppy sink by Lisa Vogt
If it worked for us, it’ll work for you.
This new, re-purposed tool significantly streamlined my workflow and improved my success rate. Here’s how you can make your own sink stand/guide.
Start with your standard, home improvement store variety roller stand. Remove the metal roller. It comes off easily by depressing two buttons, one on each end of the roller. The mechanism works similar to toilet paper roll holder. Cut a 2” x 2” block of wood to fit between the uprights. Secure the wood in place with wood screws, one on each end.
Cover the surface of the wood with a strip of nylon, like the white cutting board used in your kitchen. The nylon holds up longer than the bare wood and it won’t scratch your glass as the edge becomes polished. Hold the nylon strip in place with two wood crews.
Be sure to countersink the screws so they don’t come in contact with or damage your glass. Pre-drill two holes for the dowels behind the nylon strip. Press two hardwood dowels into the holes in the wooden base. These dowels serve as stops that help you maintain a consistent distance from the grinding wheel throughout the grinding and polishing process. Tip: Don’t glue the dowels in place. They wear out quickly, and therefore will need to be replaced every few sinks.
Once you have one of these stands, you’re certain to find multiple uses for it. So don’t hesitate to add this handy tool to the supply of tools in your studio.
Learn how to make gorgeous, vividly decorated nature themed fused glass designs in this comprehensive webinar.
Master the art of design, pattern, and color.
Join me and I’ll show you how quickly and easily you can ramp up the visual intricacy of your work in just a few steps. I’ll share my personally developed, “watercolor style,” approach to shading and highlighting glass.
You will love the easy-to-follow instruction and seeing how to create elaborately detailed works of art with a gorgeous three-dimensional flair.
In this webinar you will learn how to use advanced artistic techniques like a pro. Beginner, intermediate and advanced fusers alike will enjoy applying the many simple, yet effective techniques I share in this in-depth, live event.
Plus, asa special bonus I include step-by-step instruction on how to use failed projects. I’ll explain in detail how to solve problems and how to ensure successful projects moving forward.
I also include my custom firing guides, project patterns and materials list in PDF form.
You will be fired up and eager to apply these new techniques to enhance the beauty and charm of your work.
Currents as seen In Sculptural Fused Glass with Lisa Vogt video
Next Available Date! Sculptural Fused Glass, 4-Day, Hands-on Workshop September 21 – 24, 2021 Register today! 4 seat available. Register here!
Wesley Chapel, Florida, 4-Day, Hands-on, Class size is limited.
This is the turning-point workshop you’ve been waiting for.
It’s hard to describe what it’s like when I’m feeling the creative flow. Time flies. Hours pass in what I thought were minutes. My naturally distracted mind is focused on what my hands are doing, and nothing else. I get lost in my own world. When I return to reality, I feel rejuvenated and spiritually uplifted. That’s why I like sharing my studio space with others. I try to give them that experience and hope they feel the same inspiration and fulfillment I do. -Lisa
This class is for you! Any skill level can attend. Beginner, intermediate and advanced students alike will learn how to advance their glass fusing skills and expand their artistic style.
Join me and I’ll show you all the pro tips and tricks I use to make stunning 3-dimnesional art. You’ll learn how to combine advanced techniques in new ways to create extraordinary sculptural pieces of art.
You’ll leave class with several completed glass sculptures, my custom firing guides and a deeper understanding of sculptural fused glass fabrication. You’ll have the knowledge, confidence, and inspiration you’ve been craving to take your artwork to the next level.
Materials are included, that’s a $150.00 value!
Here’s what students from my February 2021 class are saying about the workshop.
“I feel I got the movement toward developing my own creativity this week. I was surprised that the things I already knew fit into the new knowledge I was getting in this class. Lisa is an excellent teacher who is tuned into what is going on in the class. She puts no pressure on the students when I know she could when we were dragging our feet. I was absolutely comfortable with the classroom set up and cleanliness of the studio. Will see you again soon.” -Judy
Here’s what the students from my November 2020 class are saying about the workshop.
“There is a wealth of material, tools and possible projects. Lisa is very motivating, informative, and supportive. The variety of materials is amazing. The number of projects we made in 4 days is beyond what I expected. The classroom set up was very well organized. I felt completely comfortable and safe with plenty of space and sanitizer. This class was beyond my expectations.” -Jane
“My favorite thing was Lisa’s knowledge and wealth of information. I was surprised by how many projects we made. I was very comfortable with the classroom set up and loved everything about this class. I learned so much and it was fun. My least favorite part was Friday at 4:00 pm.” -Liz
“My favorite thing about this class was the variety of glass and other materials. Unlimited dichroic! I was comfortable with the classroom set up; Lisa had lots of little personal touches that made it special. Thanks for the wonderful lunches!” -Gail
Student comments from previous classes.
“My favorite part about the class was the non-stop building and the generous amount of materials available. What surprised me about the class was how full the schedule was. Usually, you do 1 project. We did 5 in 4 days. Thank you so much for your generosity.” -Christine
“My favorite part about the class was the variety of projects we made. What surprised me was the number of projects we completed. Awesome experience – will come again in the future.” -Monica
“Instruction was clear, help was always available, and Lisa’s explanation of the equipment was great.”-Sherry
“My favorite thing about the class was the friendly atmosphere that encouraged open thoughts and sharing ideas.”-Lyn
“I enjoyed making all the projects, especially the flow piece and the freedom to be creative with our work.”-Joy
“My favorite thing about the class was the ability to see multiple pieces of art that originated from concepts taught.”-Vicki
“Lisa is very professional, knowledgeable and freakishly talented. House, art, mosaic, her work – really fun and beautiful.”-Lorna
“Incredible class. Lisa shared her artistic knowledge of color flow and her technical knowledge of glass.” -Larry
“I had so much fun! Lisa is a great teacher!” -Brenda
Artwear Designed for Artists by Artists Tell them how you really feel with bold T-shirts, Eco-conscience tote bags and sassy mugs.
Artwear
Watch it NOW! Start fusing today!
Videos for every skill level and interest.
Downloadable instructional videos for every skill level.
Inspiration is here. eBooks for all skill levels.
Check out my eBooks for elegant patterns and detailed fusing instructions.
You’ve enjoyed success making the usual plates, bowls and vases following practices and guidelines laid out by the experts. But the element of surprise and the thrill of the unexpected success has gone missing. If you find yourself blindly staring at the glass wishing for inspiration, then it’s time to break the rules. Make art that excites you again.
Before you run wildly through your glass studio, let’s be sure to set this excursion up for success. Start by studying finished art that you find attractive. Define what it is about the piece that appeals to you. Is it the shape, the colors, the pattern, or the design? Take that element and put it aside temporarily. Maybe loosely sketch it out on paper for quick reference later. Do this for three individual pieces of art.
Small details can have a huge impact on the visual appearance of your art. Don’t underestimate the power of minor changes to customary pieces. When trying to navigate new territory, you’ll have the greatest success if you take what has worked for you in the past and then expand on it to create something all new and unexpected.
Blue Beauty from Breaking Through
Pattern and shape are two of the simplest elements that can easily be manipulated to dramatically increase the appeal of fused glass art. By adding unique patterns and building new shapes you can draw the viewer in and lock their attention tight. In the end, isn’t that our ultimate goal, to inspire people?
Here’s how.
Anchor the viewer’s eye with an interesting pattern. Unexpected bubbles are usually considered undesirable. But when made into a uniform design, bubbles can add a whole new dimension to the glass art. Designing with bubbles is a terrific way to add decoration and a little sparkle. Light dances inside the tiny dome shapes which increases the appearance of depth and the overall intricacy of the finished piece.
Brilliant Bubbles by Lisa Vogt
Here, I’m using stringers to establish the pattern. They’re placed even distances apart in two directions on a base glass and then capped with clear glass. The cool thing about this technique is the assembly method dictates the placement, size and shape of the bubbles. If the openings between the stringers are square, then the bubbles are round. Rectangular openings result in oval shaped bubbles. While triangular openings give you tear drop shaped bubbles.
Making small, 2” x 2” test pieces will give you an opportunity to try unusual color combinations. It also builds confidence because you know what to expect when you go bigger. The best part of this technique is the possibilities for imaginative designs are endless. Try it. You’ll be blown away!
Dancer from Sculptural Fused Glass with Lisa Vogt
Sculpture romances the viewer. It pulls them in like a magnet. Give your art unique shape and the viewer will be hooked. With so many fusing materials at your disposal, it’s never been easier to get creative with your art’s profile. The easiest way to get funky shapes is to drape fiber material over an existing slumping mold. Give the fiber paper exaggerated contours by tucking kiln posts or fiber board between the mold and the fiber.
You can also achieve new shapes by combining different ceramic or stainless steel slumping molds together. Some of my most exciting pieces have been made this way.
If you’re shy to jump in, build a sample out of clear glass. Make the sample the same shape, size and thickness as the intended project. Clear is the best choice because it’s the least expensive glass. And you can see through it to see where the glass rests on the mold assembly. Then you’re able to make adjustments to the final piece as needed. Plus, there’s no waste. The clear sample can be smashed and used for casting filler. It’s a win, win.
The wonderful thing about this technique is every piece of glass slumped has a one-of-a-kind flare. They’re your own personal original. Now that’s exciting!
Get crazy and combine both techniques and you have a showstopper. The biggest drawback to this in-depth approach is the amount of time necessary to plan an exceptional project. True, not all projects warrant this much effort. But if you work in stages on a few, you’ll find the outcome is extremely rewarding.
Evergreen from Go with the Flow
Design developer.
Take it a step further and create your own design. Go back to the three pieces of art you studied earlier. Take the three elements that attracted you and combine them with a unique pattern and a sculptural shape. Now you’re on the threshold of greatness!
These are just a few examples of breaking the rules. If you’re ready to rush into your studio, excited about the possibilities, don’t stop here. These techniques have great potential for expansion in so many directions. Take them and run and set your imagination free.
Want more personalized instruction and guidance? Join me May 25-28, 2021 for my Sculptural Fused Glass Class.
Due to a last minute cancellation, 1 seat in now available. Register here!
Wherever you are in your journey you are doing great! Keep creating!
Learn how to make gorgeous, vividly decorated nature themed fused glass designs in this comprehensive webinar.
Master the art of design, pattern, and color.
Join me and I’ll show you how quickly and easily you can ramp up the visual intricacy of your work in just a few steps. I’ll share my personally developed, “watercolor style,” approach to shading and highlighting glass.
You will love the easy-to-follow instruction and seeing how to create elaborately detailed works of art with a gorgeous three-dimensional flair.
In this webinar you will learn how to use advanced artistic techniques like a pro. Beginner, intermediate and advanced fusers alike will enjoy applying the many simple, yet effective techniques I share in this in-depth, live event.
Plus, asa special bonus I include step-by-step instruction on how to use failed projects. I’ll explain in detail how to solve problems and how to ensure successful projects moving forward.
I also include my custom firing guides, project patterns and materials list in PDF form.
You will be fired up and eager to apply these new techniques to enhance the beauty and charm of your work.
Currents as seen In Sculptural Fused Glass with Lisa Vogt video
CLASS UPDATE!
1 Seat Opened Up in my May 25-28, 2012 Sculptural Fused Glass Class! Due to a cancellation there is one seat available in my May 25-28, 2012 class. Register Here: Register here!
New Date! Sculptural Fused Glass, 4-Day, Hands-on Workshop September 21 – 24, 2021 Register today! 4 seat available.
Register here!
Wesley Chapel, Florida, 4-Day, Hands-on, Class size is limited.
This is the turning-point workshop you’ve been waiting for.
It’s hard to describe what it’s like when I’m feeling the creative flow. Time flies. Hours pass in what I thought were minutes. My naturally distracted mind is focused on what my hands are doing, and nothing else. I get lost in my own world. When I return to reality, I feel rejuvenated and spiritually uplifted. That’s why I like sharing my studio space with others. I try to give them that experience and hope they feel the same inspiration and fulfillment I do. -Lisa
This class is for you! Any skill level can attend. Beginner, intermediate and advanced students alike will learn how to advance their glass fusing skills and expand their artistic style.
Join me and I’ll show you all the pro tips and tricks I use to make stunning 3-dimnesional art. You’ll learn how to combine advanced techniques in new ways to create extraordinary sculptural pieces of art.
You’ll leave class with several completed glass sculptures, my custom firing guides and a deeper understanding of sculptural fused glass fabrication. You’ll have the knowledge, confidence, and inspiration you’ve been craving to take your artwork to the next level.
Materials are included, that’s a $150.00 value!
Here’s what students from my February 2021 class are saying about the workshop.
“I feel I got the movement toward developing my own creativity this week. I was surprised that the things I already knew fit into the new knowledge I was getting in this class. Lisa is an excellent teacher who is tuned into what is going on in the class. She puts no pressure on the students when I know she could when we were dragging our feet. I was absolutely comfortable with the classroom set up and cleanliness of the studio. Will see you again soon.” -Judy
Here’s what the students from my November 2020 class are saying about the workshop.
“There is a wealth of material, tools and possible projects. Lisa is very motivating, informative, and supportive. The variety of materials is amazing. The number of projects we made in 4 days is beyond what I expected. The classroom set up was very well organized. I felt completely comfortable and safe with plenty of space and sanitizer. This class was beyond my expectations.” -Jane
“My favorite thing was Lisa’s knowledge and wealth of information. I was surprised by how many projects we made. I was very comfortable with the classroom set up and loved everything about this class. I learned so much and it was fun. My least favorite part was Friday at 4:00 pm.” -Liz
“My favorite thing about this class was the variety of glass and other materials. Unlimited dichroic! I was comfortable with the classroom set up; Lisa had lots of little personal touches that made it special. Thanks for the wonderful lunches!” -Gail
Student comments from previous classes.
“My favorite part about the class was the non-stop building and the generous amount of materials available. What surprised me about the class was how full the schedule was. Usually, you do 1 project. We did 5 in 4 days. Thank you so much for your generosity.” -Christine
“My favorite part about the class was the variety of projects we made. What surprised me was the number of projects we completed. Awesome experience – will come again in the future.” -Monica
“Instruction was clear, help was always available, and Lisa’s explanation of the equipment was great.”-Sherry
“My favorite thing about the class was the friendly atmosphere that encouraged open thoughts and sharing ideas.”-Lyn
“I enjoyed making all the projects, especially the flow piece and the freedom to be creative with our work.”-Joy
“My favorite thing about the class was the ability to see multiple pieces of art that originated from concepts taught.”-Vicki
“Lisa is very professional, knowledgeable and freakishly talented. House, art, mosaic, her work – really fun and beautiful.”-Lorna
“Incredible class. Lisa shared her artistic knowledge of color flow and her technical knowledge of glass.” -Larry
“I had so much fun! Lisa is a great teacher!” -Brenda
Artwear Designed for Artists by Artists Tell them how you really feel with bold T-shirts, Eco-conscience tote bags and sassy mugs.
Watch it NOW! Start fusing today!
Instructional videos for all skill levels and interests.
Downloadable instructional videos for every skill level.
eBooks full of inspiration.
Check out my eBooks for elegant patterns and detailed fusing instructions.
Last year my family bought me a new, really nice camera. It has changed my life. I’m obsessed. Every time I think I’ve taken the absolute best picture I possibly can, a striking new angle or new dramatic shadow reveals itself. Suddenly, I’ve lost 20 minutes and my photo count is up by 20 or 30.
The real difference between this camera and my old one is pixels. It may sound naïve, but I had no idea that the increase in fire power would be responsible for such a huge improvement in my pictures. After all, digital is digital, right? Nope.
Doubling your resolution doubles your image sharpness, color and focus. My old camera had 12 million pixels. My new Nikon D3500 has 24.2 million pixels! I’m not endorsing this particular camera. But I am saying that, from my experience, this camera’s mega-powerful pixel count takes incredible pictures.
This isn’t intended to be a technical lesson on taking product pictures. You can easily find the dry, dos and don’ts online. Here, I going to share the composition and creative tricks I’m using to set a mood and capture emotion in my pictures.
I have to admit this new direction I’m taking with my pictures was not all my idea. I’m bossy. I live in a house full of bossy, opinionated, intelligent people. We like to joke that we have all chiefs and no Indians here. What can I say, I’m surrounded by a high, self-esteem crowd. But we’re all flourishing amid the positive energy we’re generating, so it’s all good.
Anyway, my daughter Niki suggested I move my picture taking outside and I listened. In the past, I’ve recommended taking pictures of your work in neutral environments with white backgrounds. In theory, the bare background should make the true glass colors show well. A plain setting, free of distractions should make the artwork jump off the page.
But the trend for product photos has changed. The generic backdrop no longer stimulates or engages us. Now, photographs have to create a mood. They have to project a lifestyle. To do that, pictures are taken in thought-provoking settings with textures and colors that establish a sense of time and place.
This concept is new to me. I’m learning what works and what I like as I go along.
It’s hard work toting my heavy, fragile artwork around. But, wow! I’m getting amazing results. And, I’m having so much fun learning new tricks to show off my art in interesting ways.
The best thing about digital photography is you can take hundreds of pictures for free. And you can view your results immediately. If you capture the feel you want in a picture, great, move on to the next set up. If not, simply move. Take the picture from a different perspective. Or turn the art. You can test unusual backgrounds with wild abandonment. Shoot away. Get crazy. Go for it. Have fun. I do.
Here are some things I’ve learned while taking more than 10,000 pictures in the past month.
Waterfall by Lisa Vogt
Shadows are your friend. Seek out dramatic angles created by the strong contrast of light and shadow. It really pushes the artwork to a new, higher level of sophistication.
Whispering Woodlands by Lisa Vogt
Fall in love with textures and patterns. They add visual intricacy and increased depth to your pictures. It also establishes a welcoming setting that draws the viewer’s attention and establishes a tangible mood. Place your art in front of different backdrops and see which one magnifies the beauty of the glass.
Bountiful Harvest by Lisa Vogt
Get in tight. Fill the frame with your art. Before taking a picture, I run my eye around the perimeter of the view finder. I want to make sure there aren’t any shapes or objects in the background that might detract or overshadow the art. Try different angles that might make the art look more exotic. Take the picture. Go ahead. You have the storage space. And it might be the one that you absolutely love best.
Apsoematic by Lisa Vogt
Try different camera settings. I’ve been shooting every single picture in 3 modes, automatic, portrait and manual aperture. In automatic mode the camera has standard settings. It’s a great mode to establish a baseline and for image consistency for the entire photo shoot. Portrait mode is fun. The focal point is in focus, but the background is fuzzy. It creates a dreamy mood. It’s great for taking profile pictures and artwork pictures when you want the art to stand out from the background. In manual aperture mode I can play with the depth of field. If I want the art and the background to both be in focus, I select a high number like F22. If I want just the front edge of the art to be in focus, I try a lower F stop like F4.5.
Dancer by Lisa Vogt
Color is not the enemy. Embrace brightly colored backdrops. Blue sky, sparking water and green grass are all winners in my book. They do wonders for your pictures. The inclusion of such strong colors immediately sets an uplifting mood that speaks volumes to the viewer.
Shattered by Lisa Vogt
Zoom in. Try using a zoom lens from a distance. It pushes portrait mode to a higher level that changes everything in a good way. The only way to describe the extreme perspective is, romantic. The fantastic image lures you in and plays with your heart.
Paradise Cove by Lisa Vogt
Crop it with the camera. Select a tight composition and take the absolute best picture you can every time. Don’t rely on cropping to fix it. Of course, you’ll want to crop some pictures when you sit down and plan how and where to use the images. But I considered that a subsequent part or step of the documenting process.
Bountiful Harvest by Lisa Vogt
Mirror, mirror. Include the art’s reflection and light passing through the glass in some pictures. One of the brilliant features of glass is its transparency and reflective quality. Show it off with clever angles and a strong light source.
Rapture by Lisa Vogt
Take it on the road. Take pictures of your art at new locations. Select different sites. Pick certain sites because they complement your artistic style. Then pic others specifically because they contrast your art. I found the more exotic sites gave me the most exciting results. Don’t worry what other people will think when they see you pulling bowls out of your bag. You’re an artist. Weird is wonderful. Embrace your specialness.
Cabana by Lisa Vogt
Get down. Change your point-of-view. Try taking pictures from a low perspective shooting up at the art. It’s a refreshing composition and it exaggerates the importance of the art.
This started as a simple project; take updated pictures of my gallery artwork for my new website. But it has exploded into a whole new artistic outlet for me. My pictures no longer represent just a physical item. Now they’re living, breathing extensions of my art with a passionate sparkle all their own.
Artistically we’re always maturing and growing stronger and more excited about our creative endeavors. This experience has taught me that you can learn new, fun things if you open yourself up to the possibilities and dive in.
Wherever you are in your creative journey you’re doing great. Keep up the terrific work. Do your best, be your best and the rest will take care of itself.
Learn how to make gorgeous, vividly decorated nature themed fused glass designs in this comprehensive webinar.
Master the art of design, pattern, and color.
Join me and I’ll show you how quickly and easily you can ramp up the visual intricacy of your work in just a few steps. I’ll share my personally developed, “watercolor style,” approach to shading and highlighting glass.
You will love the easy-to-follow instruction and seeing how to create elaborately detailed works of art with a gorgeous three-dimensional flair.
In this webinar you will learn how to use advanced artistic techniques like a pro. Beginner, intermediate and advanced fusers alike will enjoy applying the many simple, yet effective techniques I share in this in-depth, live event.
Plus, asa special bonus I include step-by-step instruction on how to use failed projects. I’ll explain in detail how to solve problems and how to ensure successful projects moving forward.
I also include my custom firing guides, project patterns and materials list in PDF form.
You will be fired up and eager to apply these new techniques to enhance the beauty and charm of your work.
Currents as seen In Sculptural Fused Glass with Lisa Vogt video
My April and May classes are SOLD OUT
New Date! Sculptural Fused Glass, 4-Day, Hands-on Workshop September 21 – 24, 2021 Register today! 3 seats available. Register here!
Wesley Chapel, Florida, 4-Day, Hands-on, Class size is limited.
This is the turning-point workshop you’ve been waiting for.
It’s hard to describe what it’s like when I’m feeling the creative flow. Time flies. Hours pass in what I thought were minutes. My naturally distracted mind is focused on what my hands are doing, and nothing else. I get lost in my own world. When I return to reality, I feel rejuvenated and spiritually uplifted. That’s why I like sharing my studio space with others. I try to give them that experience and hope they feel the same inspiration and fulfillment I do. -Lisa
This class is for you! Any skill level can attend. Beginner, intermediate and advanced students alike will learn how to advance their glass fusing skills and expand their artistic style.
Join me and I’ll show you all the pro tips and tricks I use to make stunning 3-dimnesional art. You’ll learn how to combine advanced techniques in new ways to create extraordinary sculptural pieces of art.
You’ll leave class with several completed glass sculptures, my custom firing guides and a deeper understanding of sculptural fused glass fabrication. You’ll have the knowledge, confidence, and inspiration you’ve been craving to take your artwork to the next level.
Materials are included, that’s a $150.00 value!
Here’s what students from my February 2021 class are saying about the workshop.
“I feel I got the movement toward developing my own creativity this week. I was surprised that the things I already knew fit into the new knowledge I was getting in this class. Lisa is an excellent teacher who is tuned into what is going on in the class. She puts no pressure on the students when I know she could when we were dragging our feet. I was absolutely comfortable with the classroom set up and cleanliness of the studio. Will see you again soon.” -Judy
Here’s what the students from my November 2020 class are saying about the workshop.
“There is a wealth of material, tools and possible projects. Lisa is very motivating, informative, and supportive. The variety of materials is amazing. The number of projects we made in 4 days is beyond what I expected. The classroom set up was very well organized. I felt completely comfortable and safe with plenty of space and sanitizer. This class was beyond my expectations.” -Jane
“My favorite thing was Lisa’s knowledge and wealth of information. I was surprised by how many projects we made. I was very comfortable with the classroom set up and loved everything about this class. I learned so much and it was fun. My least favorite part was Friday at 4:00 pm.” -Liz
“My favorite thing about this class was the variety of glass and other materials. Unlimited dichroic! I was comfortable with the classroom set up; Lisa had lots of little personal touches that made it special. Thanks for the wonderful lunches!” -Gail
Student comments from previous classes.
“My favorite part about the class was the non-stop building and the generous amount of materials available. What surprised me about the class was how full the schedule was. Usually, you do 1 project. We did 5 in 4 days. Thank you so much for your generosity.” -Christine
“My favorite part about the class was the variety of projects we made. What surprised me was the number of projects we completed. Awesome experience – will come again in the future.” -Monica
“Instruction was clear, help was always available, and Lisa’s explanation of the equipment was great.”-Sherry
“My favorite thing about the class was the friendly atmosphere that encouraged open thoughts and sharing ideas.”-Lyn
“I enjoyed making all the projects, especially the flow piece and the freedom to be creative with our work.”-Joy
“My favorite thing about the class was the ability to see multiple pieces of art that originated from concepts taught.”-Vicki
“Lisa is very professional, knowledgeable and freakishly talented. House, art, mosaic, her work – really fun and beautiful.”-Lorna
“Incredible class. Lisa shared her artistic knowledge of color flow and her technical knowledge of glass.” -Larry
“I had so much fun! Lisa is a great teacher!” -Brenda
Artwear Designed for Artists by Artists Tell them how you really feel with bold T-shirts, Eco-conscience tote bags and sassy mugs.
Artwear
Watch it NOW! Start fusing today!
Videos for every skill level and interest.
Downloadable instructional videos for every skill level.
Inspiration is here. Ebooks for all skill levels.
Check out my eBooks for elegant patterns and detailed fusing instructions.