

Posted on — Leave a comment

5 Quick Holiday Favorites to Brighten Your Home

Cookies for Santa

At this over scheduled time of year, we’re all longing for the peace and tranquility we associate with more studio time. Well here’s your excuse to log in more hours with your glass cutter and kiln. Don’t let these charming projects fool you; these flashy little beauties are fun, fast and easy to make. Plus, they make great gifts for family and friends.   

You’re a Mean One Plate

These darling plates are great for table decorations or for serving sweet treats. The dishes photographed here measure 10-inch by 10-inch. But these smart designs also look terrific in 12-inch or 8-inch sizes. Feel free to adjust the size to fit any slumping mold you may have. 

Star of David

To make these seasonal plates, cut a 10-inch by 10-inch piece of clear fusible glass for the base layer. Select your design and glass colors. Cut the design layer using the specific pattern you selected as a guide. Glue the design layer on top of the base layer with a small amount of fusers glue, or another appropriate adhesive. Set the project aside to let the glue dry. (I like to use a tiny amount of white Elmer’s school glue and apply it with a tooth pick. This glue dries fast and when used in tiny amounts burns off without a trace.) Using the pattern as a guide, cut the accent pieces that make up the design you selected. Grind the cut accent pieces for a nice, clean fit. Clean the glass with water and then dry it with a towel. (I prefer to use water over detergents or other solvents that could leave residue that might burn onto the glass surface during fusing.) Glue the accent pieces to the design layer with fusers glue. Let the glue dry before moving to the next step. 

Christmas Tree

For Cookies for Santa, Star of David and You’re a Mean One, select the appropriate power frit colors. Wearing a dust mask, sift your chosen powder evenly over the glass. Using a small dry paint brush or the tip of a pencil draw your message in the frit like you would draw in the sand. Remove any frit that might have fallen on the surrounding glass pieces with the dry paint brush. 

Snowman

Chill out with this friendly winter visitor. This plate is fast and easy to make no frit needed.

Full fuse and then slump your plates using my firing guides available on my website.

Get FREE Holiday project patterns on my website.

Find More Holiday Ideas Check Out These eBooks!

Cheers!

Happy Fusing!

Lisa & Niki

Follow my blog for weekly inspiration sent to your inbox! 

Take your glass fusing to the next level!


Great Gifts for Artists

Premium Video Membership

Art wear Designed for Artists by Artists Tell them how you really feel with bold T-shirts, Eco-conscience tote bags and sassy mugs.

Artwear T’s by Lisa Vogt
Artwear Eco-totes by Lisa Vogt

Artwear Mugs by Lisa Vogt

Downloadable instructional videos for every skill level.

Posted on — Leave a comment

Brilliant Gift Ideas for the Holidays

Brighten Your Day with Fused Glass Lanterns

It’s always a thrill when I come up with a fun, way to add dazzling art glass to my home, office, and yard. I’ve designed a series of fused glass lanterns that bring a special brightness and cheerful joy to any setting.

I enjoy having soft accent lights around my home. So, I thought, why not create a collection of pieces I could switch out seasonally to add a festive atmosphere to my rooms all year long. Designing such a wide variety of themes also kept the construction fresh and fun.

In my video Lumin-Essence I share how to make 8 shimmering lanterns. The lanterns range in complexity, but anyone with a flair for fusing can easily make them all. I will tell you though, they will challenge your fabrication skills. But in a good way by trying something new that you’ll love.  

The first lantern I designed is inspired by relaxing summer vacations spent on a serene lake. A sailboat glides over calm waters with a picturesque view of mountains and pine trees behind. The custom-made glass base provides a lift and an attractive pedestal to showcase the scenic setting. The front panel of the lantern bows out. The back panel bows in the opposite creating the perfect space for a candle or LED lights.

Weave is an especially fun lantern to make. It looks complicated and fragile, when it’s easy and sturdy once assembled. Plus, it’s a terrific size for adding a touch of light to small or confined spaces. The assembly is simple. You cut a bunch of strips, lay them out in 4 alternating layers and then tack the pieces together in your kiln. The 4 sides are then glued together around a clear glass base. I like to add dichroic glass strips to mine for that super shine that lights up the room. The best part is Weave looks amazingly beautiful when lit. The open construction and rich colors cast a rainbow of colors on the table and surrounding walls.

Winter Wonderland is my favorite lantern. The clear glass backdrop is the perfect complement to the white and dichroic snowflakes. This dazzling lantern requires extra steps as the snowflakes are tacked together and then tacked on the clear front and back panels. Let me tell you, this one is worth your time. Winter Wonderland is a spectacular, glistening addition to any room.

Dogwood reminds me of flower gardening and the rebirth of nature in the spring. I selected a crisp, clean, simple color palate for this lantern. I used clear glass for the lattice because I wanted this lantern to have structure, but also a light, airy feel. The flowers are fun to make. They’re tacked together and then slumped in small bowl molds to give them form. Dogwood is assembled it multiple easy steps. The lantern sides are glued around a clear base. After the glue is dry the flowers are glued on one side at a time. When lit, Dogwood makes a dazzling centerpiece.   

Blue Mountains were inspired by the cool gradient colors of the Great Smoky Mountains. We all enjoy a refreshing trip to the mountains where stunning views and peaceful moments linger in our hearts. With this lantern you can relive those tranquil times every day. This lantern is super easy to make. You just layer several shades of blue. The beauty of Blue Mountains is in its simplicity of design and construction. You’ll love making this restful lantern.     

Red Heart is a darling combination of vivid color and lacy pattern. The great thing about this lantern is the small, fused glass design combined with a ready-made candle shelter, make it quick and easy to make. You’ll definitely want one of these around come February. This dainty lantern is a perfect personalized gift to show family and friends they hold a special place in your heart.

Fall Leaf is another quick and easy design you can make to bring a seasonal touch to your home. Its organic shape and bright, cheery colors make it the perfect complement to your fall decorations.

Purple Heart may be dainty, but it lights up the room with an impressive glow. It’s another quick and easy project that makes a great gift. Just fuse glass strips and then glue them on a ready-made candle shelter. It doesn’t get easier.    

I hope this illuminating collection inspires you to be creative and celebrate family, friends, and all that we have to be thankful for.  

Follow my blog for weekly inspiration sent to your inbox! 

Happy Fusing!

Lisa & Niki

NEW Premium Video Course by Lisa


Posted on — Leave a comment

Fuse up For Fall – Celebrations Begin with Glowing Seasonal Home Accents

Fall in Florida is like spring up north in the sense that we’re coming off months spent inside due to extreme temperatures outside. In Florida we were inside to avoid the heat, up north it’s to avoid the cold. As a result, Autumn’s crisp air and colorful foliage inspires renewed creativity and a longing to spend time in my glass studio.

Autumn also marks the upcoming holiday season. It means it’s time to start thinking about making fun seasonal themed fused glass projects to decorate my home and give as gifts. In recent years, I’ve really enjoyed displaying sparkling fused glass lanterns in my home, office, and yard. Lanterns are an easy way to include art glass in my decor to bring a special brightness and cheerful joy to these personal spaces.   

Especially around the holidays, I enjoy having soft accent lights around my home. So, I created a collection of lanterns I could switch out seasonally to add a festive atmosphere to my rooms all year long. And best of all, having a variety of design themes keeps the construction fresh and fun.

In my video Lumin-Essence I show how to make 8 shimmering lanterns. The lanterns range in complexity, but anyone with a flair for fusing can easily make them all. I will tell you though, they will challenge your fabrication skills. But in a good, try something new way that you’ll love. 

Fall Leaf is a quick and easy design to get you fired up and bring a seasonal touch to your home. It’s organic shape and bright, cheery colors make it the perfect complement to your fall decorations. Plus, the compact size makes it the perfect accent in small spaces or in dark areas where a little light would warm up your space.   

The first lantern I designed was inspired by relaxing summer vacations spent on a serene lake. A sailboat glides over calm waters with a picturesque view of mountains and pine trees behind. The custom-made glass base provides a lift and an attractive pedestal to showcase the scenic setting. The front panel of the lantern bows out. The back panel bows in the opposite creating the perfect space for a candle or LED lights.

Weave is an especially fun lantern to make. It looks complicated and fragile, when it’s easy and sturdy once assembled. Plus, it’s a terrific size for adding a touch of light to small or confined spaces. The assembly is simple. You cut a bunch of strips, lay them out in 4 alternating layers and then tack the pieces together in your kiln. The 4 sides are then glued together around a clear glass base. I like to add dichroic glass strips to mine for that super shine that lights up the room. The best part is Weave looks amazingly beautiful when lit. The open construction and rich colors cast a rainbow of colors on the table and surrounding walls.

Winter Wonderland is my favorite lantern. The clear glass backdrop is the perfect complement to the white and dichroic snowflakes. This dazzling lantern requires extra steps as the snowflakes are tacked together and then tacked on the clear front and back panels. Let me tell you, this one is worth your time. Winter Wonderland is a spectacular, glistening addition to any room.

Dogwood reminds me of flower gardening and the rebirth of nature in the spring. I selected a crisp, clean, simple color palate for this lantern. I used clear glass for the lattice because I wanted this lantern to have structure, but also a light, airy feel. The flowers are fun to make. They’re tacked together and then slumped in small bowl molds to give them form. Dogwood is assembled it multiple easy steps. The lantern sides are glued around a clear base. After the glue is dry the flowers are glued on one side at a time. When lit, Dogwood makes a dazzling centerpiece.  

Blue Mountains was inspired by the cool gradient colors of the Great Smoky Mountains. We all enjoy a refreshing trip to the mountains where stunning views and peaceful moments linger in our hearts. With this lantern you can relive those tranquil times every day. This lantern is super easy to make. You just layer several shades of blue. The beauty of Blue Mountains is in its simplicity of design and construction. You’ll love making this restful lantern.    

Red Heart is a darling combination of vivid color and lacy pattern. The great thing about this lantern is the small, fused glass design combined with a ready-made candle shelter, make it quick and easy to construct. You’ll want one of these around come February. This dainty lantern is a perfect personalized gift to show family and friends they hold a special place in your heart.

Purple Heart may be dainty, but it lights up the room with an impressive glow. It’s another quick and easy project that makes a great gift. Just fuse glass strips and then glue them on a ready-made candle shelter. It doesn’t get easier.   

I hope this illuminating collection inspires you to be creative and celebrate family, friends, and all that we are thankful for. 

Follow my blog for weekly inspiration sent to your inbox! 

If you enjoy reading my blog, I have a feature on my website you’ll like. From the home page click on any page. On the side bar you can read my Top 10 Blog Posts. The list updates every 48 hours so check back often.

Happy Fusing!

Lisa


Premium Video Courses by Lisa


Posted on — Leave a comment

Spooktacular Ghost Plate How-to

Halloween is one of my favorite holidays. I love the wide variety of fun designs we can make to decorate our homes with a seasonal flare. I like this particular plate for its free-form shape. The graceful curve around the ghost’s head make it jump off the counter. But, don’t let the unusual shape scare you. The subtle contours are actually easy to cut. And, you can always grind the edge to fine tune the shape. Let’s get started.  

How-to:

Cut a 10 inch clear circle for the base layer. Using the pattern as a guide, cut the clear glass circle to match the irregular pattern shape. Grind the glass to remove sharp edges and smooth the shape.

Cut white glass to match the clear base layer. Using a wet saw, cut the background around the ghost’s head and arms away.  

Pro Tip: No saw needed. If you don’t have a saw, the white ghost layer can be made up of pieces. OR Cut the white layer to match the clear base layer. Then make the shapes that outline the ghost’s head and arms just like the eyes and mouth, with cut navy blue glass. 

Tack glue the white layer onto the clear base with a small amount of fuser’s glue. Let the glue dry before moving to the next step. Gluing keeps the white glass from sliding around when you apply the frit.

Glue Tip: I like to use Elmer’s white glue. I apply the smallest amount of glue possible with the tip of a toothpick. The tiny, pin head size dots of glue burn off during firing without leaving a distracting haze between the glass layers. 

Cut the ghost’s eyes and mouth out of navy blue glass. Grind them to improve the shape. Set them aside.

Color Tip: When possible, I prefer to use dark, navy blue instead of black. Black creates a visual hole in the artwork. While the dark blue adds a nice tonal quality that gives the art a more interesting look.    

Cut the letters out of bright, seasonal colors. Grind the letters to smooth out the edges. Set them aside.

Once the glue holding the white layer in place is dry, apply the frit. Using a spoon, pour power navy blue frit into the spaces that outline the ghost’s head and arms. Leave enough room to add fine aventurine blue for shading. Next add fine, aventurine blue. Concentrate the darker color on the right side of the openings to create a moody shadow effect.

Using a small, dry paint brush clean any excess frit off the white glass. Be meticulous with your clean up. It’s this type of attention to detail that will make a huge difference in the visual quality of your finished pieces.     

Frit Tip: Pile the frit as high as the white glass that contains it. This gives the transparent material strong color saturation, which in turn produces the dramatic, high contrast effect we’re trying to achieve. If you ask yourself, is it enough, add more frit.

Stack the cut glass eyes and mouth on the white layer. Arrange the cut glass letters on the bottom in a semi-circle.

Fire the assembled project to a full fuse temperature using the guide available on my website.

Slump the fused project in a shallow plate mold using the guide available on my website.

Follow my blog for weekly inspiration sent to your inbox! 

If you enjoy reading my blog, I have a feature on my website you’ll like. From the home page click on any page. On the side bar you can read my Top 10 Blog Posts. The list updates every 48 hours so check back often.

Happy Fusing!

Lisa & Niki


Premium Video Courses by Lisa


Posted on — Leave a comment

How to Create Shadows and Shading

You’re wondering why is this subject important? You’ve likely had success working some element of shading into your pieces and that’s great. However, you may not know about the seldom discussed advanced techniques experienced artists use to produce more sophisticated compositions. With thoughtful planning, you can apply these simple techniques and drastically increase the richness of your work.      

When creating shading, it’s natural to reach for black frit or black glass. Black efficiently separates the foreground from the background. Black is also great for outlining your subject. However, there’s a better solution that adds richness to your scene.

When you use black to make shadows it creates a visual hole in your work. This void pulls the viewer’s attention away from your composition. For this reason, I use black as little as possible. I apply it with purpose for specific details in my designs. Instead of black, I use very dark blue, chocolate brown, deep purple or ruby red to make shadows in my pieces. I select the dark color that best suits the color scheme in my artwork. Using powerful high contrast colors adds velvety depth and an incredible richness to the setting.

How to create shadows with color.

Wine Glass as seen in my Simple Pleasures Video

Here I used dark blue to establish the linear details that translate into a grape vineyard behind the wine glass. The deep shadows the blue color creates, give the scene a relaxing late afternoon mood. The border is dark purple which mimics the color of grapes and wine.

Octopus Tray as seen in my Premium Video Membership

Here I used dark red to make shadows on the underside of the octopus tentacles. This application also makes the tentacle visually round and full. Dark red also worked beautifully to outline the octopus body and place it in front of the tentacles that curl behind its body. The only black in this piece is the eye detail.

Fairy tale Forest as seen in my Painting with Frit Video

There’s no black in this lush scene. The dark shadows in the trees and along the path are made with dark blue. The shadow cast on the woodland path is a combination of purple and dark amber frit. Get creative with your color combinations to build up dark recesses that make your highlighted details pop.

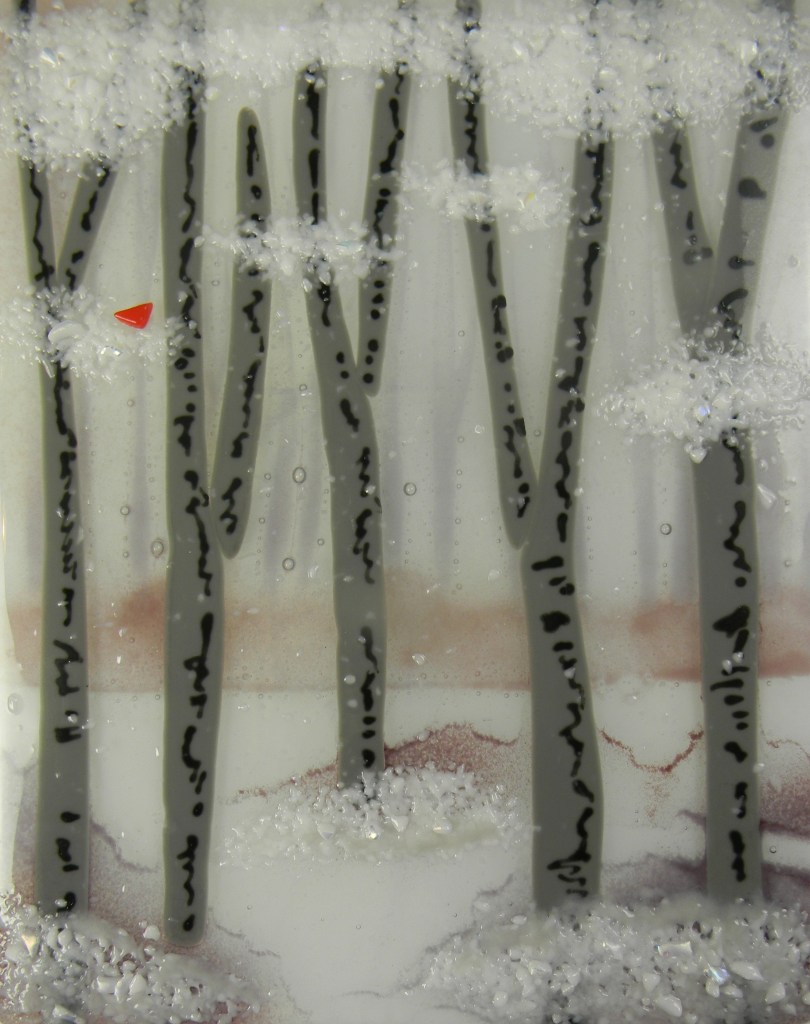
Winter Landscape as seen in the winter issue G.P.Q. Magazine Jan 2023

In this piece of art, black is limited to the lines on the tree trunks. I selected muted tones to create a quiet, calm, and relaxing setting. The shadow under the trees are created with medium purple frit. It simultaneously gave me depth and softness which I wanted to portray in this winter scene.

Welcome Fall as seen in my Premium Video Membership

When making this seasonal piece I wanted to maintain a warm yet rich color palette. I used a small amount black in the word welcome and in some of the letters that spell out FALL. When it came to adding shadows to the pumpkin, I used orange opal frit. The contrast is subtle but effective. I’m pleased with the stylized design and the inviting warmth it adds to my home.  

You got this!

Don’t worry about missing black. Once you substitute colors for black, you’ll love the effects you’re able to create. You’ll be amazed how switching to dark colors transforms your art and brings it to life.

Artists take what they see and make it new.

We take an ordinary scene and turn it into something new that reflects our sense of drama and whimsy. Using rich colors, instead of black, is a fabulous way to push designs in any direction you want to establish a personalized mood and tone. Give it a try. The possibilities are endless. You’re only limited by your imagination.

Watch the video here.

Follow my blog for weekly inspiration sent to your inbox! 

Happy Fusing!

Lisa & Niki

Premium Videos by Lisa


Get your Artwear!