Posted on Leave a comment

How to Create Shadows and Shading

Youโ€™re wondering why is this subject important? Youโ€™ve likely had success working some element of shading into your pieces and thatโ€™s great. However, you may not know about the seldom discussed advanced techniques experienced artists use to produce more sophisticated compositions. With thoughtful planning, you can apply these simple techniques and drastically increase the richness of your work.      

When creating shading, itโ€™s natural to reach for black frit or black glass. Black efficiently separates the foreground from the background. Black is also great for outlining your subject. However, thereโ€™s a better solution that adds richness to your scene.

When you use black to make shadows it creates a visual hole in your work. This void pulls the viewerโ€™s attention away from your composition. For this reason, I use black as little as possible. I apply it with purpose for specific details in my designs. Instead of black, I use very dark blue, chocolate brown, deep purple or ruby red to make shadows in my pieces. I select the dark color that best suits the color scheme in my artwork. Using powerful high contrast colors adds velvety depth and an incredible richness to the setting.

How to create shadows with color.

Wine Glass as seen in my Simple Pleasures Video

Here I used dark blue to establish the linear details that translate into a grape vineyard behind the wine glass. The deep shadows the blue color creates, give the scene a relaxing late afternoon mood. The border is dark purple which mimics the color of grapes and wine.

Octopus Tray as seen in my Premium Video Membership

Here I used dark red to make shadows on the underside of the octopus tentacles. This application also makes the tentacle visually round and full. Dark red also worked beautifully to outline the octopus body and place it in front of the tentacles that curl behind its body. The only black in this piece is the eye detail.

Fairy tale Forest as seen in my Painting with Frit Video

Thereโ€™s no black in this lush scene. The dark shadows in the trees and along the path are made with dark blue. The shadow cast on the woodland path is a combination of purple and dark amber frit. Get creative with your color combinations to build up dark recesses that make your highlighted details pop.

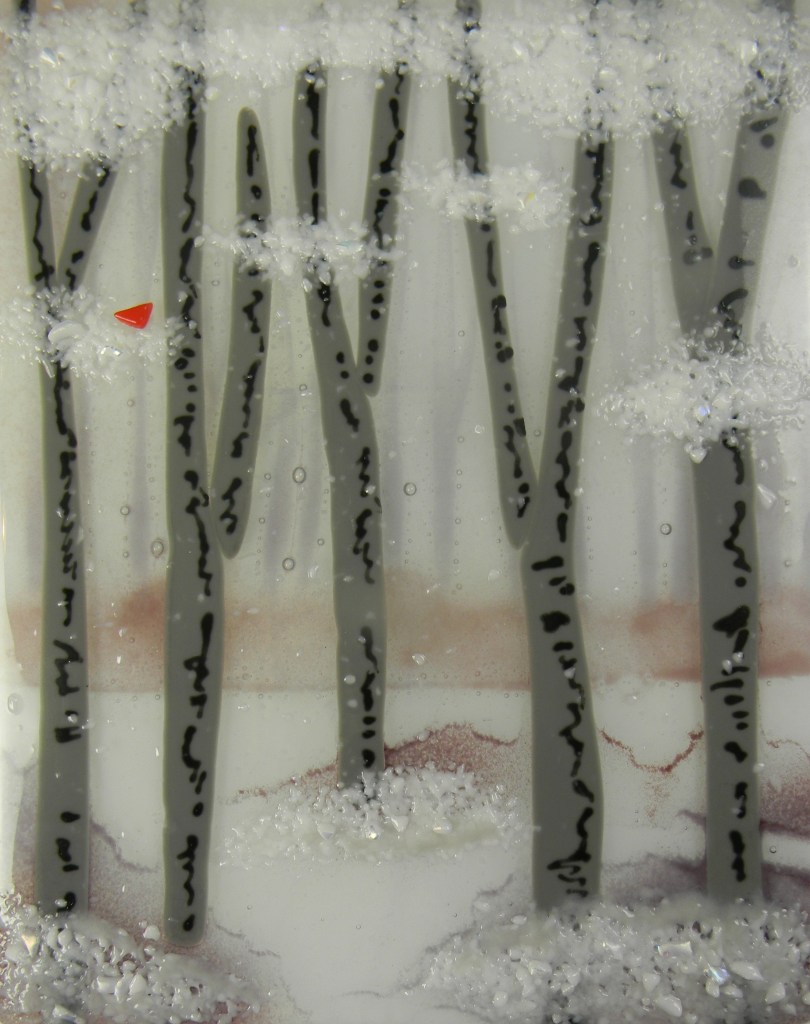
Winter Landscape as seen in the winter issue G.P.Q. Magazine Jan 2023

In this piece of art, black is limited to the lines on the tree trunks. I selected muted tones to create a quiet, calm, and relaxing setting. The shadow under the trees are created with medium purple frit. It simultaneously gave me depth and softness which I wanted to portray in this winter scene.

Welcome Fall as seen in my Premium Video Membership

When making this seasonal piece I wanted to maintain a warm yet rich color palette. I used a small amount black in the word welcome and in some of the letters that spell out FALL. When it came to adding shadows to the pumpkin, I used orange opal frit. The contrast is subtle but effective. Iโ€™m pleased with the stylized design and the inviting warmth it adds to my home.  

You got this!

Donโ€™t worry about missing black. Once you substitute colors for black, youโ€™ll love the effects youโ€™re able to create. Youโ€™ll be amazed how switching to dark colors transforms your art and brings it to life.

Artists take what they see and make it new.

We take an ordinary scene and turn it into something new that reflects our sense of drama and whimsy. Using rich colors, instead of black, is a fabulous way to push designs in any direction you want to establish a personalized mood and tone. Give it a try. The possibilities are endless. Youโ€™re only limited by your imagination.

Watch the video here.

Follow my blog for weekly inspiration sent to your inbox! 

Happy Fusing!

Lisa

Premium Videos by Lisa


Get your Artwear!

Posted on Leave a comment

Advanced Design-How to Create Impressive Backgrounds

When I open myself to inspiration and begin the design process for a new piece of art, my first consideration is the focal point. I ask myself, what key element do I want to include to drive the design direction? Once Iโ€™ve established the subject matter, I wonder, what can I do to enhance my focal point to  make my composition stronger?

I then imagine my subject in different settings. I tap into my mood that day? Do I envision my design going in a geometric direction with complex shapes or do I feel like building a tropical scene with lush foliage? Once I decide my path, I plan the best way to reach my destination.

Creating the subject is easy.

I know from the start what I want to make, so I begin construction with that. When it comes to establishing a background that creates a relevant setting for the subject, I have several fabrication options. I can surround the subject with a decorative border, leaves, or any other related shape. I select design elements that complement my subject and support my design vision. This type of design style is literal. The objects are recognizable and translate the artistโ€™s intention easily, which is great.

But sometimes I feel my design would benefit from a more subtle approach to the background. In that case, I create an entirely different complimentary design on the base layer. Itโ€™s fun, easy and an  extremely effective way to enhance a simple pattern. In effect, the base layer is no longer just mass or a platform to build on. With this easy to apply technique the base layer now offers the clever artist an opportunity to create a more intricate design with greater depth.      

Daisy Dish is a great example of the beauty of this multi-layer design technique. By applying this technique, we introduce color, create pattern, and present a lush setting in just a few easy steps.

How itโ€™s done.

This project is made with two design layers. The base layer is white. We sifted pastel powder frit over stencils to create a botanical background. The second clear layer is placed on top. Daisy flower petals are then arranged on a clear layer. The white flowers are detailed with yellow frit. Building this way, with parts of the design separated by the clear layer produces cool shadows and a greater sense of depth. This innovative technique has a lot of potential. Itโ€™s prefect for creative experimentation that ultimately illuminates pathways to exciting new design ideas.

Daisy Dish is the newest addition to my Premium Video Membership course. Members can assess this tutorial with their membership. Join today to enjoy this lovely project along with 16 other exciting, advanced glass fusing project videos and complimentary printable pattern eBooks.

Wherever you are on your journey youโ€™re doing great! Enjoy the journey. The destination will take care of itself. ย ย ย 

Watch the video here.

Follow my blog for weekly inspiration sent to your inbox! 

Happy Fusing!

Lisa

Premium Videos by Lisa


Get your Artwear!

Posted on Leave a comment

6 Easy Ways to Include Words in Your Designs

Weโ€™re a chatty society. We favor T-shirts with funny sayings and wall art with inspirational messages written on them. Itโ€™s only natural to want to add a similar touch to your fused glass art. But creating text thatโ€™s attractive and legible in glass is difficult because the medium is bulky.

Iโ€™ve been including words in my art for years. It takes extra effort, but Iโ€™m willing to put in the time when  the inclusion of a written message will strengthen the impact of my artwork. The techniques outlined here are fun, fast, and easy. Theyโ€™re great compliments for seasonal pieces, personalized gifts, and stylized art.

Letโ€™s get started.

Great Fall is a super fun project! The step-by-step tutorial and full size pattern are now available in the Fall 2023 issue of Glass Patterns Quarterly. I included it here because itโ€™s a terrific example of combining different methods in the same piece of art.

Great Fall

I wanted the word Great to be compact and graceful. I painted it on the glass with black Glassline outlining medium. After the paint dries, I go back and touch up the lettering to make the line width uniform. I use the point of a wooden toothpick or a razor knife to scrape the unwanted paint away.

When it came time to render the word Fall, I had a few ideas in mind. I could simply cut thin strips of glass or use noodles to write the word. Then it occurred to me that using colorful stringers would give me visual texture and look like sticks. This was the first time I tried that method and Iโ€™m really pleased with the results.

Welcome Fall

Welcome Fall is a new video course that will be released soon. Premium Video Members can look forward to having access to this fun project with their membership.

Batty

Batty utilizes the cut glass method to include text. The balloon style lettering is easy to cut out of glass and the oversized word adds an additional splash of color to the simple design. This bouncy lettering style is well suited for short impactful words. The Batty pattern is in my eBook Fireworks.

Love

Love also uses the cut glass method to achieve lettering. Here the lettering is the design and so, bold bright colors are key to delivering the lively message. These straight letters are fast and easy to cut. Theyโ€™re a great choice for writing names. The Love how-to video and pattern eBook is available through my Premium Video Membership.   

Cookies for Santa

Cookies for Santa is a wonderful example of using frit to write intricate messages on your fused glass designs. Simply sift powder frit over the glass then write your words in the frit with a small paint brush or the eraser end of a pencil. For the best results, use high contrast colors and apply a thick layer of frit. Have fun with it! The Cookies for Santa pattern is in my eBook Fireworks.

Wish

Wish features delicate, whimsical lettering. The word is made by sifting powder frit, over a stencil. This easy technique is great for quick projects that call for intimate details. Hint, use more than one color frit to get a paintbrush stroke quality to the lettering. Also, use high contrast colors to ensure good readability. 

Wedding Heart

Wedding Heart is a little more complicated than the other techniques shown here. The advantage of using this method is itโ€™s extremely effective and the results are graceful and elegant. Here the lettering is handwritten in liquid platinum with a needle type applicator pen. These items are available from your art glass supplier. The liquid platinum is fired onto the glass in the kiln for a permanent finish. The lettering is fired face down, in contact with a primed ceramic kiln shelf. Tip, the lettering does not adhere well if fired on fiber paper. It comes out dull and blotchy instead of uniform and shiny.

The lettering on the front of the heart is written with a silver sharpie marker. Itโ€™s not permanent and will wash off if the glass gets wet. We used these hearts for seating markers at my daughterโ€™s wedding. They were memorable keepsakes and the guests loved them!

Including words in your projects is a fun way to ramp up the visual intricacy of your art.

Whether you keep it simple or combine multiple techniques youโ€™re sure to enjoy the process and the outcome. I hope you found this spotlight on easy ways to include lettering in your fused glass designs helpful. Now get writing!    

Watch the How to Include Words in Your Designs with Lisa Vogt video here.

Follow my blog for weekly inspiration sent to your inbox! 

Happy Fusing!

Lisa

Premium Videos by Lisa


Get your Artwear!

Posted on Leave a comment

Celebrate Glowing Seasonal Home Accents

Fall in Florida is like spring up north in the sense that weโ€™re coming off of months spent inside due to extreme temperatures outside. In Florida we were inside to avoid the heat, up north itโ€™s to avoid the cold. Aa a result, Autumnโ€™s crisp air and colorful foliage inspires renewed creativity and a longing to spend time in my glass studio.

Autumn also marks the upcoming holiday season. It means itโ€™s time to start thinking about making fun seasonal themed fused glass projects to decorate my home and give as gifts. In recent years, Iโ€™ve really enjoyed displaying sparkling fused glass lanterns in my home, office, and yard. Lanterns are an easy way to include art glass in my decor to bring a special brightness and cheerful joy to these personal spaces.   

Especially around the holidays, I enjoy having soft accent lights around my home. So, I created a collection of lanterns I could switch out seasonally to add a festive atmosphere to my rooms all year long. And best of all, having a variety of design themes keeps the construction fresh and fun.

In my video Lumin-Essence I show how to make 8 shimmering lanterns. The lanterns range in complexity, but anyone with a flair for fusing can easily make them all. I will tell you though, they will challenge your fabrication skills. But in a good, try something new way that youโ€™ll love.ย 

Fall Leaf is a quick and easy design to get you fired up and bring a seasonal touch to your home. Itโ€™s organic shape and bright, cheery colors make it the perfect complement to your fall decorations. Plus, the compact size makes it the perfect accent in small spaces or in dark areas where a little light would warm up your space.ย  ย 

Brilliant gift ideas just in time for the holidays.

The first lantern I designed was inspired by relaxing summer vacations spent on a serene lake. A sailboat glides over calm waters with a picturesque view of mountains and pine trees behind. The custom made glass base provides a lift and an attractive pedestal to showcase the scenic setting. The front panel of the lantern bows out. The back panel bows in the opposite creating the perfect space for a candle or LED lights.

Weave is an especially fun lantern to make. It looks complicated and fragile, when in reality itโ€™s easy and sturdy once assembled. Plus, itโ€™s a terrific size for adding a touch of light to small or confined spaces. The assembly is simple. You cut a bunch of strips, lay them out in 4 alternating layers and then tack the pieces together in your kiln. The 4 sides are then glued together around a clear glass base. I like to add dichroic glass strips to mine for that super shine that lights up the room. The best part is Weave looks amazingly beautiful when lit. The open construction and rich colors cast a rainbow of colors on the table and surrounding walls.

Winter Wonderland is my favorite lantern. The clear glass backdrop is the perfect complement to the white and dichroic snowflakes. This dazzling lantern requires extra steps as the snowflakes are tacked together and then tacked on the clear front and back panels. Let me tell you, this one is worth your time. Winter Wonderland is a spectacular, glistening addition to any room.

Dogwood reminds me of flower gardening and the rebirth of nature in the spring. I selected a crisp, clean, simple color palate for this lantern. I used clear glass for the lattice because I wanted this lantern to have structure, but also a light, airy feel. The flowers are fun to make. Theyโ€™re tacked together and then slumped in small bowl molds to give them form. Dogwood is assembled it multiple easy steps. The lantern sides are glued around a clear base. After the glue is dry the flowers are glued on one side at a time. When lit, Dogwood makes a dazzling centerpiece.ย ย 

Blue Mountains was inspired by the cool gradient colors of the Great Smoky Mountains. We all enjoy a refreshing trip to the mountains where stunning views and peaceful moments linger in our hearts. With this lantern you can relive those tranquil times every day. This lantern is super easy to make. You just layer several shades of blue. The beauty of Blue Mountains is in its simplicity of design and construction. Youโ€™ll love making this restful lantern.ย ย ย ย 

Red Heart is a darling combination of vivid color and lacy pattern. The great thing about this lantern is the small, fused glass design combined with a ready-made candle shelter, make it quick and easy to construct. Youโ€™ll definitely want one of these around come February. This dainty lantern is a perfect personalized gift to show family and friends they hold a special place in your heart.

Purple Heart may be dainty, but it lights up the room with an impressive glow. Itโ€™s another quick and easy project that makes a great gift. Just fuse glass strips and then glue them on a ready-made candle shelter. It doesnโ€™t get easier.ย ย ย 

I hope this illuminating collection inspires you to be creative and celebrate family, friends, and all that we have to be thankful for. 

All of my multi-project videos come with a printable full size pattern eBook.

If you enjoy reading my blog, I have a feature on my website youโ€™ll like. From the home page click on any page. On the right hand side bar you can read my Top 10 Blog Posts. The list updates every 48 hours so check back often.

Follow my blog for weekly inspiration sent to your inbox!ย 

Happy Fusing!

Lisa

You’re Invited to Join Me for This Upcoming LIVE Event!

Think Like an Artist, A Live 1 -Hour Lecture with Lisa

September 21, 2023

How to Think Like an Artist 

Essential Design and Color Theory for Every Artist 

Exceptional art is no accident. It is the product of a strategic plan that employs thoughtful design and color decisions, made by a skilled artist. Outstanding art is the result of informed choices applied to a work of art from its conception and then carried out through to its completion. 

In this comprehensive lecture, I’ll show you how to lay out your design to establish impactful compositions. I’ll explain how and why you should use color to create a light source, add visual depth, and create a sense of mood. Youโ€™ll learn how to use high-contrast colors to influence the viewers engagement with your art. Youโ€™ll see the importance of including recognizable subject matter and a focal point. 

No matter where you are in your journey, your artistic approach will benefit significantly from the easy-to-develop practices outlined in this in-depth presentation.  

Donโ€™t miss this fast-track opportunity to learn the age-old, hidden secrets employed by the great masters. Enjoy renewed artistic freedom with an understanding of the proven methods they used to create unforgettable original works of art. 

Join me for this intimate, conversational live event to ignite your dormant creativity and experience a renewed awakening of your personal artistic strengths. 


Premium Videos by Lisa


Get your Artwear!

Posted on Leave a comment

Spark Your Imagination with Lustrous Lanterns

Brilliant gift ideas just in time for the holidays.

Where do you get your design ideas? Iโ€™m asked that question all the time. I honestly donโ€™t know. When it comes time to put a new webinar project together, I simply open myself up to inspiration. Suddenly, I see new design concepts in random places like in drifting clouds or in the organized repetition of sheet glass stacked on shelves in my studio. In time, the assortment of fresh ideas jell into a cohesive whole and boom, a new webinar theme is born.   

When the concept of making fused glass lanterns came to mind, I was thrilled. Itโ€™s really exciting to develop fused glass art that goes beyond being purely ornamental. This series of lanterns is so much more than decorative. These 3-D creations are brilliant models of functional art that can be used anywhere, anytime to create a comforting glow and festive atmosphere all year long. Another terrific aspect of these colorful free-standing pieces is they give us passionate artists another way to incorporate art glass into our everyday lives. If thatโ€™s not enough incentive to spark your imagination, youโ€™ll be delighted to know that my step-by-step assembly instructions make these trendy lights even more enticing as theyโ€™re actually fun and easy to make. And displaying these colorful beauties is even easier.

Before you get fired up, hereโ€™s a friendly note:

Hereโ€™s the honest truth. These lanterns are not made with your standard or basic construction methods. They will challenge your artistic skills and test your self-discipline to follow through and complete them. At times theyโ€™ll frustrate you and maybe even bore you to tears. Iโ€™m here to tell you, donโ€™t quit or give up. Applying these multiple advanced techniques in combination is a valuable learning experience thatโ€™ll elevate your working knowledge and build your confidence. These lustrous lanterns are spectacular when finished. Theyโ€™re well worth every minute it takes to produce the intricate details that make them so special.

I believe in you and your dedication to being a lifelong learner. You embrace growth even when it means hard work to achieve your goals. Tricky or not, you can make these lanterns. Trust me, youโ€™ll be glowing as brightly as your luminous glass lantern when you light one in a place of honor or give it as a thoughtful, personal gift.

Youโ€™re invited to join me.

Thursday September 7, 2023 Iโ€™m presenting my webinar, Lustrous Lanterns. In this comprehensive event I show step-by-step how to make 6 shimmering fused glass lanterns. The event is live which means we get to hang out together and talk about our favorite topic, glass fusing. What makes a live event different and beneficial? You benefit from the guided in-person instruction, and youโ€™re able to ask your specific questions and I answer them for you right away. Plus, youโ€™re among other enthusiastic glass artists from around the world who make up our generous and colorful community. In addition, youโ€™ll have exciting new holiday season gift ideas for family and friends. And we all know hand-made, personalized gifts shine brightest as their the most memorable and loved gifts of all.ย ย 

Letโ€™s get together and fuse glass!

I hope to see YOU in my webinar, Lustrous Lanterns on Thursday September 7, 2023. 

Follow my blog for weekly inspiration sent to your inbox! 

Happy Fusing!

Lisa

You’re Invited to Join Me for these Upcoming Webinars!

Lustrous Lanterns Webinar

September 7, 2023

Light up with me! Create colorful luminaries to brighten your home, office, porch, or anywhere else youโ€™d enjoy the comforting glow of a dazzling accent light.

In this comprehensive live event, I’ll show you how to make 6 sparkling fused glass lanterns. Youโ€™ll learn how easily you can construct and build stunning 3-D lamps. I’ll guide you step-by-step through the many stages of construction, including pattern preparation, glass cutting, project assembly, fusing, slumping, and how to โ€œcold fuseโ€ the lanterns together.

Youโ€™ll also be shown how to finish the lanterns with custom, professional quality glass display bases. In addition, I’ll share how to utilize ready-made clear glass candle shelters to make fast and easy pick-me-ups. I also show several quick and simple methods for lighting your beautiful new creations. Along with detailed instruction, youโ€™ll receive 6 full-size lantern patterns, my project-specific firing guides, and supply list.

Beginner, intermediate, and advanced glass fusers alike will love the wide variety of unique shapes and elegant new patterns,  custom designed to enrich any decor. Join me to rekindle your creative spark with lustrous lanterns designed to set your artistic imagination aglow.   


Think Like an Artist, A Lecture with Lisa

September 21, 2023

How to Think Like an Artist 

Essential Design and Color Theory for Every Artist 

Exceptional art is no accident. It is the product of a strategic plan that employs thoughtful design and color decisions, made by a skilled artist. Outstanding art is the result of informed choices applied to a work of art from its conception and then carried out through to its completion. 

In this comprehensive lecture, I’ll show you how to lay out your design to establish impactful compositions. I’ll explain how and why you should use color to create a light source, add visual depth, and create a sense of mood. Youโ€™ll learn how to use high-contrast colors to influence the viewers engagement with your art. Youโ€™ll see the importance of including recognizable subject matter and a focal point. 

No matter where you are in your journey, your artistic approach will benefit significantly from the easy-to-develop practices outlined in this in-depth presentation.  

Donโ€™t miss this fast-track opportunity to learn the age-old, hidden secrets employed by the great masters. Enjoy renewed artistic freedom with an understanding of the proven methods they used to create unforgettable original works of art. 

Join me for this intimate, conversational live event to ignite your dormant creativity and experience a renewed awakening of your personal artistic strengths. 


Premium Videos by Lisa


Get your Artwear!